Tuesday, January 25, 2011

Franco-Prussian War French Command

Back from my hols in sunnier climes (sand, surf and sun - when the rain wasn't too torrential!) and first off decided to finish the French command base I previewed in my last post.  They are all Foundry figures I've had for years and finally decided to do something with.  The scene is French commanding general Bazaine has a massive headache while his corps commanders argue about where the Prussians are coming from and how the hell they're going to get out of the mess they're in.  Two field officers are observing the battle while the conference goes on behind and a courier has just arrived with what looks like could be more bad news for Bazaine.  Typical FPW French command debacle.

First French officer to 2nd officer (observing the battle in front): 'Are we in a bit of trouble mon ami?'
2nd officer to 1st officer: 'Oui - judging from the noise behind us - we're screwed!'


The courier arrives: 'Well - if you REALLY want to give it to him... '

Bazaine - wishing they'd invented Aspro's in 1870

'I know where the Prussians are - it says so right here on this map!'

Other general: 'Imbecile!' Bazaine: [groan]'Mon Dieu!'


The chair, table and maps were part of the original Foundry set but I added the box with a spare Perry's French officer's sword and kepi.  The flocking on the base was a flocking nightmare being about 35C today and being a clumsy old sod I got the muck everywhere.  At least the tree turned out OK.

I love the FPW period and have also made up a number of casualty markers for the French included one of my artillery ones like I made for the Prussians.  Don't know how if they'll make any difference playing the game but at least like the respective command stands - they'll be good eye-candy for the table - and you can't have too much of that I say!

Cheers,
            Doc

Thursday, January 13, 2011

FPW: Prussian Cavalry Command & WIP French Command

Must be some sort of record for this blog - can't remember when I lasted posted twice in a day!   Managed to finish my command stand for the Prussian cavalry.  Its meant to represent the command for the 12th Cavalry Bde of the III Corps (7th Kuirassier, 19th Dragoons & 16th Uhlans) under Maj Gen von Bredow.  The standard is an 1870 Prussian cavalry standard (many thanks to Ian Croxall's Warflag site) as I couldn't find a specific one for the 12th Brigade.  I also made them both Kuirassier although pictures I've seen of von Bredow don't have him dressed as one (didn't have a beard either but hey - he was on campaign, OK?)  Bit of artistic license on my part!  To make him a proper general he has all the silver lace and a rakish greatcoat slung over the shoulder.  Took a bit of work with the high speed drill and hair-dryer to bend it into the shape required.  I knew one of those spare ones from the Victrix box would come in handy!  The Standard-bearer's arm came from Perry's ACW figures and the sword pommel from their French Heavy Cav (only fitting really!)


I've modeled my French FPW army on Bazaine's VI Corps under Canrobert.  It was the latter's guns that von Bredow was ordered to silence, leading to the famous Mars-La Tour 'Tottenritt'.  I have a few things to do to finish off the French including putting together a command stand.  I've had the figures for years but never really got around to doing it - umming and ahhing over just how to compose it.  Finishing the Prussian command encouraged me to just get on with it - also finding a suitable MDF wood stand of the right size to put it on.  The scene shows Bazaine in 'conference' (in despair more like) with his senior commanders, all looking a tad perplexed.


It is a work in progress that I hope to finish before the end of the month and I go back to work.  Got a lot of Prussian infantry to do too and my box of Bolt Action Fallschirmjaeger  have arrived demanding attention to finish my WWII German para company.  [Sigh] so many figures to paint, so little time...

Well, enough of that melodrama - just to even things up a bit, here's one of the Prussian casualty markers I recently finished.  Its a bit unusual in that its an artillery marker as I noticed in BP that there were none to denote hits on guns etc.  I'll be adding numbers to the corners so it can be used to represent up to four casualties on any unit and/or a destroyed gun.  


I'll post more when I finish the French command but that's it from me for a week or two as I'll be out of town for a bit.  As before, click on the pix to see the enlargement and please leave any comments or queries about this or any other of my recent postings - which I promise to answer when I return.

Ciao for now.

             Doc

Fantasy figure: Amaregus the Slayer of Old Age

A mate of mine just reached the dreaded big 5-0 and unbeknown to him, I've prepared a little present.  Basically its an Orc wielding a large axe that just happens to bear a passing resemblance to it's intended recipient (except my mate isn't green of course!)

To commemorate my friend's roguish and conspicuous aging I have him/the orc 'slay old age' as it were and I have the orc's boot on the head of the former Empire gunner playing the part of 'Old Age'.  A bit of slicing and dicing (the head mainly) and cleaning up the rather worse-for-wear and paint encrusted orc, and giving him a face-lift (if that's the proper metaphor to use for an orc!) and it all came together in a quaint but suitably gruesome vignette.

The result is 'Amaregus - Slayer of Old Age':


So there you have it.  A few hours work on a rainy afternoon and an old figure gets a new life. That's the thing about doing fantasy figures - they are a lot of fun and you can let your imagination rip!

Fun and frivolity over, its now back to my very serious FPW Prussians.  Just finishing off my Von Bredow command stand for the 'Tottenritt' 12th Bde: "Vorwarts Mein Kinder!!!"


Cheers,
           Doc

Monday, January 10, 2011

Holiday project: first part of the FPW Prussian army complete

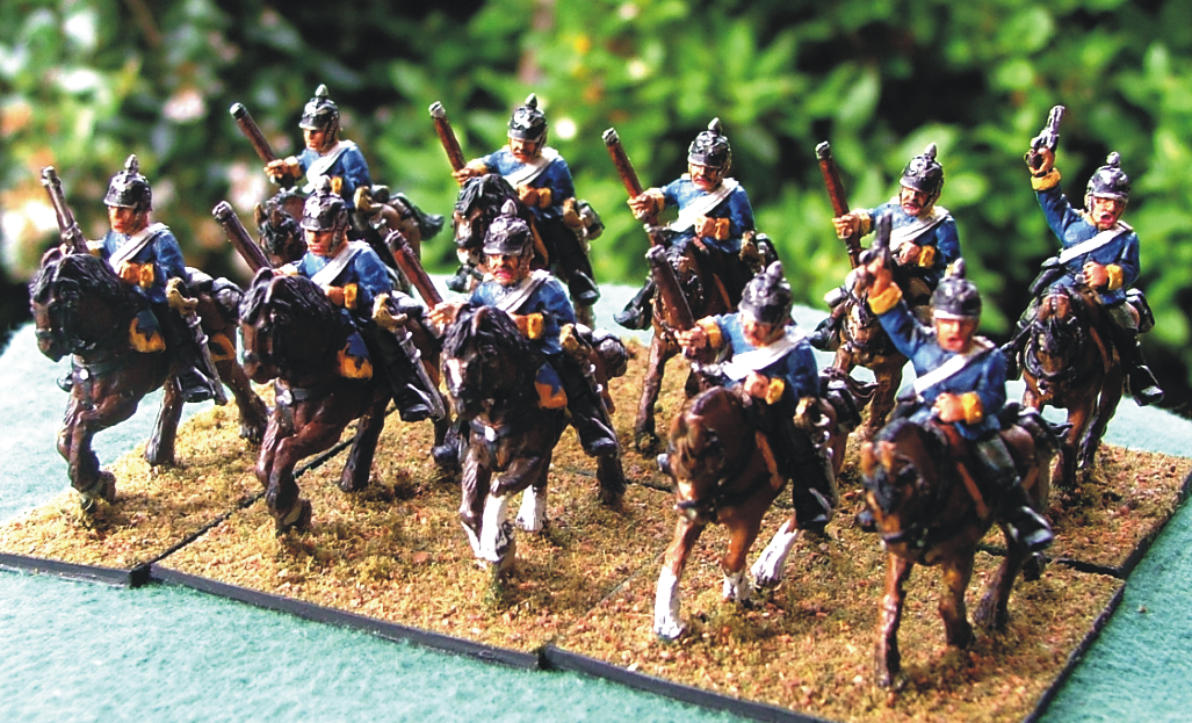
Just spent the last few days finishing off the first part of my holiday project; my 1870 Prussian army.  I've had it sitting largely in unpainted metal for over two years, just starting over a year ago with the cavalry.  I did the regiments that featured in Von Bredow's famous Mars-La Tour 'Tottenritt' ('Deathride');  the 7th Kuirassier and the 16th Uhlans (subject of a previous post) and now I've finished the the 19th Dragoons.  I have created three 10-figure units but still have a cav command (Von Bredow himself perhaps?) to do.  In addition I have finished the re-basing and painting etc, of the Prussian artillery with their deadly breach-loading rapid-fire Krupps guns.   Save for a few Uhlanen all figures are Foundry.

To finish the first part of the project I also put together a little command vignette of mounted general in consultation with two field officers (infantry) which I have tentatively titled 'Wo sind die Verdammpt Franzosen?' - one of the officers is pointing and perhaps suggesting 'they ran that-a-way Sir!'.  


The figures are Foundry's original Franco-Prussian line but the general's horse is a rather modified version (saddle cut down to fit the otherwise horseless general) - French officer's ride?  Not sure, but it is an attractively sculpted nag nonetheless.


The detritus of battle left from the fleeing French has been added to give a little atmosphere to the scene.  It includes an officer's kepi, a dragoon helmet, an abandoned pack and a broken rifle.  The helmet was a Perry's dragoon head suitably hollowed out.  The pack is their British(?) one from one of their boxes (dead handy they are too - I've used them on a few different bases).


The cavalry hung around for quite some time before I got around to finishing them as I just did not have enough figures for full units, particularly of Uhlans.  In the end I bought a few Castaway Arts Prussian Uhlans including a trumpeter, to fill the gaps and provide a command.  Although Castaway do some very nice figures and their horses in particular a usually well sculpted, their FPW range, at least these cav figures anyway, were a disappointment (expensive too!)  They are scrawny with melon-heads and incorrect or missing equipment (no swords etc).  This is a pity but they fit in well enough at scale with the Foundry ones.


The 7th (Magdeburg) Kuirassier are beautiful figures but I needed a command for the unit.  In the end I managed to find another officer and converted one of the troopers to a trumpeter.  I believe the Prussians did armour their trumpeters in 1870 but I couldn't find a pictorial reference so the figure is guess-work on my part.


And the full regiment...


And of course, the dragoons...


Last not not least is my Prussian artillery.  In addition to superior organisation and generalship, a war-winning advantage on the battlefield was undoubtedly the Prussian breech-loading artillery.  At least one historian I have read (Jeffery Wawro?) tells the story that Napoleon was offered the invention but had already blown the budget on rifled front-loaders of his own design and the French parliament wouldn't vote him any more.  So the German inventors went to the Prussians who snapped the breech-loading mechanism up and quickly put it into production.  I had a great deal of difficulty trying to scrounge another slightly heavier gun to match for my second battery.  Finally managed it but on one of the unique Prussian carriages which had seats built into the gun axle that acted as a kind of shield as well (the way the Prussians used their guns, sometimes dragging them into the infantry's firing-line for close support, they certainly needed them!)


Now all I've left to do are about four brigades of infantry.  No problem - have 'em ready by Christmas (the next one that is!)

All the figures are matched to my French FPW army, for which I have to paint up my Chasseurs d'Afrique some time to finish that lot.  Once done I'll have all the works for a good old Black Powder battle for the Franco-Prussian War.  Its a fascinating period to game and no, the Prussians do not always win!

Hope you enjoy the pics, click on them for enlargement and feel free to leave a comment too.

Cheers,
         Doc

Friday, January 7, 2011

ACW: The Battle of Mills Spring Part Two

Had to take a break in my blog posting to do some serious PC maintenance - given my browser (and thus Blogger) crashed twice this morning it was urgently required!

So, all fixed touch wood and on with the show...

Once Doug and Cameron's advance guard had been dealt with, it was straight up the middle with everything!  At which point in the proceedings I blundered again.  Took another swig too many from the bottle and fell off my horse - 'Ch-ch-ch (hic) chaaarge!!'  (thud)  But once again the Dice Gods smiled favourably and allowed my blundered unit to charge the nearest enemy (one of the options on the blunder chart) which actually took them exactly where I had intended.  Hooray for the pisspot general! 

But the battle in the centre was now reaching its critical moment.

The main assault on the Union centre gets underway - Carroll's cav on the left (minus the dodgy Kentucky marauders) have  burst out of the woods and scared the pants of the green Union troops opposite.  The Alabama veterans have fallen victim to Doug's artillery in the middle and are shortly to be followed by another unit.

The Union artillery, specifically the 2nd Bde's battery was the most effective unit on either side during the game.  It dispatched one of George's cav regiments, then Andrew's Alabama veterans and finally (above) another regiment from the same brigade.  It alone accounted for over half the Rebel losses in the game (that is units removed from the table) before I was able to get my guns on it, destroying one gun and driving the other off.  

The only dispute of note was with Andrew's cavalry which had burst out of the woods along that road (i.e. they were in column) and caught Doug's artillery on the move.  I contended that they would have destroyed the battery regardless of what formation the cav were in.  The head of a column would be plenty enough to engage what was a defenseless target.  But I was overruled and Doug somehow turned his carriages around and pulled them out of danger.  The compromise being he couldn't deploy them (and thus fire) in the next move.  

I became a sulky drunk general but went along with the consensus: 'Ah do say sah that the gentleman's rules of Black Powder insist upon gentlemanly conduct - let's have a drink to celebrate our decorum!'  'What a grand notion sah, don't mind if'n ah do - bottomsup!'  Besides which, the crucial fight that eventually decided the game was happening in the centre/left of the Union line.


The Union throws out a skirmish line to outflank the Rebel advance but too late to prevent a larger Rebel unit from also deploying in the woods to counter the move.  The remainder of Zollicoffer's Bde repeatedly charges the increasingly shaky Union centre...

...which finally starts to give way under repeated assault.

The Union centre/left collapses - an entire brigade blown off the table! Doug's other battery, rescued from Andrew's cav have finally deployed but were unable to come into action before being hit in the flank.  
Reb General Crittenden celebrates with another l'il drinky-poo!
The fight on the centre/left went down to the wire with all of (Andrew's) Carroll's Brigade (minus some skirmish units) stalled in mid field after failing orders - twice!  The entire weight of the final assault fell on Zollicoffer's depleted brigade - only three of five regiments left.  

The guys very kindly let me 'blood' my VMI regiment and guns in substitute for the Missi, Missisip,  Missip...  them other Rebs - and they excelled!  The guns disordered two regiments, causing one to withdraw and finally put paid to Doug's pesky battery.  The VMI instructors would have been pleased with their students efforts!  The VMI regt. repeatedly attacked, drove off one Union opponent and disordered another before being driven off themselves, only to rally in time to join the final attack.  That's mah boys!

The loss of Doug's brigade on the centre/left caused all his army units to test and as a result the disordered units on his right  which had been under tremendous pressure from Andrew's constant artillery, skirmisher fire and cavalry attacks (shotties at close quarters!) failed their morale and also collapsed.  


With the total loss of two of three brigades for the Union, the result was a resounding Confederate victory.  

An th' general celebrated by breakin' outa 'nother bottle o' his fahnest sipping whiskey...   YEEEHAH!

Cheers,
          Doc

PS: All the scenery and many figures are Doug's with most (many/most? Old Glory) belonging to the redoubtable Andrew.  I supplied the VMI cadets and the two 'Apostle' guns and whiskey sah, plenty o' whiskey! (Hic!)

PPS: My current painting project is finishing my Franco-Prussian War Prussian army while I'm on leave.  Cav & artillery are done - now for a command & 3 or 4 brigades of infantry.  Should be finished by this time next year for sure!  Post on the figures I've done so far next week.

Black Powder ACW game - Battle of Mill Springs

After spending an ordinary Christmas which included being stranded with a broken down car, being rained on and frozen in unseasonably cold weather for a day while waiting for a $3 part to fix the bloody car, I was in the mood for an afternoon of genteel wargaming in the Black Powder manner with some reasonably sane fellow adults.  And what a game was had!

The scenario was the Battle of Mills Springs, also known as Logan's Crossroads in which the Confederate Army of East Tennessee under the soused Maj Gen George Crittenden was soundly flogged by the Union 1st Div of the Army of the Ohio under the sober Gen George Thomas.  Being fashionably late, I was duly appointed 'Crittenden' and told that I was drunk and in charge.  I quickly played the part and in character managed to roll both the blunders of the afternoon but with the uncanny luck of a true dipsomaniac managed to hand out an unhistorical flogging to them thar Blue-bellies.  Yeeehaaa!!!!(Hic! Buuuurp!)

 The vital crossroads are behind the wooded area on the right.  The Rebs come on along the other edge of the table, Carroll's Bde (Andrew) in front of the farm house and Zollicoffer's (George and me) along the road.  The weather is dreadful with intermittent pouring rain (diced for each turn).  The Union forces (Cameron and Doug) have thrown their cavalry picket (1st Kentucky - henceforth known as the 'Plucky Kentucky') forward to the first defensible position in order to buy time for the rest of the Union forces to come up.


The rest of the brigade is coming on at the other end of the table, with one regiment double-timing it up the road to support the cav picket.  The Union had to dice to see when and in what order their other two brigades come on during the game which proved a problem for them.  All troops are classed as 'green' on both sides save for the 1st Mississippi (Zollicoffer's Bde) and the 16th Alabama (Carroll's) and perhaps the 10th Indiana of Manson's 2nd Bde (Union).  Fortunately for me I rolled a D6 for my inebriated general's characteristics which made him an impetuous drunk, otherwise all commanders were rated 8 with the exception of Thomas (a 9).


Being impetuous I ordered the cav straight in - charging the Union picket behind the fenceline by riding right up and blasting them with shotguns at pointblank (the only way to use them).  Not only did the green Union cav hold against 2-to-1 odds, they gave as good as they got and inflicted increasingly heavy casualties from the 1st round.  The Union picket managed to hold on for an incredible four moves under repeated attack before being destroyed.


The Union cav picket is finally forced back, unblocking the Reb traffic jam on the road

Which in turn allowed the Reb artillery to be brought into action. Note the right hand infantry column - the result of my first 'blunder' which sent them off on an excursion to the woods.

The Union infantry also fought well against overwhelming odds, deploying from the woods on the left in the nick of time and then holding on for three turns in a vicious hand-to-hand.  The advance Union forces bought time for the rest to come on - which proved a problem for Doug and Cameron (even with the latter's uncanny di rolling) as the opportunity their sacrifice afforded was not used to full effect - Doug had to roll to bring his troops on but couldn't match his co-commander Cam's magical di-work!  Historically the Union forces caught the Rebs bunched up charging across the open fields in the centre and slaughtered them.  But not this time round!

  The Alabama veterans (on the right) come up against the green Union troops of Mahon's Bde (Cameron) who - at odds of nearly 3-to-1 - hold them off for three turns AND drive the cav off!

The picket dies but does not surrender! Driven out of the farmhouse and unable to mount their horses and escape, the 'Plucky Kentucky' cav face the final charge (and annihilation) by Carroll's (Andrew's) Tennessee cavalry.

Part two of the Battle of Mills Springs to follow in a sec - ups the guts with guns and smoke!  Chaaaarge!!! (Hic!)


Cheers,
          Doc

Sunday, January 2, 2011

Some mechanicals to go with the Fallschirmjaeger

The last thing I finished off last year was an armoured recon half-track to go with the Fallschirmjaeger platoon I did earlier. Basically I got two half-tracks and a Kubelwagon to create a motorised platoon for the FJ.


 The Kubelwagon is probably superfluous but I can always get a few motorcycle combinations later on for a fully mobile HQ section.  I got the half-tracks and wagon already finished and only needing some minor repairs/touch-ups but the Recon Halftrack was a Blacktree Designs metal kit.


 While I am reasonably pleased with the result, it was possibly the worst kit I have ever had to build.  Firstly, its rough - very rough - and the parts do not fit together.  Even the photo of the completed model on the Blacktree site doesn't - you can see the gaps everywhere.

 But by far the worst was the stupidity of the manufacturer of including two wheel/track guards for the same side.  There is no way you can cut and redo to fit - I was forced to make one of them out of card.  That and the tons of bogging required to fill in the gaps in the model made it a right royal pain in the arse to build. As you are paying over UK$20 for the kit, this really isn't good enough in my opinion.  That said, the completed model looks OK and fits in well with the rest of the models & figures.


On the plus side it comes with a good MG32 and 35mm canon options - I chose the latter - as there is not enough room for both in the cupola. I also added some track and tow bar to the front for further detail.  The figures came in useful as I used one for the missing Kubelwagon driver which fitted well enough (with a bit of surgery) in the smallish wagon model.


Hans - vatch out fur zat verdampten Kfz du Dummkopfen!

The last  pic is the recon/HQ sections.  Click on the pic for an enlargement and feel free to leave a comment.  Happy New Year everyone!

Cheers,
           Doc