Friday, December 30, 2016

Come Fly With Me... and the second Greek campaign battle on the Albanian frontier.

A Merry Christmas and Happy New Year to all the followers of Doc's 'Art of War'. The counter thingy tells me its clicked over 150,000 views which is, I believe, a milestone of sorts for this little blog so again, thanks to all who've taken the time to visit and especially comment on my eclectic wargame activities.  This year has been pretty ordinary with the loss of Bowie, Prince, Ricky Parfit (Status Quo) - great muso and a thoroughly good bloke BTW - and then to finish off the indomitable 'Princess Leila' Carrie Fisher (followed by her mum Debbie Reynolds) - and a host of others. Dropping like flies they are so it'll be good to see the back of 2016!

I thought I'd sneak in one last post for the year - a bit different as I'm more a figure collector / gamer than model-builder BUT as it involved my growing WWII collection I thought I'd show a few of my recent aircraft.  I've got a decent selection of German aircraft - JU52, JU87 Stuka, BF109 and ME110 (next will be a JU88 to complete my Mediterranean theatre Luftflotte) but wanted to finish my Italian airforce.  I had my little Macci 'Arrow' fighter but needed a heavy/ground attack fighter-bomber so just finished an S79 Sparviero trimotor. Absolute bugger to build (snapped the cockpit canopy in two and spend hours on hands and knees hunting for and invisible piece of clear plastic on a grey carpet...) but the end result was worth it. Just have a CR.42 biplane to finish and the Italian Regio Aeronautica air support for the Regio Esercito for Greece and North Africa is done.


And (below) with his escort, somewhere over the Albanian 'badlands' or Libyan desert.


After I took a few shots I decided to do a few more 'pairings'. As I have already posted on the Gloster I decided instead to do the Hurricane (that replaced them) for a 'somewhere over Greece' shot with the Blenheim, using my home-made desert battle mat as a backdrop.


JU87 Stuka and ME110 over Doc's desert battle mat (and maybe a little bit of photoshopping to rub out the air stands). And last but not least, perennial favorites the Heinkel and ME109 escort.


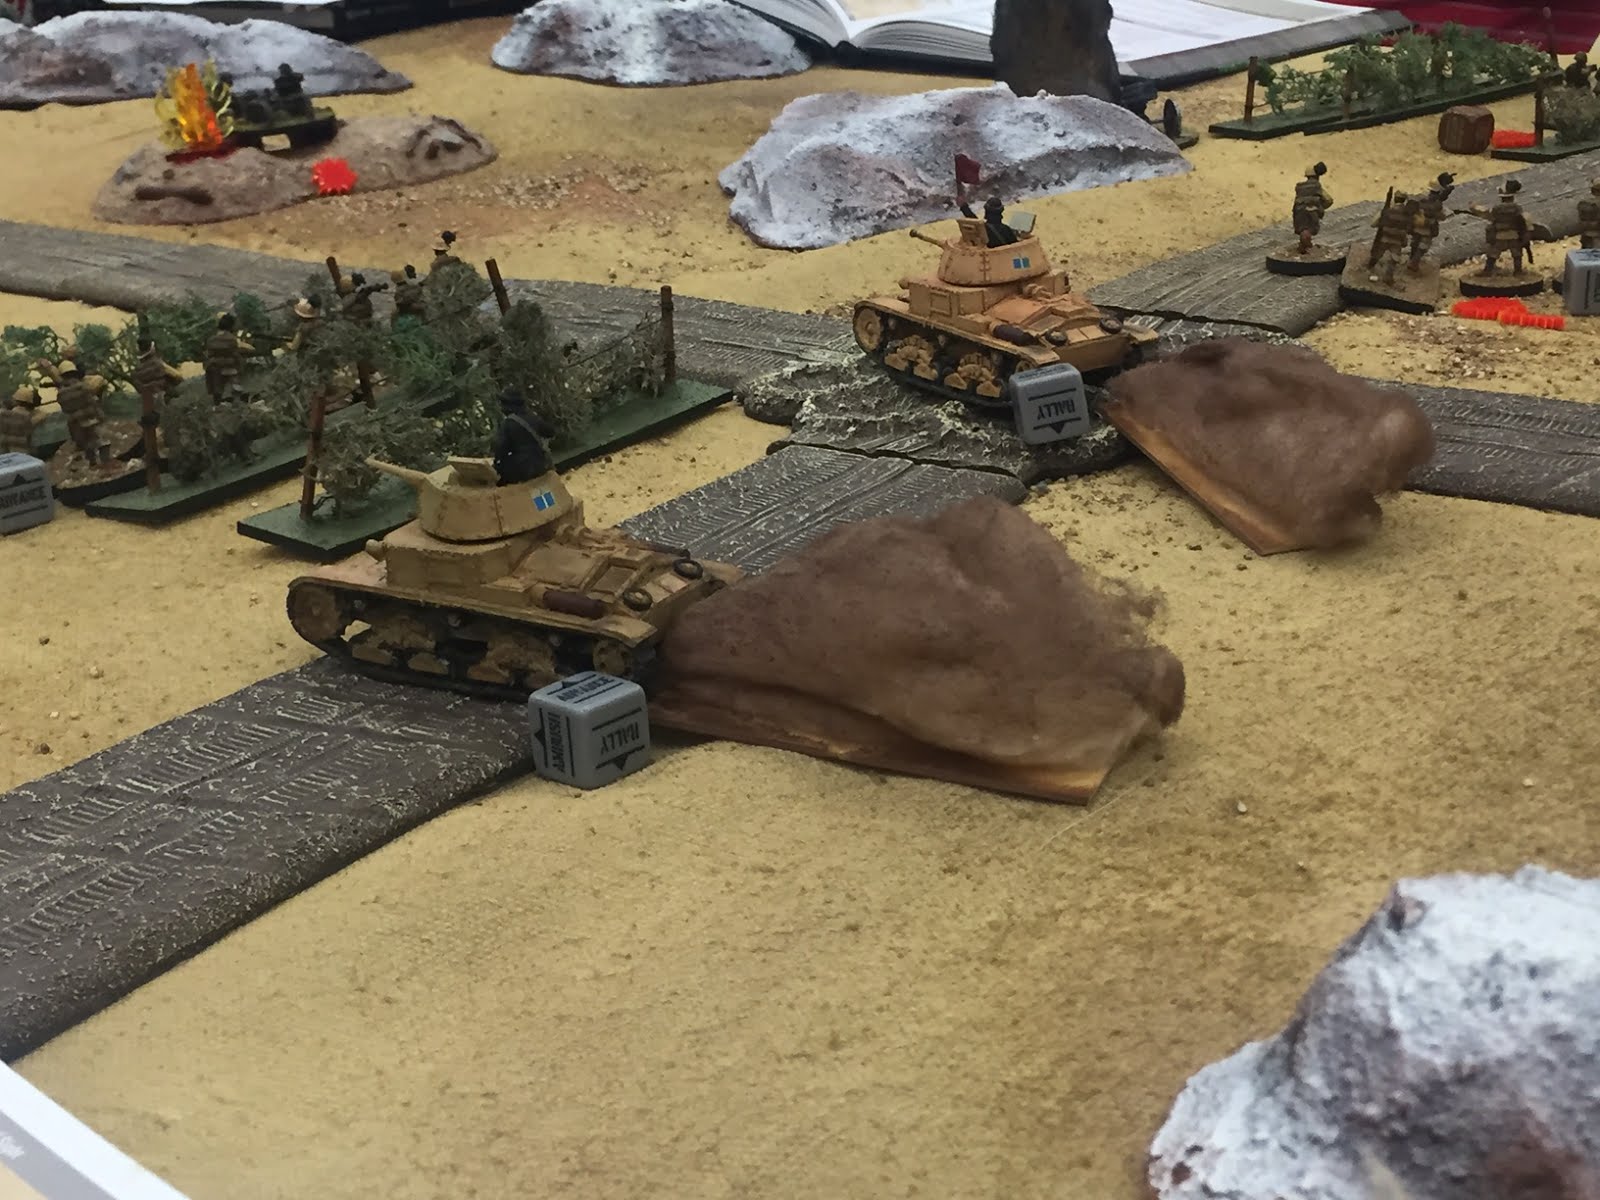
We had a game at Jolt in Mitchell before Christmas - the second of our Greek Campaign.  My Italian army has invaded Greece from Albania and at the same time as a lightning advance by Italian armour along the coast, a second thrust is being made in the mountainous north by Italian infantry divisions. Now I spent plenty of valuable points on an Air Forward Observation Officer (75 out of an 800 point army for a single figure!) but unlike the first game didn't get to use him as I left it too late and we ran out of time.

There was not a chance of the whitewash of the first game with Mark's horribly outnumbered Greeks being pummeled by  artillery, air and armour - this time they were in a heavily defended frontier in one of three(!) indestructible pillboxes (also the Italian objectives!) or behind stout (Greek) stonewalls - and only outnumbered 2 to 1 by attacking Italians with NO armour (yikes!)  I thought I had offset this by bringing along a Canone da 75 but that didn't survive two rounds before being taken out by a Greek howitzer (WWI Austrian issue!)
The Italian 75, having been towed into position by the GoGo-mobile, open fire on the Greeks... only to be obliterated by the Greek howitzer opposite!
Italians under heavy fire, try a coordinated assault with the Alpini to their right who spent most of the game trying to winkle around the other Greek flank - they copped a shellacking but kept on a-commin'!

The prelim bombardment wasn't nearly as effective this time although it got several valuable pins on the middle bunker. The entrenched Greek howitzer on the far right was untouched - very bad for me!
My useless air observer and my very useful sniper team move up.
'Alpini' (subbed for by my Bersaglieri figures) try to sneak up under cover on the right - still a lot of open ground to cover!
The preliminary bombardment - a few pin markers and a spectacular hit on one bunker/objective that achieved... not much! 
Mark's light mortar quickly zeroed in on the Italians crossing open ground - it proved to be quite a nuisance! (so much so I was inspired to make one up for my Greek platoon!)
The Italians on the left try and work their way around to a position where they can rush the bunker opposite. Conspicuously they had a very Italian-like failure of nerve at the daunting prospect of crossing the open to rush the bunker.  This held up and threatened to stall the entire Italian attack.


After having finally eliminated the Greek infantry covering the gun position, the Alpini/Bersas prepare to assault the gun position (objective 3) while the other (much depleted) section charge recklessly at the Greek HMG in the bunker (objective 2). unfortunately that's as far as we got as we ran out of time after six? turns.


The Italians come under heavy fire advancing in the open against the Greeks behind yet another stone wall but the real hero of the piece was the sniper on the hill behind them.  Despite coming under intense HMG fire and loosing his spotter, he calmly took aim and took out the Greek Captain, which compromised their entire defense.


The last act of the game: the Italians finally worked up to nerve to assault the bunker, which they took after yet another vicious round of hand-to-hand. Similarly to the first game the Greek defenders took out the same number of Italians including their NCO, selling their lives dearly for Greece!

The Greeks lost very heavily in this game, losing most of their units but also managing to inflict some heavy losses on the Italians - particularly the 75 gun!   

Although a 5 to 1 result it could have easily been the other way and as the Italians were only able to seize one of three objectives the game was a draw and the Italian offensive in the north is deemed to have stalled.  The Italians had a very hard nut to crack with no less than four fortified defenses to overcome but the Greeks were disadvantaged by having useless AT rifles in bunkers were they should have had MGs (had I have known I would have given them the extra I had with me). Despite attempts to fight the third game before Christmas it proved too much with everyone including myself committed to Christmas/family/shopping/lunches at work etc etc. 

Well must away and finish the Italians Santa very cleverly bought me (how did he know?) including a German Kradshutzen squad which I have just converted into a Bersaglieri Moto Guzzi squad - including with a handlebar mounted Breda LMG! I've also given the Italians a Flak 38 by converting the crew (and much blue language assembling that bloody gun - sorry Santa!) The Bersas also get more Baretta SMGs and an Autoblinda AC to complete my armoured scouting unit. I'll post photos when I finish them. 

Thanks again to all followers of Doc's Art of War in 2016. Hope you enjoyed what I've posted even if you didn't enjoy the rather long lapses between those postings! Merry Christmas and a Happy and Prosperous New Year to all.

Sunday, December 4, 2016

First game of our BA2 Greece Campaign and going for Baroque at the Club!

Mate Ian at the club last Wednesday chided me for yet again neglecting my blog and not posting for weeks - and clearly spending way too much time on #@$%ing Facebook. Guilty Yer Honour! To make amends I'm posting on not one but TWO games I had recently.  The first was my introduction to Bolt Action Ver 2 - which rules we tested out at 3D6 in Tuggeranong. Now I always give a decent establishment a plug as well, hence the link and this one to their nicely done pub next door, the Loaded Dice which has a decent bar and hot food reasonably priced mere steps away from your gaming table (food delivered while-u-throw dice!)

The first game was several weeks ago and featured by LV33 tankettes uncharacteristically successful and my Bersaglieri getting into all sorts of trouble in town. No matter as the purpose was to get use to the new revised version of BA - which is a quantum improvement over the first IMO.

The stirring sight of Italian LV33s coming to the rescue of the DAK. Hilarious!
 A rather good table with my very own 12' desert battle mat made from a canvas drop cloth from Bunnings (all of $24 - the rubber backed ones are $36 but better mats).  The second game of BA2 also went well as the first of our Greece Campaign series. In this as Italian commander I am taking a rather un-historical tack by successfully invading Greece from Albania along the coastal route.  It is a surprise move so the poor old Greeks are heavily outnumbered by Italian armour, mobile troops, artillery support and even air cover.  My opponent Mark put up a game fight (note to any Italian generals: avoid hand-to-hand with Greeks!) but pounded by a preliminary artillery bombardment (which also heralded my rolling of more boxcar D6 for any game in living memory!) which absolutely hammered the Greeks who had no defences other than a solitary bunker with an AT gun in it - an almost impossible nut to crack as it turned out.
The Greeks were outnumbered 3 to 1 and faced a horde of tanks supported by mobile infantry: the lead truck is stopped by taking a few hits - the Bersaglieri section dismount and advance across open ground at the Greeks hiding amongst the grapevines. They were reduced to half strength but kept on going - not bad for Italians!
The Regia Aeronautica also enjoyed uncharacteristic success being called in by the FOO and taking out the Greeks only artillery ordnance (a WWI vintage Austrian howitzer) virtually before it could fire a shot. The explosion marker on the other side of the grape vines marks another hit on the Greeks only HMG - which otherwise should have done great execution on the Bersa out in the open.
  Even the Italian tanks performed well... mostly. One copped several hits from the AT gun in the bunker and refused to go anywhere but the other two used their plentiful MGs to hose the Greek infantry among the grapevines.

Mark's Greeks were plenty tough - twice they had to be taken out in hand-to-hand and even hugely outnumbered, inflicting as many casualties as they suffered in the process. Like the Japs, you do NOT want to get into fisticuffs up close with the Greeks - they'll hurt you every time!

Italian armour advances. The flame symbol on the bunker in the distance is a rather optimistic (as it turned out) aerial attack marker. 
The Italians didn't get it all their own way - the AT gun in the bunker took out a truck and some of the infantry section it was carrying, forcing the rest to bail out.
The second wave of Italians, regular infantry plus supports, were most reluctant to come on before all the fighting was done, so just in time for the awarding of medals.  The Greeks bunker was a true beast which was impervious to everything thrown at it. To kill anything in the bunker you literally need to roll three 6D6 in a row, otherwise the only way to take it is with infantry assault. That's hand-to-hand. Against Greeks. Not good!

The tank made no impression as had the aerial and artillery bombardment beforehand. It was up to the brave Bersaglieri to frontally assault and pin the crew inside while the rest went around the back to get inside.  The two surviving crew took the leading NCO and his oppo with them. Another was given a large AT hole in him trying to throw grenades etc into the embrasure. Mumma mia!
The game at 3D6 was really enjoyable and we got through four turns in three hours as we became more familiar with the rules. Mark's Greeks put up a credible performance considering the odds stacked against them but the next encounter will be in the mountains to the north and they will only be outnumbered two to one next time - and no tanks!

At the Lanyon club last Wednesday Doug and I finally had that TYW game of Baroque ('Europe At War 1550 - 1700') we'd been promising to do for months. Its an unusual Impetus-style rule system that reduces things to simple mechanics rather than multiple factors, so once you get used to how it operates, the game flows and its quite enjoyable.


Unlike other systems it does not require hordes of figures, which is also useful. Two 650 point armies going at it will give you a good three hour game. Doug fielded his Ottomans and I my Poles taken from the Baroque lists. The only criticism is that artillery seem completely useless. You really don't need to spend the points on them as they do very little anyway. I realise that artillery were not as effective during this period but I think they probably go too far the other way (I may be a bit harsh here - if you buy a Master Gunner they are more effective). No matter - it doesn't spoil the game and the combat is, as it was at the time, rather brutal!

Polish army with Pacerni closest and Rieter behind. The other Pacerni are on the other side of the useless gun and Winged Hussars next to them.
The infantry - must be a later Polish army as only one unit of the fearsome Haiduks (closest) are allowed in the army list.  The rest are all standard Pike and Shot.
After being rebuffed by Doug's Sipahis, my Pacerni are hit - hard - by his ferocious Quapukulu Sipahis heavies.
My Pacerni hold and a second unit hits his Sipahis in the flank. In the background my victorious Hussars (scratch two units of mounted Sipahi Bow) are about to get their comeuppance with a devastating volley or three from the Janissaries. 
Reduced to just one effective figure the unit somehow remained on the field with Doug frustratingly unable to get the one extra hit that would have destroyed them.
Closeup of the endless melee between the Polish Pacerni and the Sipahi (Deli?) heavies.  The Ottoman heavies are as hard to kill as my Polish winged hussars.
The Pacerni in turn were hit by Doug's Sipahi/Deli heavies.
  After running out of time the infantry on the right didn't really get engaged.  The Haiduks volleyed the Ottoman bow (Anatolic skirmishers?) into oblivion but Doug's advancing Janissaries were unable to get to grips with the Poles. On the other flank Doug's Ottoman Dragoons (lurking in the rough) were destroyed by a rolling attack - effectively a caracole by the Reiter and one of the Pacerni units - who rode up to the edge of the rough, fired then were replaced by the next unit etc. With Doug's entire right wing (a third of his command) gone it was a convincing Polish victory  BUT Doug generously explained how the rules worked and I got lucky dice when I needed them.  After a frustrating start where most of my units failed their initiative several times while Doug's entire right wing division advanced, I got lucky with the melees. All in all an interesting game to play and - importantly - gave me the excuse to get out armies I haven't played in years. Great fun. We'll be playing more Baroque in the future.

'Pulled' the post for a final bit of editing as I just noticed the counter has turned over 150,000 visits. Wow - has it been that long? A HUGE thank you to all the followers and visitors to my humble blog.

Cheers,
             Doc

Wednesday, November 9, 2016

Canberra's Little Wars 2016

This is my second attempt to post after the @#$%ing PC crashed last night and I lost the lot. Usually saves a draft - not this time Josephine. Swear I have so many things happening at the same time its doing my head in. Well in the immortal words of Bullwinkle Moose: "This time fer sure!"

First up my hearty congratulations to Ian, Leigh and Greg for putting on another great Little Wars convention.  Raised over $400 for Soldier On so a great effort one and all. And what an enjoyable day's gaming there was!  So many different and amazing looking games - a bit of something for everyone.  I think the traders did good business as well - Dean from Olympian ran a well-attended bring-and-buy as well as his usual array of laser-cut precision MDF bits and BA-CoC-Saga etc etc bits and bobs at bargain prices as well as Nick from Eureka with a mouth-watering array of fantastic figures. Wargamer heaven it was.  Now the games.

First I noticed was an amazing Rome v Carthage in 54mm with hundreds of figures - looked spectacular!


Next to our Sharp Practice game my mate Cam had set up a very cool fantasy Horde of the Lizard King game with a suitably glittering prize horde of ... well , glittery stuff AND spectacular scenery a la Ankor Wat junglie-like hall. Look here are some photos ok?


Man, I seriously covet my neighbour's temple. Have no idea what I'd use it for - me just wants it. My Precious.

Also right up there in the wargame desirability stakes was Greg's Viking Raid game with some spectacular to-scale (28mm) Viking longboats. Although he doesn't realize it he has generously donated a couple of his excellent photos of it for my blog.  Thanks Greg!
 
Another was a great-looking table of modular terrain for a 20mm - 1/72 WWI Western Front game with tanks, cavalry (!) gas-mask-clad infantry and beautifully made trenchworks.
 
 
To the west of this - waaay out west - was a small but spectacular table that looked like it could have been a Hollywood film set for a game of Dead Man's Hand. A superbly-made Western town replete with railway terminal and the Dalton gang drawin' thur  six-shooters ta pump dang varmints fulla lead that be needin' a good shootin'! I'm sure that's what they told the Sheriff.  Oh wait... HE was the one they were pumpin' fulla lead?  My bad.
 
 
Also a spectacular-looking game table with an amazing set was the WWII Arnhem game brought by the same chaps that did the equally spectacular-looking raid on a U-boat in its pen game last year. The work they must put into these is mind-boggling.  Have a look at these photos and prepare to be boggled. As with the above game, my phone-photography doesn't do it justice. The last photo is a rather neat Charge of the Light Brigade in 15mm.
 
 
Myself Mark and Owen put on a Sharp Practice (ver. 2) game 'Somewhere in Russia - 1812'. I supplied the figures for two Russian, a French and a Polish force in what we intended to be more of an encounter skirmish game. Michael Geld took the Polish command (thanks Geldie) to round out numbers and proceeded to do what Poles like to do when they encounter Russians - give 'em a darn good flogging!  Pity the same couldn't be said about my French who failed to advance and dislodge Owen's deftly-handled Russians opposite.  I put it down to Cossack-fear.  My Voltigeurs fired a thunderous volley into them that killed two and put no less than nine (nine!!!) shock on them which saw them...  run away a little then ignore my lousy shooting for virtually the rest of the game.
  
 
The figures are a mix of mainly Perry's and Front Rank - with a few lovely old Foundry (French Legere) and some odds and sods thrown in like Victrix plastics for two brown jacketed units of the 'Emperor's Cousins' (Corsicans of course). The Poles are all the beautifully Paul Hicks sculpted Murowski Miniatures with Perry's Guard (Polish) Lancers.  The greatest success and failures of the game involved the French & Polish cavalry.
 
The successful cav: Geldie's Poles ride down and chase Mark's Russian infantry right off the table! And the unsuccessful cav: what's left of my dragoons after surprising Owen's infantry in line, hitting their flank - and getting bounced! Owen's repeated volleys did the rest.


My infantry fared little better - stuck in the middle of an open field they copped horrendous casualties from Owen's infantry and gun in front and his Jaegers in the apple orchard on their right.  Even when my skirmishers (more Corsicans of course) eventually came on and joined in they could make no headway. At the end they had 14 out of 24 figures left and were carrying 26 shock! My artillery made up for it a bit by enfilading the unit that bounced my dragoons but those Russians are a tough lot - never looked like budging let alone breaking!

It was a different story for the Poles.  Although the cavalry were virtually destroyed by their efforts, they did drive off most if not all of the opposing Russian infantry.  The Polish infantry volleyed Mark's cossacks out of the way (no cossack-fear for the Poles!) advanced virtually unopposed and got into the village, copped some canister hits from Mark's gun, laughed it off then bayonet charged and captured both gun and the crossroads objective.


While remaining completely unimpressed with the SP Hollywood history treatment of Fisticuffs between fresh cavalry and infantry not in a defensive formation (result = completely unrealistic crap simply due to the lack of factors to hit for the cavalry) the overall mechanism works and makes for a fun game. It also means you don't have to have masses of figures to have a reasonable wargame.

Thanks to those that joined in and hope they had a good time - two to three hours for a 60+ points a side game is very doable even on a large table and we managed that with a break for lunch.  And a nice icy cold beer afterwards to celebrate a successful Little Wars for another year!