Showing posts with label Painting tutorial. Show all posts

Monday, September 30, 2013

Napoleonic Poles & some Legere


Finally finished my Murowski Miniatures figures - the beautiful Paul Hicks sculpted Napoleonic Polish infantry. I got the figures from Roger about a year ago(?) and had over half of them sitting around until a few weeks ago. The last of them to do was the artillery battery which I finished yesterday.  I now have a full brigade - 100 foot divided into two regiments of two 24 figures battalions apiece, with two extra stands skirmishers for the Vistula regiment I've painted in winter uniform.


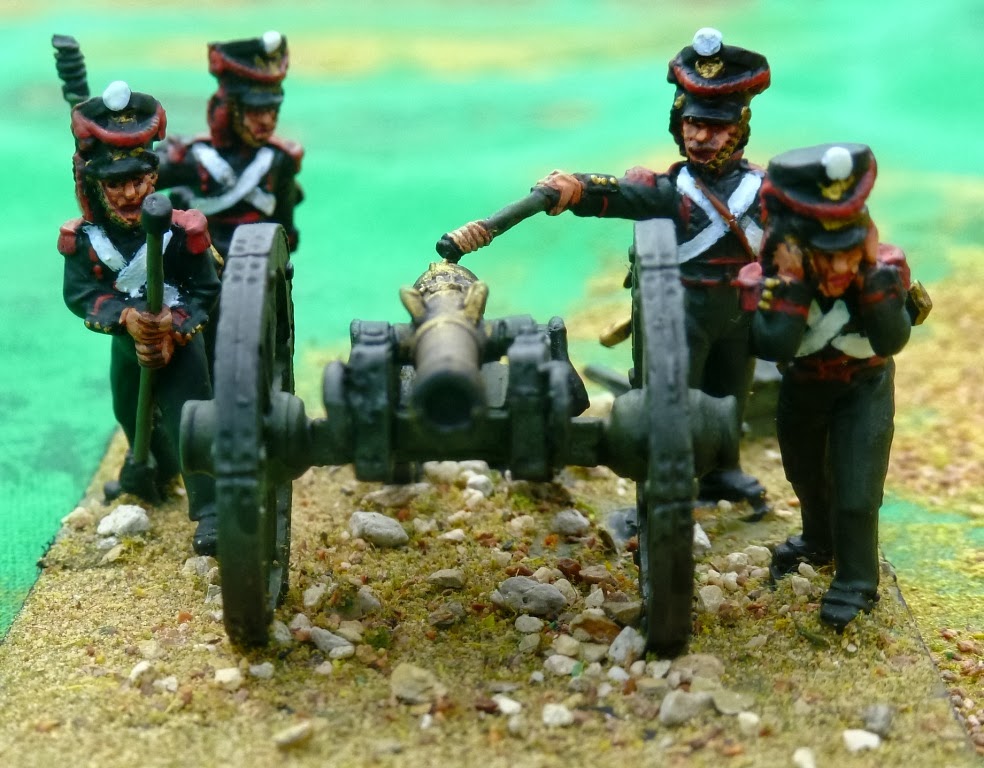
The artillery are two 8pdrs and a howitzer and for completeness I've combined them all with a regiment of Perry's lancers. I  had done the lancers up as Guard Eclaireurs (scouts) but the uniform is almost identical with that worn by Polish lancers of the late Napoleonic Wars (from 1810 onwards) so they fit in rather well.


The Vistula Legion infantry are now two regiments in summer and winter uniform. I did this purely for esthetic reasons - the uniform combination of dark blue jacket with yellow facings (and czapka) has always appealed. The idea is I will have four French and allied brigades (or thereabouts) for BlackPowder games: Polish, Italian, Bavarian and French.  Opposing them I now have about 5 Allied brigades (3 Austrian and two Russian).  I've still got to finish my Austrian and Russian brigades from the Perrys' figures I've bought - which is still hundreds of figures to paint. Tempted to get more Murowski Poles but there are more than enough of the unpainted Perry's to do.


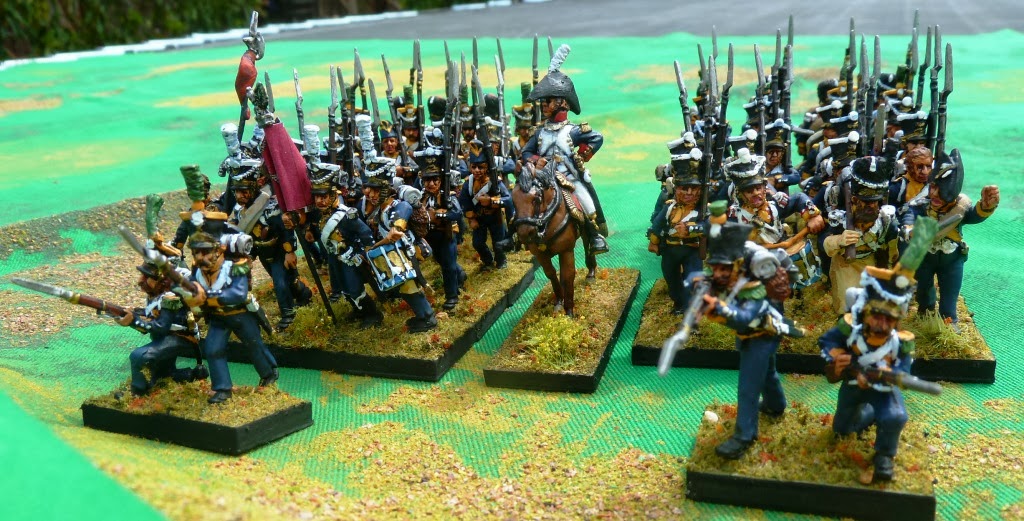
I particularly liked some of the skirmishing figures - wish I'd ordered more.  The Vistula regiment in winter uniform have 26 figure battalions rather than the usual 24 to add the skirmish stands in.


I must admit I love the Poles and waited for years for someone to produce quality figures before diving in and buying up a motza of metal. Its taken me a while but its great to have finally finished painting them. One regiment of them has already debuted on the wargaming table - now they're finished I can't wait to get the whole brigade into action!


I also did a bit more tinkering with my Legere, changing the command stand around yet again by adding two figures and making a command stand for the carabinier company.  The other revelation I've discovered is Testor's Dullcote. I know I'm a few years behind the times but after experimenting with a number of flat finish varnish systems including airbrushing artist's varnish on figures (good result and cheaper but too messy and fiddly to set and clean up) a decided to try one of the small and expensive cans of Testors. It gives the best flat varnish finish on painted figures I've ever seen. The colours seem to be enhanced by it as well.  All my new Poles as well as the Legere have now been finished in this spray lacquer.


Legere colonel with a bit of battlefield litter on the base 
A word of caution though, as good as the Testors is it has one major drawback.  I smelt some pretty heavy chemicals in it ('petroleum distillates' etc on the label) like Toluene or worse - God knows what the propellant is.  As it's an aerosol I'd only use it outdoors - and avoid getting a snoot full as it can't be good for you.  I think I got an allergic reaction to it after  I used it carefully, so beware people.  It gives great results BUT incorrect use could have a very major health risk attached to it.

Now I've scared the pants off you all, hope you enjoyed the post on the Poles!

Saturday, April 10, 2010

Dismounted dragoons (and a dead legere) nearly done - the 'how-to' for basing and finishing your new dragoons!

After the usual interruptions I've managed to do the finishing on the dismounted dragoons from the latest Perry's release.  I decided to use the plastic bases that came with the set - perfect for the figures in 'open order' as it were.  I cut and maggy-sheeted some individual bases to go with them.  The figures in this first pic have been finished with Army Painter, final touch-ups (white cartridge-box belts etc)- got all the way through them, glued them to the bases and started the flocking before I found out I'd forgotten the boot spurs! 

After leaving overnight for the Painter to set, a solid coat of matt varnish and then leave them for a few hours more. I found it useful to do it in stages, leaving the figures overnight after finishing the painting as the paint has to be completely dry before coating with Army Painter otherwise you risk crackling ( a nice effect interior designers strive for but a disaster for miniature soldier painters!)  The completely dried and varnished figures are then removed from the painting sticks, the figure bases cleaned up and then glued to the stand bases, all of which have magnetic sheeting cut to fit on the bottom (gives the figures a smidgeon more 'heft' too!)
The first part of the flocking I add some rock and grass features.  I gives a nice touch to the bases rather than just the straight flocking mix.  I tend to do it on the nicer figure stands, command vignettes and casualty markers.  Its pretty straight forward and an easy techniques to use to enhance the look of your bases.
 
I use small rocks - railway scenery 'ballast' that is actually a very light shale - put a dollop of PVA glue on the base (I use a fine palette knife to make sure I get it where I want it) and then press the small rocks into it - just enough so they are seated in the glue not covered by it!  I then get a good pinch of the static grass and making sure it covers all the glue and rocks, press it firmly, then carefully lift and tap off the excess.
The next step is to add the rest of the flocking.  I use a paint sample-pot of Dulux Olive Green which gives a nice undercoating as well as remaining wet enough for the flock to adhere to. I think I have said in a previous post that you get 250 ml. in a sample pot - enough to do thousands of bases!  As you can see above, the grassy outcrops look particularly effective on casualty markers - this one being a dead French legere  carabinier (French light infantry equivalent of a grenadier) - formerly a dead British fusilier and one of the handy casualty freebies you get with the horse sprues in each box - the grenadier's bearskin courtesy of the elite company dragoon heads.

After you've given them a final flocking (sounds kinda wrong but looks alright!) wipe off the excess on the edges finish sealing them with paint - I use a flat black acrylic as it defines and lifts the base. 

Tomorrow its off outside to give them the last coat of matt varnish to seal the lot in forming a nice solid protective coating for the stands. I'll post some pics of the final results when its all done - then its off to paint hordes of Indian sepoys for the Black Powder Indian Mutiny battle planned for week after next!

We do like that dragoon officer too! He's turned out OK but I may have to do more work on that fake leopardskin on the helmet.

Cheers,
             Doc

Sunday, March 14, 2010

Italian Grenadier Command

 These were the 'extra' figures out of the box of Victrix, which together with the kneeling figures I'm making into separate stands. Those kneeling are made into skirmishers - no surprises there - but the other were additional (or rather superfluous) command figures.  With the plethora of bits that come in the box, I was able to turn them into a command stand.  If I add the eight other grenadiers from the four battalions I have I get an extra Grenadier Battalion.  The eight skirmishers make up the deficit if I choose - so either way I get five battalions out of one box!  That's better than a brigade - best value on the market in my opinion.


After I finished the painting I decided to apply the Army Painter tone.  Apart from the flesh and a general weak black wash - which was then highlighted in the base colour - I did not do the usual layers of washes to build up the tone.  So the first shot is the figures painted but 'in the raw' as it were, before basing and flags to finish.  I was particularly interested to see how the white uniforms would turn out as I had abandoned my earlier method with these figures.

The next is of the finished figures, with the toner and after a matt varnish has been applied.  The variation on the white uniforms is almost entirely the addition of the Painter tone.  Looks OK to me and saves time - I'll be using this method again for the remaining two battalions of Italians.
All told it took about an hour and a half per figure to paint - about average for normal figures but about half an hour less for command ones, which I usually lavish more time and detail on.  It took about an hour to do the flag and Eagle Guard's pennant then another hour and a bit to trim down the plastic stands on the figures then base and flock and final varnish. I reckon the Army Painter probably saved me at least an hour - the only drawback being you have to leave it overnight (minimum of 12 hours) to dry and set before you varnish.

I must admit to enjoying doing small dioramas like these, far more enjoyable than painting figures en masse - which is what I now must away to do to get a regiment of Union Perry figures painted and based for a Black Powder game tomorrow evening. 

I tell you - the work never stops!

Cheers,
          Doc

Wednesday, February 24, 2010

Last stages of finishing the Perry's French Cuirassiers

After many delays, pfaffin' about, experimentation and so on, the first batch of cuirassiers - 8 figures of the 5th Regt. - are now complete.

I still used washes over the colours and even the flesh to get the tone I wanted before finishing with the Army Painter - far too many steps perhaps to do them quickly.  But as I had so many interruptions to my painting I used each uninterrupted session to plan out the painting.  This worked out better in the long run - particularly for the horses - which I wanted to get right.  Hopefully I have achieved this.

After finishing the painting I put the Quickshade Strong tone on (the mid range one) by brush.


After this I realised that the tone made some things a bit too dark and 'muddied' some of the white highlights.  I ended up doing the white gloves, belts and the grenade design on the saddlecloth.  The last bit was annoying - I can't paint small details that well and having it slightly raised in the sculpt would have been more helpful. I also redid the swords as the tone made them look a bit dirty.  After the final paint touch-ups I made the bases - I always do my own with board and adhesive backed  magnetic sheets.
Next step was the flocking to finish off the bases, then outside for a decent coat of matt varnish.


Friday, January 29, 2010

'Bring Out Yer Dead!' - Casualty Markers Finished

Casualty markers done.  A fine selection of dead Frenchmen for your delectation. Including one sliced and diced ex-Perry's Pommie now looking much better as a dead Frog.

I'm inclined to agree with von Peter and others that it is a pity Perry's put him in a box of French rather than make a second pose for a French casualty figure.  However, plastic is nothing if not malleable with my trusty old scalpel - the slicing on the ex-Brit fusilier for example now includes a cut that has split the shako and the head to the bone.

Bad to the bone.

B-b-b-b-baay-yad.

Sorry, just had a George Thoroughgood Moment.

Anyway, the dead'un in question.
 
Now I did say in my last post that I was deciding to experiment with the new can of Army Painter dip that I had acquired.  Matt gave me some good advice about painting it on rather than dipping.  So I tried it on the casualty markers.  I have to say it gives a really good lustre and subtle depth of shading - if you compare these pics with those in the previous post, you'll see what I mean.  Its the 'Strong Tone' can which is the middle effect one - and much more subtle than I expected.  Hit it with a good coat of flat matt varnish and the figure really comes up well.  I have to confess I had already used the usual washes before I applied the dip, but nonetheless it had a very good effect and gave them a really nice finish I think.


Second pic above not so hot - a very dark figure and the reflective light off the varnished board made it very hard to get it to focus.  But the 'cousin' casualty (Chasseur d'Elbe) marker turned out well and photographed much better under exactly the same conditions.

As you can see below, Unlucky Pierre's had enough of my inept photography and is rolling his eyes up in frustration...

..sorry, my mistake - that's the early onset of rigor mortis! (8-o)
Well enough of this morbid fascination.

Next week boys and girls, my zombie battalion...

No really, I hopefully will have made some progress on my cuirassiers.  Got some stiff competition out there in blogland too - never mind pro painter Sasha Herm, blogger Dean Motoyama has posted some absolutely beautiful Perry's cuirassiers and carabiniers on his 'WAB Corner' blog, the horses in particular are excellent! 

His results have inspired me to extractus digitus, put aside the scalpel and get cracking with the brushes.

Cheers,
          Doc

Friday, December 4, 2009

Victrix painting: base coating tutorial


The box of Victrix made up and on sticks ready to paint.


The 'spare' grenadier command stand.  Note the black arm on the officer - 'borrowed' from Perrys spare bits.  
They mix in nicely - the patient responding well to the transplant.


 Ready for the first coat of primer.

A note of caution: spray painting is hazardous to your health!  The aerosol agent in most spray cans may be non-CFC, which is a good thing - no nasty holes in the ozone - BUT they have a toluene base, a very nasty chemical that together with the paint, you definitely DON'T want a snoot full of when spraying!  As seen from the pictures I do it outdoors and also sometimes using a spray booth made of a large three-sided box.  Don't do it on a windy day or wear a mask. Actually, you should always wear a mask, just to be safe.  

Before you start check your paint - which should be a flat or matt black (or white, depending on your painting school) by testing  it on a bit of plastic sprue.  Some aerosol agents eat plastic giving that nice pitted, rough look to your figures which you will probably want to avoid.  Give the can a good shake to mix the paint pigment up and holding it about 15cm (that's about 12" for you non-metric colonial types) away at a slight angle, give a few 2-3 second bursts.  Avoid long continuous spraying as if you linger for more than a nanosecond in any one spot the paint could pool into the folds on the figure, stuffing up that nice detail you'll want for your painting later on.  I use continuous short bursts aimed at each figure, front then back, pausing to let it dry between about three good applications.  The idea is to build up a nice solid even coverage. 


The boys all nicely blacked up, Al Jolson style.

TIP: hold the can upside down when you're finished and spray until clear stuff is coming out the nozzle.  It may seem wasteful but isn't as it stops dried paint from blocking up the nozzle and you will be able to use 100% of the can rather than wasting a heap when the aerosol runs out or the nozzle gets blocked permanently - a worthy consideration if you're using that horrendously expensive Citadel stuff.  Works even better for cans of spray varnish too.