Showing posts with label FPW Prussian cavalry. Show all posts

Saturday, June 16, 2012

Battle of Froschwiller at WinterCon 2012

As promised, herewith are the photos of the Black Powder FPW action at WinterCon.  As we had surmised, it ran its course over eight turns and after a pretty tough and even fight, ended with a pretty convincing Prussian victory by Turn 8.  The big difference this time was in the higher infantry casualties inflicted by the much bolder French this time round. This time the Prussians lost no less than 9-10 battalions of infantry and three regiments of cavalry. The French lost about 8-9 (or more?) battalions of infantry, three or four regiments of cavalry and all their guns save one - the equivalent of nine batteries (including the attached Mitrailleuse) in BP rules.  The fact that the Prussians didn't loose a single gun- even though half their eight batteries took casualties - says more about the effectiveness of the French artillery.   The French have more guns on the table, but they are less effective at long range than the Prussian ones - and the Prussians have three batteries off table firing at long range. While this aspect of the game produced a slight imbalance in Prussian favour, it did conform to historical reality where in the end it was the Prussian artillery that pounded the French into defeat and destroyed Froschwiller when the Prussian infantry couldn't take it.  Historically the Prussians lost over 9,000 battle casualties - slightly more than the French but the latter also lost an additional 12,000 prisoners.  In our game we didn't get the prisoners as the French withdrew but the casualties were about the same.

The French in the vineyards outside Froschwiller
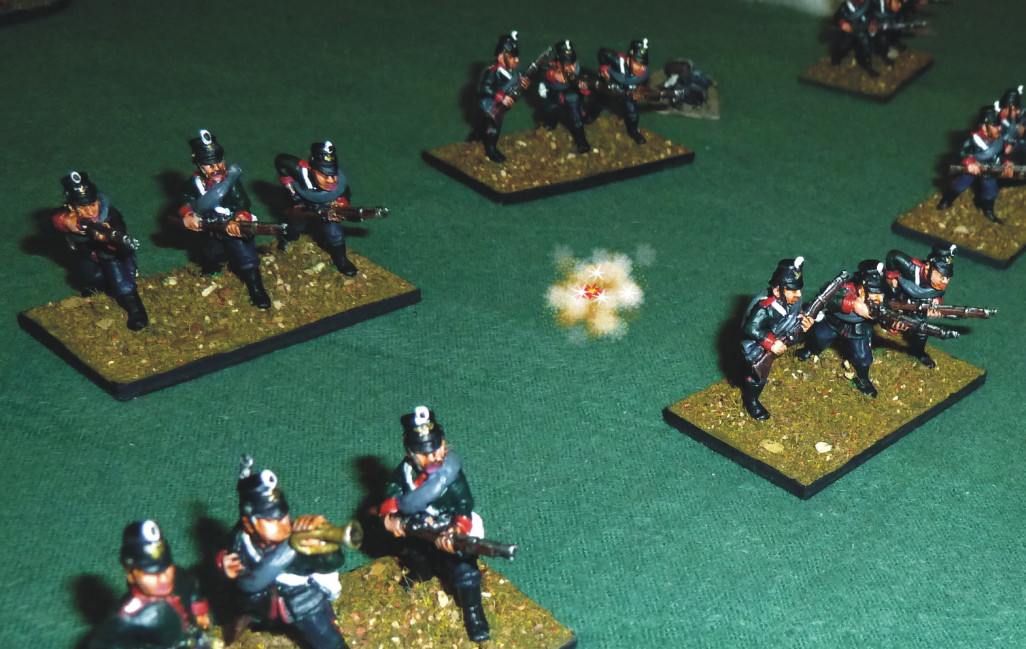
The Prussians emerge from Worth and come under immediate fire 
- view from French entrenchments along the ridge from Froschwiller to Elsasshausen
The Zouaves next to Froschwiller
The Turkos in reserve just behind the town
This time the Prussians came under heavy Chassepot, artillery and Mitrailleuse fire from the outset, with predictable results!
The Prussian tactic was to target the French gun batteries and take them out before they could inflict too much damage on the successive waves of infantry coming across the open ground in front of the town.  For the most part, it worked.
The first wave of attackers destroyed, the second and third waves spread out and engage the French in the vineyard.
On the other side of the table Dom's second and third waves attack the Niederwald and advance on Elsasshausen in the French centre.
The successive waves of Prussian attackers bunch up at the end of the vineyard - but can't break in!
The French Chasseurs a Pied (closest) beat off no less than three attacks by battalions twice their number.
The situation by Turn 5. 
Note the two battalions and artillery battery that were across the road into the town have been eliminated - but so had three battalions of Prussians!
The situation at the Niederwald, Turn 5.  Dom's massed Prussians had made sustained attacks but had been held off with heavy casualties by outnumbered but resolute Zouaves and Chasseurs.
The pressure on the Niederwald position was intense with the French threatened to be driven out by sheer weight of numbers.  To relieve the pressure, the French in front of Elsasshausen left their entrenchments and supported by the Chasseurs in the Niederwald, drove into the advancing Prussian columns, bringing them to a sudden halt.
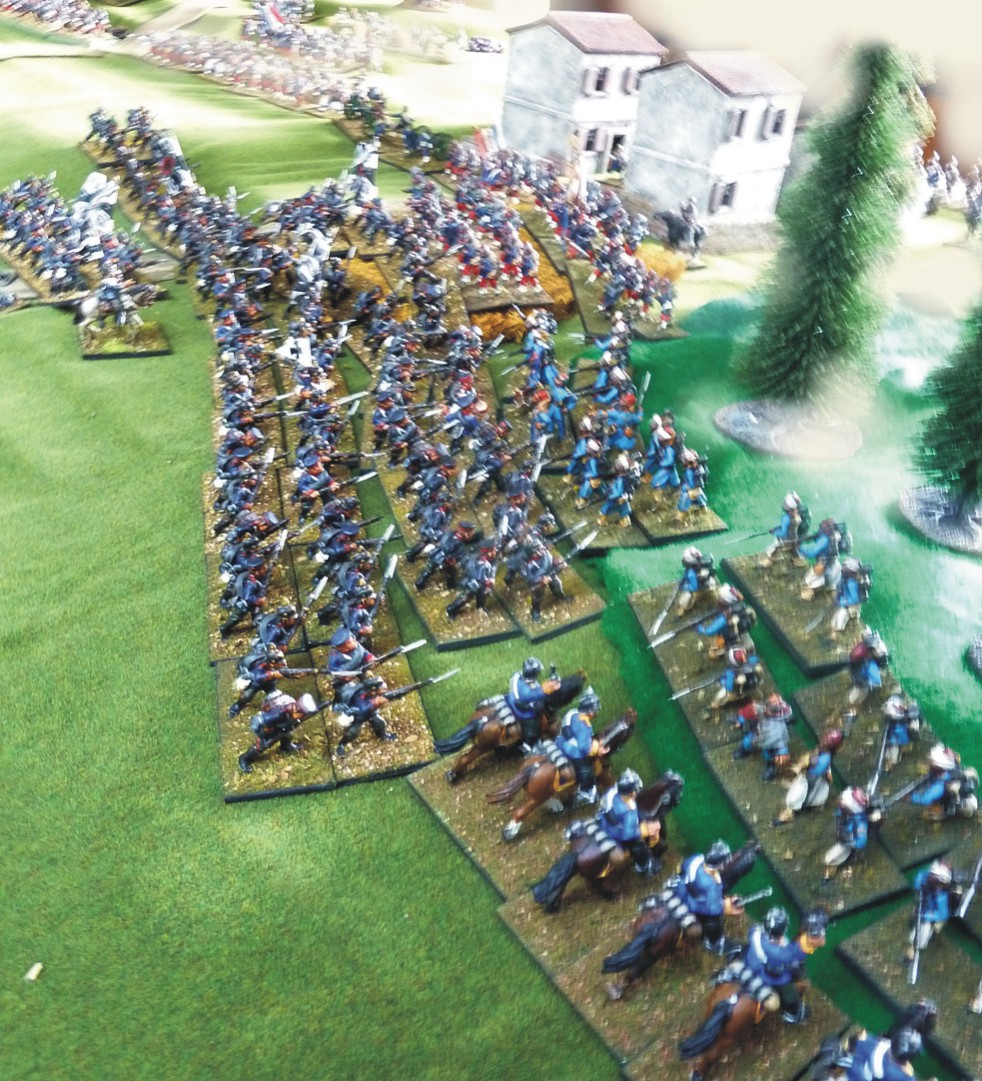
Perhaps inspired by the success of the counterattack in front of Elsasshausen, the French lancers had a rush of blood to the head and charged unsupported into the mass of Prussians advancing up the road to Froschwiller.  The usual fate in FPW of cavalry who attempt to frontally charge infantry is to be cut down but perhaps the sheer audacity of the move unsettled the Prussians who failed to stop them with shooting and still couldn't defeat them in three rounds of hand-to-hand! Similarly to the Cuirassiers, they were finally wiped out by a flank attack by a fresh regiment of Prussian dragoons.
Meanwhile in the vineyards next to Froschwiller, the relentless assaults by Michael's Prussians had slowly ground down Mark's French who were reduced to the plucky Chasseurs and were forced to bring up their reserves as the Prussians gradually expelled them from the trampled vineyards.   
As the French attack next to the Niederwald swung in the balance sucking in more French  including their cavalry brigade which had been in reserve behind Elsasshausen village.  Now a hole opened up in the centre of the French line which the Prussian cavalry - which didn't arrive on the field until Turn 5 - quickly  exploited, with three of the four regiments galloping in.  In the background the French Cuirassiers made another desperate 'deathride' into the middle of the Prussian line opposite the Niederwald but they were on their own as the unfortunate French Dragoons on the other side of the forest had been destroyed attempting to charge the Prussian guns.
The French armoured heavies should have punched through but the combination of Prussian Needlegun rifles and sheer numbers meant they found themselves, similar to their lancer brothers on the left flank, held up in debilitating rounds of hand-to-hand. 
The situation Turn 7 - the final phase of the battle.  The French Cuirassier had failed to break through and trapped in front of steady Prussian infantry, they were simultaneously charged in the flank by a fresh regiment of Prussian Dragoons and destroyed. This proved to be a decisive point as with that and the loss of a supporting battalion of infantry, the French counterattack in the centre failed.
Must be something in the water at Froschwiller as this battle inspired a number of  heroic and desperate cavalry charges. In this the Prussians were slightly luckier. The two regiments of Hussars charged through the now nearly empty centre of the French position - against one reduced French battery which they destroyed - and ended up doing a break-through charge against a second, which proved an entirely different proposition.
Instead of riding down the remaining French battery, the French artillerymen fought back with trailspikes and rammers, not only holding the Prussian hussars but inflicted casualties on them. Some of the remaining French infantry then charged them in the flank to make it an all-in brawl, eventually destroying one regiment of Prussian hussars.
On the extreme French right they had run out of reserves to feed into the Neiderwald and with only three battalions of Zouaves and Chasseurs remaining, Dom's Prussians started to clear the woods.
At Froschwiller Michael charged in his Prussian infantry, finally taking the vineyards and fatally reducing the reserve of Turkos, two battalions of which had moved up through the burning village under artillery fire to face a furious final assault.  
Doug had threwn everything forward in a last desperate attempt to break the Prussian attack but the second regiment of Prussian hussars and another of dragoons destroyed the remaining French guns and Doug's last infantry reserves in the centre.   Facing annihilation, the French in and around Froschwiller were eventually forced to withdraw.
At the same time Dom's Prussians were finally successful in driving the remaining French out of the Niederwald - although at a very high price.  At the end of Turn 8 the French had two small units of Chasseurs and one depleated battalion of Zouaves left in the woods - but it had cost at least four battalions of Prussians destroyed to take the woods.
The final scene, Froschwiller.  The Turkos are holding out to the last - covering the French withdrawal.  (Doug) MacMahon's command is under the tree at the top of the ridge in the middle.  Immediately in front of him is a victorious regiment of Prussian hussars and to his left, another battalion of Michael's infantry.  Time to call it a day.

Eight turns of action and the battle in the balance right up until the last.  After fighting this twice now and tweaking the scenario & rules etc for this, its remarkable how close the final result matched the historical one.  The introduction of cavalry to the scenario was a good touch.  Historically they didn't have much to do with the battle - the most significant part was the trapping of the French Cuirassier inside the town of Morsbronn to the left of the Niederwald, where some 700 were massacred within minutes by close range Prussian rifles - which does not exactly lend itself to our little scenario!  

Doug has masterfully condensed a huge battle directly involving two Prussian corps - the XI and the V - with the one and a bit French corps.  We couldn't quite match that number of figures but I think what we have managed to field worked well. At present we would have close to 500 pieces per side, which makes a Black Powder game of eight turns do-able.  Thanks go again to those who participated in our demo game in particular Dom (who helped test it out too) Mark and Michael.  

I think that just about does it for FPW posting on this blog for the time being.  While I still have dozens of figures to paint, we don't plan any more games until CanCon itself next year, by which time both our armies will be completed.  

Cheers,
            Doc

Tuesday, June 5, 2012

Black Powder Franco-Prussian War demo game

Having collected and painted like mad for months Doug and I are about to trial our Franco-Prussian War Black Powder game at our local WinterCon gaming convention.  But to do so we had to iron out the scenario adaption and how the rules best apply.  The emphasis is to include historical accuracy (Chassepot v Needlegun, Krupp's breach loading artillery v Mitrailleuse etc,) but without unduly disadvantaging either side - the advantages for one are hopefully cancelled out by those for the other.  Basically if you are French, shoot the crap out of the Germans as soon as they appear (let your Mitrailluese loose!); if you are Prussian use your rapid-fire artillery to soften them up then close with the Froggies as fast as you can and use your numbers - and your cold steel of course! Vorwarts meine Kinder!

The scenario is the battle of Froschwiller in Alsace, one of the decisive frontier battles right at the start of the war.  It pit's McMahon's 1st Corp of his Army of Alsace - considered the elite of the French army - against the Prussian V Corps of Crown Prince William's III Army. The town of Worth has fallen and the road through Froschwiller is open - unless the French can hold the Prussians off.  The road leads directly to McMahon's vital rail-head at Reichshofen.  The Prussians have to capture Froschwiller by 1700 hrs that day and destroy over twelve French battalions in order to gain a major victory.  The French have to hold the village until 1700 hrs and destroy up to 15 Prussian battalions in the process in order for them to claim a major victory.  Historically, the French missed a huge opportunity to defeat the Prussians as they came on piecemeal (at first) - it would have thrown the entire Prussian invasion schedule out of kilter and changed the course of the war - one of the great 'what-ifs' of the FPW - and so a great scenario to fight. We estimate the game will take about eight turns to complete.  In our first trial we go going late but managed six turns before calling it a day.


The setup at Turn 1 with McMahon's forces spread along the ridge with the Niederwald forest closest, Elasshausen in the middle and Froschwiller ta the other end - vineyards and open forest on the French left flank - a very good defensive position.

The town of Worth (in Prussian hands) is directly opposite Froschwiller (upper right of 1st photo).  The Prussians cross the Sauer river (fordable for infantry) and come on at Worth in Turn 1 and on the French right opposite the forest at Turn 2.


French defensive position along the ridge
French centre on the ridge in front of Elasshausen

The Prussian objective - Froschwiller village - note the Mitrailleuse on the left!

As Prussian commander I realised that the longer I was within range of the dreaded French Chassepot rifles before engaging the French the more damage they could do to me.  I honestly expected my first three or four units - the first wave of attack - to be wiped out but although they sustained some casualties, the larger Prussian formations (24 figures opposed to the French 18 figure battalions) proved very resilient.

 The Prussians emerge from Worth to begin the assault

Fortunately my dice rolling for my initial was good and I got my three first moves in which got me across the fields to just below the vineyards next to Froschwiller and changed formation from dense attack column to line.  Then the fun began.

The Prussian dispositions at end of Turn 1

The French opened up with everything including the fearful Mitrailleuse - at close range! As expected the lead Prussian units soon took heavy casualties.


But the Prussians were also lucky as after three shots the closest Mitrailleuse jammed and remained that way for several more rounds of shooting. Although they survived their initial break tests,even with superior unit size it was obvious that they couldn't sit there and shoot it out - they had to charge in with the cold steel!  The first Prussian battalion charged the lead French one holding the vineyard (which looks remarkably like a wheat field in the above photo!) for a desperate hand-to-hand a la bayonet! 


Turn 3: The French and Algerian Tirailleurs manage to hold off the Prussian hordes!

The far left of the French position was held by the Tirailleurs Algeriens - the famous Turkos - in the open woods next to the vineyards.  The French flank was not for turning either - it was straight up the guts to Froschwiller or nothing at all!


As the Prussian assault went in the Algerians were also faced with menacing Prussian Dragoons - the only cavalry unit on the table.  The Prussians tried a bold charge but steady French shooting halted them at the woods edge and forced them to retreat back to the start line at Worth.


The Prussian Dragoons about to launch a charge at the Turkos in the woods - are they bloody mad?

The French line comes under increasing pressure 

Meanwhile, on the Prussian left in front of the Neiderwald, Prussian deputy commander Dom launched his rapid attack columns right across the centre of the French position to try and drawn off French units from reinforcing Froschwiller.  In response the French launched themselves from the ridge at Elasshausen and from the Neiderwald right into the flank of the Prussian columns.

Prussian attack columns in front of the centre of the French position

The French counter-attack halts the Prussians in front of Elasshausen

The Prussian attack in the centre did increase pressure on the French line but didn't affect the fight at Froschwiller.  After heavy shooting fierce hand-to-hand brought the Prussian columns to a halt.  The French brigade on the other side of the Neiderwald could have made quite a difference but never budged much - the curse of the dice!  

At first the Prussians appeared successful in front of Froschwiller

Same happened to my supporting artillery which got onto the table at Worth and halted just outside of Chassepot range but failed to unlimber and immediately came under effective counter-battery fire - just could not roll the dice I needed to get them into action.  However, the assault on the vineyard was successful and two French units were destroyed or broke.  But then the Turkos, after successfully holding off the Prussians to their front and driving off the Dragoons, swung around and hit the Prussian line in the flank, also bringing that assault to a grinding halt. By the end of Turn 4 the battle appeared to be in the balance. 

Situation at end of Turn 4 with the second wave of Prussians beginning to come on.

The French got their second battery and Mitrailleuse into action.  Combined with the great shooting from a small unit of Chasseurs that managed to negotiate the traffic jam in the town, the victorious Prussians in the vineyard were first brought to a halt, then enfiladed with one working Mitrailleuse which finally destroyed them.  The alternating rounds of shooting and hand-to-hand also drove back the two supporting battalions and with half the leading Prussian brigade dead or in retreat, the other half halted by the outnumbered but courageous Turkos, a second brigade brought to a halt in front of the French guns at Elasshausen (in the centre of the French line), things suddenly looked decidedly dicey for the Prussians! 

The redoubtable Turkos hit the Prussians in the flank just as they appear to be overwhelming the French defence

The Turkos launched into the Prussian flank and for a minute there nearly brought the whole thing undone.  Because of their smaller unit size, the added factors for flank attack still didn't give them enough to break the Prussians.  They SHOULD have but if you don't roll high enough then...   After losing two rounds of combat and having two battalions in retreat, I managed to roll just enough to save a third.  At that point the Dragoons, which everyone seemed to have forgotten about, launched a furious charge into the back of the  Turkos who had originally driven them off - ca la guerre!  The valiant Turkos were cut down to a man by the vengeful Prussian cavalry.  Nonetheless the Turkos 1st battalion managed to out-shoot and out-bayonet one larger Prussian unit while at the same time being hit in the flank by another - but showed no signs of breaking themselves!

Situation at the end of Turn 6 - the end of the battle for us

At this point we'd run out of time and decided to call a halt to the proceedings.  Technically, it was a draw as the French lost considerably more than the attacking Prussians (six battalions to just one Prussian) but still held onto Froschwiller.  The Prussians would likely have cracked the French left had the game gone on and the avalanche of jack-boots in the centre would have been hard to contain BUT the French still had reserves in and behind the town, the vaunted Prussian artillery hardly got into action whereas the French and at least one Mitrailleuse had caused considerable damage so its very doubtful that Froschwiller would have fallen by 5 o'clock as required!  

What did I learn? Well, the Prussian attack was far too disjointed to be guaranteed success but on the plus side, those big battalions can absorb a lot of punishment!  I think that the rules (with some tweaking) played well and pretty much tracked what happened historically, which pleases the pedant in me.  A lot of work to do to be ready for WinterCon but I think it'll work well.  And most of all - it was FUN!

Note to self: MUST paint more Prussians (particularly casualty markers - we ran out!)

Cheers,
           Doc 

Saturday, April 30, 2011

FPW - progress with the Prussians

After all the frivolity of Blog Style Awards (the receiving and giving thereof) I got stuck into my Prussian Guard and Jaeger battalions and various command stands.  I now have 7 x 24 figure battalions, with at least another five of same to get a division's worth to enable a Black Powder game.  Just a small amount of painting & basing to get through!
The Prussian Guard on the march and under fire!

I know the BP boys are keen but while Doug and I can muster nearly two divisions of French between us, we have a shortage of Prussians - nobody seems to have any.  As I have the lead, I have to get painting - and I would like to have a FPW game myself this year!

Jaeger skirmish screen advances through smoke and French shelling outside Mars La Tour

With this in mind, once I finished the Guard & Jaeger I decided to get all the FPW figures I had out to see where I needed to go next.  Well, one thing lead to another AND as I had assembled my recently completed gaming table I decided to do a little reenactment - just 'cos I could!  Not a game mind, but with all my painted FPW on the table I couldn't resist. Having finished the Prussian 12th Cavalry Bde I decided to try and depict the Mars-La-Tour 'Tottenritt' (Death-ride).


French guns on a ridge to the north of Mars-La-Tour

The story of Mars-La-Tour started with the French army in a good defensive position around Gravolette to the north.  The Prussians were somewhat strung out in an attempted out flanking move further to the south.  Neither side knew precisely the position of the other.  The French furthest south were under Cranrobert just outside Mars-La-Tour village.  A better part of a Prussian corps were passing to the south of the French position, strung out in line of march but well within range of French guns set up on a low ridge a bit over two miles to the north.  Canrobert concentrated his artillery and plastered the Prussian infantry as they passed through and beyond the village.

Prussian command under fire at Mars-La-Tour face a dilemma - 
silence the French guns or risk getting caught on the march

So much of a nuisance was the French fire that it threatened to disrupt the Prussian flanking movement.  The ground between was undulating but open and the French guns were supported by infantry behind - any attempted attack by massed infantry would have resulted in even heavier casualties.

Jaeger skirmishers screening Mars-La-Tour come under increasing fire

The Prussians could only bring up a few guns which were no match for the massed French batteries and began to take heavy casualties.  Prussian troops passing through the village also came under increasingly accurate fire which threatened to disrupt the Prussian march.

Prussian counter-battery fire is ineffective (even with Krupps guns!)

The Prussian Corps commander decided to use his available cavalry to buy him some time, ordering the 12th Brigade consisting of the famous Magdeberg Kuirassiers, Uhlan (lancers) and Dragoon regiments, about 1800 men in all, to silence the French guns.  The Prussians must have known they were sacrificing their cavalry but were in desperate straights - if only Cranrobert had known how precarious the Prussian position was!  Had he attacked with his infantry, he would have hit the Prussians in their flank and likely have inflicted a decisive defeat...  but that never happened, instead it was the Prussians who attacked!

French command on ridge north of Mars-La-Tour (supporting infantry behind)

The Prussians reconnoitered and discovered a shallow fold in the undulating ground about 1,000 meters in front of the French position.  They used this to carefully assemble their cavalry out of sight of the French.

The Prussian cavalry assemble in hollow ground before the French position

The French were startled when the Prussians literally popped out of the ground less than a kilometer in front of them.  The Prussians approached at a brisk trot, shaking out into overlapping lines as they came on.  It took them less than two minutes to cover the distance to the guns on the ridge,  coming on so fast that the French could not depress their guns sufficiently to bring them to bear, most of the fire flying over the heads of the oncoming Prussians.

 Most of the French artillery fire passed over the heads of the rapidly advancing Prussians

As the Prussian cavalry approached the French their guns, firing over open sights, started to tear holes in the Prussian lines but the momentum of the cavalry, who increased their pace to a full charge, carried them on into the French position.

The Prussians shake out into overlapping lines as the French guns begin to find their mark 
- although most shells still sailed over the heads of the Prussians

So quick was the Prussian advance that it caught most of the French gun crews still serving their guns.  The French supporting infantry, although only a few hundred yards behind, were also caught unawares by the Prussian advance and were rattled by sudden appearance of hordes of Prussian cavalry and the destruction of the French guns in front of them.

 Prussians do great execution once among the French guns

Once through the gun line, the Prussians slammed into the startled French infantry who were unable to take advantage of the range of their Chassepot rifles (otherwise accurate up to 1800 meters in battlefield conditions!)  The rattled French were driven back.  


At this point the French Guard cavalry, who had ridden hard to intercept, should have taken the now disorganised Prussians in the flank, but further disaster struck.  In all the dust and smoke, the French infantry mistook the white and light blue tunics of the French for Prussians and after repeated attacks by the latter, were shooting at anything on a horse.  The French cavalry attack was disrupted by friendly fire, suffered considerable casualties and instead of driving home, were driven off by their Prussian counterparts.

French Lancers of the Guard were mistaken for Prussians at Mars La Tour

The end result of this Prussian "Death ride"  was that although suffering over 50% casualties with covering fire from the Prussian artillery, they were able to withdraw virtually unmolested and had not only succeeded in silencing the French artillery but precipitated the panicked withdrawal of Cranrobert's French infantry.  

The Prussians drive off the disorganised French counter-attack.  
Rattled French infantry behind the ridge start to withdraw and the surviving 
but exhausted Prussian cavalry are able to return to their lines unmolested.

Well, that was my painted FPW figures (so far) in action!  Nearly enough for a game I think - its frustrating not being able to game with them at present - but a lot of painting still required.  I've just finished another brigade command and and putting together a high command for the Prussians, similar to that done for the French (see earlier posts and the above photo of the French command at Mars-La-Tour).


Some of the above photos appear a little rough its because I had to use the low-light function on my Lumix.  I've actually tried to replicate the look and feel of old French lithographs I've seen of FPW battles in some shots.

My next post will likely be the Prussian High Command stand when I finish it.

Cheers,
           Doc