Saturday, April 30, 2011

FPW - progress with the Prussians

After all the frivolity of Blog Style Awards (the receiving and giving thereof) I got stuck into my Prussian Guard and Jaeger battalions and various command stands.  I now have 7 x 24 figure battalions, with at least another five of same to get a division's worth to enable a Black Powder game.  Just a small amount of painting & basing to get through!
The Prussian Guard on the march and under fire!

I know the BP boys are keen but while Doug and I can muster nearly two divisions of French between us, we have a shortage of Prussians - nobody seems to have any.  As I have the lead, I have to get painting - and I would like to have a FPW game myself this year!

Jaeger skirmish screen advances through smoke and French shelling outside Mars La Tour

With this in mind, once I finished the Guard & Jaeger I decided to get all the FPW figures I had out to see where I needed to go next.  Well, one thing lead to another AND as I had assembled my recently completed gaming table I decided to do a little reenactment - just 'cos I could!  Not a game mind, but with all my painted FPW on the table I couldn't resist. Having finished the Prussian 12th Cavalry Bde I decided to try and depict the Mars-La-Tour 'Tottenritt' (Death-ride).


French guns on a ridge to the north of Mars-La-Tour

The story of Mars-La-Tour started with the French army in a good defensive position around Gravolette to the north.  The Prussians were somewhat strung out in an attempted out flanking move further to the south.  Neither side knew precisely the position of the other.  The French furthest south were under Cranrobert just outside Mars-La-Tour village.  A better part of a Prussian corps were passing to the south of the French position, strung out in line of march but well within range of French guns set up on a low ridge a bit over two miles to the north.  Canrobert concentrated his artillery and plastered the Prussian infantry as they passed through and beyond the village.

Prussian command under fire at Mars-La-Tour face a dilemma - 
silence the French guns or risk getting caught on the march

So much of a nuisance was the French fire that it threatened to disrupt the Prussian flanking movement.  The ground between was undulating but open and the French guns were supported by infantry behind - any attempted attack by massed infantry would have resulted in even heavier casualties.

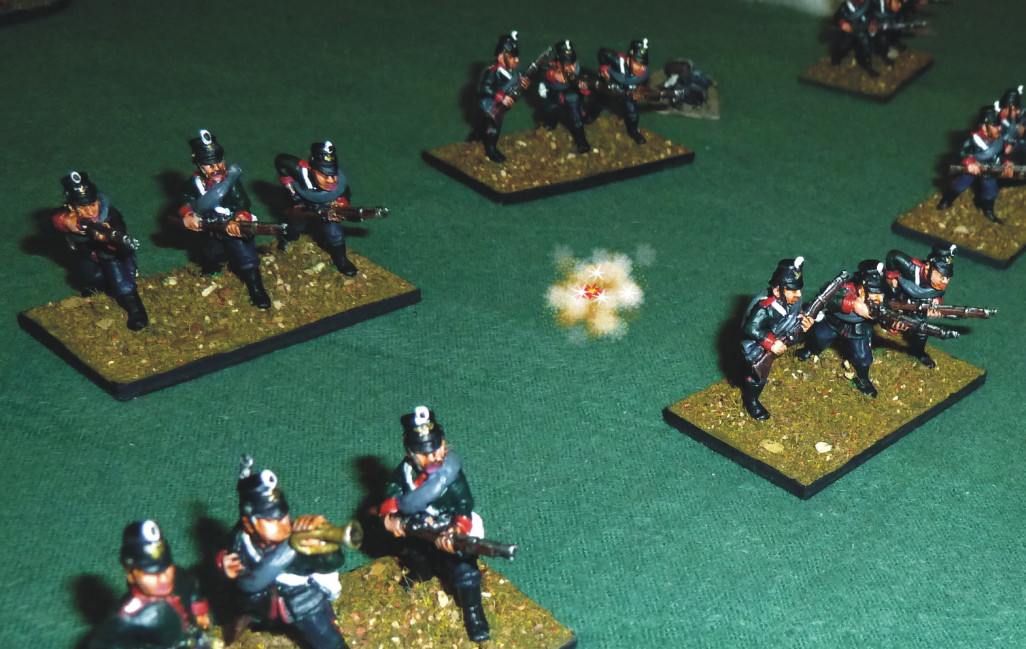
Jaeger skirmishers screening Mars-La-Tour come under increasing fire

The Prussians could only bring up a few guns which were no match for the massed French batteries and began to take heavy casualties.  Prussian troops passing through the village also came under increasingly accurate fire which threatened to disrupt the Prussian march.

Prussian counter-battery fire is ineffective (even with Krupps guns!)

The Prussian Corps commander decided to use his available cavalry to buy him some time, ordering the 12th Brigade consisting of the famous Magdeberg Kuirassiers, Uhlan (lancers) and Dragoon regiments, about 1800 men in all, to silence the French guns.  The Prussians must have known they were sacrificing their cavalry but were in desperate straights - if only Cranrobert had known how precarious the Prussian position was!  Had he attacked with his infantry, he would have hit the Prussians in their flank and likely have inflicted a decisive defeat...  but that never happened, instead it was the Prussians who attacked!

French command on ridge north of Mars-La-Tour (supporting infantry behind)

The Prussians reconnoitered and discovered a shallow fold in the undulating ground about 1,000 meters in front of the French position.  They used this to carefully assemble their cavalry out of sight of the French.

The Prussian cavalry assemble in hollow ground before the French position

The French were startled when the Prussians literally popped out of the ground less than a kilometer in front of them.  The Prussians approached at a brisk trot, shaking out into overlapping lines as they came on.  It took them less than two minutes to cover the distance to the guns on the ridge,  coming on so fast that the French could not depress their guns sufficiently to bring them to bear, most of the fire flying over the heads of the oncoming Prussians.

 Most of the French artillery fire passed over the heads of the rapidly advancing Prussians

As the Prussian cavalry approached the French their guns, firing over open sights, started to tear holes in the Prussian lines but the momentum of the cavalry, who increased their pace to a full charge, carried them on into the French position.

The Prussians shake out into overlapping lines as the French guns begin to find their mark 
- although most shells still sailed over the heads of the Prussians

So quick was the Prussian advance that it caught most of the French gun crews still serving their guns.  The French supporting infantry, although only a few hundred yards behind, were also caught unawares by the Prussian advance and were rattled by sudden appearance of hordes of Prussian cavalry and the destruction of the French guns in front of them.

 Prussians do great execution once among the French guns

Once through the gun line, the Prussians slammed into the startled French infantry who were unable to take advantage of the range of their Chassepot rifles (otherwise accurate up to 1800 meters in battlefield conditions!)  The rattled French were driven back.  


At this point the French Guard cavalry, who had ridden hard to intercept, should have taken the now disorganised Prussians in the flank, but further disaster struck.  In all the dust and smoke, the French infantry mistook the white and light blue tunics of the French for Prussians and after repeated attacks by the latter, were shooting at anything on a horse.  The French cavalry attack was disrupted by friendly fire, suffered considerable casualties and instead of driving home, were driven off by their Prussian counterparts.

French Lancers of the Guard were mistaken for Prussians at Mars La Tour

The end result of this Prussian "Death ride"  was that although suffering over 50% casualties with covering fire from the Prussian artillery, they were able to withdraw virtually unmolested and had not only succeeded in silencing the French artillery but precipitated the panicked withdrawal of Cranrobert's French infantry.  

The Prussians drive off the disorganised French counter-attack.  
Rattled French infantry behind the ridge start to withdraw and the surviving 
but exhausted Prussian cavalry are able to return to their lines unmolested.

Well, that was my painted FPW figures (so far) in action!  Nearly enough for a game I think - its frustrating not being able to game with them at present - but a lot of painting still required.  I've just finished another brigade command and and putting together a high command for the Prussians, similar to that done for the French (see earlier posts and the above photo of the French command at Mars-La-Tour).


Some of the above photos appear a little rough its because I had to use the low-light function on my Lumix.  I've actually tried to replicate the look and feel of old French lithographs I've seen of FPW battles in some shots.

My next post will likely be the Prussian High Command stand when I finish it.

Cheers,
           Doc

Tuesday, April 26, 2011

The 'Art of War' gets nominated for an 'award' and ANZAC Day 2011

I was quite chuffed to have been nominated for a blogging award the other day by the redoubtable Miles of 'Lair of the Uber Geek' - so a big 'thanks' to him (his latest post has some drool-worthy pics of his latest AWI game at his mate Ernie's wargames room - a gamer's sanctuary most of us can only dream about - lucky sod!)

As far as I can tell its a kind of chain-mail type of thing where you are nominated and in turn nominate others - which is quite OK as it is a form of peer recognition and shares the love!


Now the rules of this award are to:

        1.  A 'thank you' and link back to the nominating blog (done!)

        2.  Share seven things about yourself.

        3.  Nominate 10 or so other blogs you deem worthy of such an award (the chain-mail aspect)

        4.  Let them know of your nominating them for the award.

Hmmm...  seven things about me.  Now what can I tell the world that won't have me hunted down by Interpol or burned at the stake?  I'd better keep it simple - always follow the KISS principle - and make it about things not obvious from reading my blog!
  • (true confession time) I'm an avid AFL tragic.  For all non-Australians and rugby league supporters its our distinctly national code/form of football - and just the fastest, most exciting and most dazzlingly athletic form of footy on the planet.  It has similarities to Gaelic football and a national AFL team tours Ireland every year to play the Irish.
Taking a 'screamer' - mark - catching the ball aloft in AFL
  • I've both coached (schoolboys) and played (in my distant youth) other forms of football, particularly soccer and rugby (union) but AFL was always the one for me - and apologies to the schoolboy's Queenscliff/Point Lonsdale team for being such a crap centre back!
  • I'm a born and bred St. Kilda supporter - I remember the only flag (Grand Final) they ever won when I were but a young'un in 1966!  And the two lost GF's in the last two years - so I know all about pain and suffering!  
  • I have passed this sad affliction onto several of my children, the youngest of whom is not only the best Xbox AFL player in the country (really!) but also a very good 1st div U14 centre forward (did NOT inherit his skills from his old man) and even my beautiful daughter who was a national level gymnast and has the ambition to be betrothed to champion St Kilda centre Leigh Montagna (provided he stumps up the required dowry!)
My youngster (blue & white jersey) successfully 'roves' the ball from the centre bounce
  • Other non-football related revelations include just finishing (very late in life) my Masters at Uni. 'Terrorism, Safety and Security' for those who are interested (I can hear the snores already...)  Quite proud it took me two and a half years instead of the usual 4 - 5 while I also held down a full-time job and helped out officiating at my son's AFL games etc, etc AND retained my sanity (questionable) through my hobby of 'collecting and painting little men' (as my spouse derisively calls it) 
  • In my past I was a reasonably successful graphic designer and even got into the New York School of Art once upon-a-time, neither path pursued as a career option but rather channeled into my hobby some twenty or so years on!  Have also edited, art directed and published a wargaming rule set written by another ('Elan') which almost saw the end of me BUT am also a huge admirer of Battlegames' Henry Hyde who DID manage to be both a successful graphic designer and wargames mag publisher! This is what I'd really like to do - combine my hobby and skills in a job that would pay me to...   indulge in further fantasy!
  • Plan for my (early) retirement which is not too far away (and would involve a substantial lottery win) to enable me to get back into my fine art pursuits (painting and drawing), publishing and writing (or vice versa) and pay for furthering my indulgence in collecting and painting little men! (OK - the last not much of a revelation to followers of this blog but a feller can still dream can't he?)
On a different tack, I took my youngest Son and Heir to the War Memorial on ANZAC Day.  Although not sharing in my hobby enthusiasm he does have a genuine interest and enjoys his dad's amateur military historian  ramblings as a guided tour.  It is a superb museum and although there are some things I would like to see them do better (like promote and sell Australian model and figure manufacturers in the Memorial shop instead of all the irrelevant foreign rubbish they flog!) it is the best repository of our military history and can rightly boast of being one of the best museums of its kind in the world.


Some of the interactive multi-media exhibitions are truly mind-blowing including the G for George (above Lancaster bomber - air war over Europe), the WW1 air war on the Western Front (Peter Jackson's mini film with some stunning CGI from his Weta Studios) and the latest Battle of Kapyong (Korean War exhibition  - where you are also in a trench system on the 48th Parallel).  

Restored German Albatros fighter

Night attack, Kapyong (Korean War)

I heard one visitor remark that it was why he got into collecting and making models in the first place.  The model dioramas, particularly of the fighting in WW1, similarly inspired me at a young age.    


Light Horse charging Turkish trenches at Magrehba, Palestine

Bullecourt, winter 1916 (one of the earliest uses of tanks)

These are truly inspirational and but a small glimpse of what is on display.  Most of the WW1 dioramas were made in the 1920's from exact records and photos of the actual battlefields, much of which were still as they were at the time.  This and the restoration work done by the War Memorial itself is amazing.  While I have not tired to replicate any of the above in my hobby, I DID do a restoration job on a Turkish map taken from the Turk HQ at Bersheeba as a gift for my father and donated several others to the Memorial.  

One of my ancestors was with the Light Horse at that famous charge and helped himself to some 'memorabilia' in the Turk headquarters in Bersheeba after the battle.  Many years later I discovered them in an old trunk and got an Arab-speaking friend of mine to translate and work out where they depicted - only the entire Turkish positions in northern Palestine! They also had pencil drawn estimations of the Allied positions - pretty accurate too.  The maps were extremely good - much better than the Allied ones as they were done by German survey just before the war.  I'm sure my light-fingered ancestor gave the important ones to the intelligence boys at the time!

Well that's my indulgence for ANZAC Day 2011.  Now to finish off my FPW Prussian Guard and Jaeger and maybe catch a movie to fill in the end of the Easter break.

Cheers,
           Doc

Thursday, April 21, 2011

The Sikh Lancers

Well, after the latest Kokoda clash it was time to pay my dues (for my bodyweight in FPW Prussian lead!) by finishing the painting of the Sikh Wars Sikh cavalry for my lead-pimp Doug.  These are some early Perry sculpts for Foundry, or so I am reliably informed.  And lovely figures they are too.


They are still on their painting sticks as Doug prefers to base them - he has his own 'Punjab' mix of flocking ( a very desert-y looking mix with flecks of green) so he can flocking-well do it himself!  Besides, saves me another job, right?


I got some very good brass lances from the lance-guy (Dean @ Olympian Games) - just like the real thing and sharp too.  Got jabbed numerous times - aggressive little buggers those Sikhs!  I tried to replicate the unusual lance pennants which are basically four different coloured flat ribbons tied on the end. - sort of turned out alright but not 100% accurate in my opinion.

These are still very nice figures although they appear in only two basic poses - lances upright or couched.  Probably prefer the latter - but that might only be because the others kept on stabbing me!


One of my favourites is the trumpeter - must have been a bugger of a job blowing 'is horn with all that luxuriant facial hair!


The lancers from the rear - AFTER they've ridden over and jabbed you.  Very British style uniforms must have saved the Commissary a few bob when they eventually joined Her Majesty's Imperial force after they were defeated!


Just a few more Ghorchurras (irregular cavalry) to paint up and then get stuck into the Prussians again before the next Kokoda battle.  Have also managed to put together another gaming table out of old doors - 2.75 x 1.67 meter board that fits nicely on the old table-tennis table but can be readily broken down and packed away.  Have to see if I can fit it in the old lounge room (much to the horror of She-Who-Must-Be-Obeyed!)  If all goes well, a few games at home may be on the cards.

Cheers,
           Doc

Wednesday, April 13, 2011

Man long Yapan ekum - PIB's attempted ambush at Pitoki

The withdrawal from Kokoda didn’t quite turn into a rout but the battered survivors needed time to re-group, reinforce and rest at Deniki before the next major encounter with the Japs.  Part of the plan was to try and ambush the Japs at the village of Pitoki, about halfway along the track between Kokoda and Deniki.  The job fell to a platoon of Papuan Infantry Battalion (PIB) supported by a 39th Battalion section with a Lewis gun.  My humble command was split between Ian and myself (four 8-man sections each commanded by an Australian NCO with an automatic weapon) with Doug commanding the Australian Lewis-gun section located in the village. 

Japs cross the creek into the jungle below Pitoki

The big surprise we had for the Japs at Pitoki was the air cover - although Cameron and Greg probably guessed it was something like that as they spent most of the time avoiding any open ground in their approach to the village.  Ian, Doug and I spent the first three moves watching the Japs advancing stealthily through the jungle mainly either side of the creek that ran past the native village.  We had to nominate which move the air cover came on - Turn 5 - which was (I think) only one turn after we opened fire, revealing our positions.  Given we had been hammered every time we had done so previously, the Allies were determined to avoid another possible pasting until the last possible moment - and hand one out to the Japs for a change!

 Jungle ambush - PIB squad prepare to meet the advancing Japs

Ian very gallantly let me position one of his Papuan squads on an isolated finger of jungle on the far left, to try and hit the Japs as they massed before crossing the creek.  It was a calculated risk of course - revealing our position not just to inflict casualties on the Japanese (which they did) but to hopefully lure them out into the open to attack us in time for the air support!  Didn't work out that way of course.  Japs stayed in the jungle and actually flushed US out into the open!  


The poor old PIB gallantly inflicted a few more casualties with their attempt to 'shoot 'n scoot' but were forced to retreat onto the open ground in front of the native gardens to escape the advancing Japanese.


Despite the covering fire from Ian's 2nd PIB squad concealed in the gardens, the first squad were cut down to a man before they could regain cover.


 The 2nd squad of PIB well hidden in the native gardens

It was supposed to be an ambush designed to slow the Japs down and give them a bloody nose, but it had gotten off to a shaky start.  Mercifully for the Allies things didn't go entirely the Jap's way with the arrival of the P39 Aircobra on Turn 5.

The Aircobra's first bombing run

We soon discovered just how difficult it was to acquire targets from the air when they're hiding in dense jungle!  Amazingly the Aircobra pilot spotted movement - a hapless Jap sniper on the edge of the jungle and let loose his 500 pdr bomb.  It was deemed to have buried itself in the soft earth and killed a few trees.  An ignominious start for our much-vaunted air cover!

Strafed!  A Jap HMG & crew cop a pasting!

A second pass proved more successful with more target acquisitions and more hits - the Aircobra's four 30 Cals taking out most of a Jap machine-gun crew.  But it was our final strafing run that proved the most effective.  The Japanese had dug in their mortars and were pasting our Australian Lewis gun squad (supposedly) hidden in the village.  After wiping out the pursuing Japs (who had cut down the fleeing PIB) with some of the best shooting of the day, Ian then took further honours and rolled for the last Aircobra run and KA-BOOM! - a 500 pdr right down the Japs throat!  The bomb hit inside the emplacement and wiped the crew (the tube was deemed to have survived - what a load of it!)  Needless to say, this gave great heart to the Allies who had once more found themselves hard-pressed by the Japanese.

Aircobra scores a direct hit on the Jap mortar pit

On the other side of the creek in the approaches to the village, the Japanese had used the jungle to get virtually on top of the concealed Australian positions.  My other PIB section was divided into two squads, one hidden in front of the village and the other along the creek.  The one next to the creek allowed the Jap scouts to pass through then opened up on the main body as it came up but fatally for them - it was too early!  Half the squad cut down the scouts and the other half - including the Thompson-armed Australian NCO - managed to get a few more with the main body but in doing so exposed himself and was taken out in turn by a Jap sniper.  This proved disastrous as with the death of their NCO, the fragile PIB morale broke and they ran.

The Japs approach Pitoki with caution

The PIB entrenched in their 'scrapes' in a patch of jungle before Pitoki
Behind them the Australian militia squad is getting plastered with Jap mortar fire.

The other PIB squad was made of sterner stuff (their Aussie NCO remained alive!) and they opened up on the approaching Japs, taking out a few more including the blasted sniper and a forward observer who had been bringing down a rain of mortar fire on the village.  That was the last of the successes for the Allies who decided NOT to get caught again and started to withdraw.

Survivors of the Aussie militia section with their precious Lewis gun start to pull out 
with the surviving PIB squad covering the withdrawal

The Australians were the first to pull out - after callously allowing the Jap's to concentrate their fire on the running Papuans (they could have attempted to rally them into the shelter of the village) - then followed in turn by the surviving PIB squad.  Ian's remaining squad had withdrawn the previous turn and suddenly appearing where they had been was another section of Japs, one of two that had circled around behind us!   The Australians would have been cut off but for the Papuans of the PIB who with their Australian officer, led the Australians into the jungle to escape the encircling Japanese.  Its going to be a very long walk to Deniki!

The surviving Allies at Pitoki head for the jungle, the Papuan guides faithfully saving them from the rapidly closing Japanese - just as more Jap mortar fire starts to rain down behind!

Well, the ambush proved a little harder to execute than the Allies planned. From the Jap perspective they had gained their objective - the village - with some losses (only slightly more than our own) but we hope the sacrifice of the PIB has brought some time for the main force at Deniki to prepare for the next Japanese onslaught!

The jungle fighting is extremely difficult to replicate on the table - I screwed up the timing of the ambush on one side of Pitoki as I allowed the scouts through but should have allowed the main body too before opening fire - and revealing my position.  The fragile morale of the PIB depends on their Australian officers and NCOs - once they are killed the poor old Papuans tend to rout - which is exactly what happened to my squad.  To ambush successfully it would appear that in the jungle you have to literally cut the enemy down at point blank range but I confess that I haven't got a handle on just how this is supposed to work with Disposable Heroes.  The strafing from the air was much more straight forward and a lot of fun - it saved whatever of our bacon was saved at Pitoki and caused at least half of the Jap casualties including a mortar, HMG and crews.


A nice bit of Photoshop-ing from Greg Blake showing what the Allies would have liked to have seen
 happen to the Japs with an Aircobra strafing run (using the nose cannon too!)

Another great game and once more thanks to Andrew (who designed and adjudicates our game) Ian for some great work on the Allied left, Doug our genial host and Cameron and Greg our inscrutable foes who once again proved formidable opponents on the table!

Next game - Deniki, last stop before the apocalyptic clash at Isureva which nearly decided the whole campaign.  Stay tuned folks!

Cheers,
          Doc 

Sunday, April 10, 2011

Kokoda: Airpower!

As the shattered survivors of the 39th retreat back up the Kokoda track, we have a little surprise for our Japanese friends.

Basically the Allies made pretty good use of air cover for ground support, whereas from what I've read of the campaign, the Japanese generally didn't.  A big mistake for them as the Jap planes like the Zero were superior to most of the Allied planes available at the time.


Flying out of Port Moresby was the US Army's 8th Pursuit Group which initially consisted of about 26 P39 Bell Aircobras (out of over 40 originally sent - there were a lot of accidents!)  These planes were no good for dogfighting above 10,000 feet - completely outclassed by the faster and more maneuverable Zeros - but they packed a huge wallop in armament AND were hard to shoot down as they were armoured!  They had 4 x 30 Cals in the wings, 2 x 50 Cals mounted above the nose and in the nose a 37mm cannon!  They made a great ground attack aircraft that could also readily defend themselves at lower altitude.


They had a very short range which they extended with a drop tank but lost the tank when carrying a 500 lb bomb!  Must have been very vulnerable trundling over the Owen Stanleys with a full load of fuel etc - you have to get up to nearly 20,000 feet just to avoid flying into the mountains in Papua!  But the Japanese were too far away in Rabaul to intercept as a result the Aircobras really got stuck into the Japs on the ground on the northern Papuan coast and foothills around Kokoda. There were a few Aircobra aces too - they could readily take care of themselves at lower altitudes.

I found an old 1/72nd scale Airfix model I made as a teenager that required a bit of repair - part of the tail-plane comes from a model French Dewotine fighter - and new paint (I had to hand paint all the decals - the old ones were disintegrating with age!) to make it one of the 8th FPG out of Moresby.  Also made up a stand & its now ready for the next phase of our Kokoda campaign!

The last thing the Japanese will see as it comes skimming over the jungle top guns blazing!

The next post will be of the next phase of the Kokoda battle - ambush at Deniki. Stay tuned for more Kokoda action!

Cheers,
            Doc

Tuesday, April 5, 2011

Sikh Wars Interlude

While we work out our next clash on the Kokoda trail, I had to do a few 'jobs' that were required for my bodyweight in FPW Prussian & French lead.  Suffice to say I have two enormous (well, by my standards anyway) armies 14 battalions (@24 & 18 figures each!)  artillery batteries and 3-4 cavalry regiments plus commands.  Thats a lifetime's worth of painting of course and I will be concentrating on the Prussians first. BUT - there is a price to be paid for such frivolity.  The painting of  (my lead pimp) Doug's small mountain of Sikh cavalry.  I must confess, if it were not for the threat of divorce and financial ruin, I would seriously consider collecting Sikh Wars/Indian Mutiny figures (I seem to have painted an army's worth as it is!)  They are lovely figures too - all Foundry and some of the earliest of the Perry brother's handiwork (when Foundry was their day-job).  Michael has a real love of the period, even illustrating Ian Heath's Osprey on the subject (The Sikh Army 1799 - 1849) - my painting reference for most of these figures.

Sikh Cuirassier Jamadar (General) - my first and favourite of the Foundry figures.

Should have put more gold braid detail on the saddle cover - but I had too many more to paint!

The Sikh cavalry were as formidable as their infantry and the Sikh army, known as the Khalsa,  very nearly inflicted defeat on the British - after one such Pyhrric victory the Viceroy of India, Lord Dalhousie remarked: "A few more such victories will loose us the Empire!" Didn't help that the British general, Gough, was also an idiot.  His use of 'Tipperary tactics' - frontal charge with bayonet - cost the British thousands of casualties.  The Sikhs, as well as good infantry and well-armed, mad cavalry, possessed quite a large number of guns.  Sikh gunners were describes as 'huge' - most six foot or over, well drilled and utterly fearless.  As well as not having to face them, I am relieved to say the job for Doug did not entail painting dozens of Sikh guns and crews!

Perry-designed (?) Sikh cuirassier finished - & Doug can do his own basing!
And the trumpeter. As per European fashion: sans cuiras

Prominent amongst the cavalry arm were various types of irregulars.  The British found them to be very tough customers and often better armed than they were.  Like many Sikhs utterly fearless but as cavalry, virtually uncontrollable on the battlefield.  Bit too charge-happy to be really useful - fortunately for the better-disciplined Brits.  The next lot are Ghorchurras - armed with a medieval mix of armour, chain-mail, wickedly sharp scimitars, a variety of knives and even reflex-bows (powerful enough to punch through armour) and pistols or muskets.  The guys I've painted here are jamadars or commanders but I've got another bunch of irregular cav to go as well (he does extract his pound or two of flesh does our Doug ;-0 )

Yes folks, that IS a Rohan shield (with a few obligatory sword notches in it)
Other side, Ghorchurra commander

Another of the Sikh wildmen: a Ghorchurra Khas sowar (unit commander/NCO)

Not to be outdone for the period were (of course) the British.  The following is a British cavalry commander - could be a general or could be an officer (very Hodson's Horse-like; a young Hodson himself perhaps?)  Nice figure - not Foundry, as far as I can tell.


Last by certainly not the least (over a dozen more lancer types and more irregs to paint up!) are the Sikh Dragoons.  There were a number of Sikh cavalry units that copied the British and were organised and drilled in the classic European way.  There were a number of Europeans who fought for the Sikhs and organised these units.  One French Napoleonic veteran, General Jean-Francois Allard, not only commanded a Sikh army but sourced and brought over the carabinier-type cuirasses to equip the Sikh heavy cavalry (pics at top of blog).  But these are not they.  These are the dragoons m'Lord - nasty beggars that ride away then turn around and shoot you - very unsporting eh what?

Foundry figures again - very nice too.
And their jamadar - similar uniforms to the Brits but black leather webbing to go with a snazzy red turban!

Well that's it for the Sikh Wars cavalry for now.  I have a few more to do including the famous lancers but they will have to wait (sorry Doug!) as we have to try and avoid defeat on the Kokoda track - likely my next post but hopefully not weeks away this time round!

Remember to click on the pics for enlargement and leave a comment if you want.

Cheers,
           Doc