Thursday, December 23, 2010

A Christmas Message from your Dogs of War boys...


Seasons greetings, Merry Christmas, and another inspirational New Year to all the wargaming, figure painting and collecting fraternity in the blogosphere from Doc's 'Art of War'.

Monday, December 13, 2010

The battle of East Kokoda, part 2

The battle commenced with a crescendo of mortar and mountain gun fire.  The eerie half light thrown off the mist by the star shells showed the fleeting ghostly outlines of the first waves of Japanese troops coming on - fast!
 The mist shrouded village comes under fire.

Templeton's men opened up first.  A D1 to acquire meant a 10% chance and Doug rolled well for his forward sections but less so for the Vickers which tried repeatedly to find targets.  Every allied volley was responded to with a hail of mortar and gun fire.  The Japs soon zeroed in on the Vickers and the mortar.

Templeton's men come under increasing mortar fire - the green marker indicates the mortar has been activated to fire.
In the distance at the end of a clump of jungle is the redoubtable Hajimoto-san, sniper extraordinaire.

Captain Bistrap's D Company consisting of 16th & 17th platoons (each of three 9-man sections, each with a Lewis LMG)  covered the Administration buildings at the end of the airstrip.  The Japanese were massed in a wide arc covering the end of the plateau and came on to our front and left flank. 
 
In order to shoot the Japs they had to be within 12" - but of course at that range, they can also see you!   Their natural inclination during the first half of the battle was to close in fast and attempt to overrun the position.  Which gave the defenders only one chance to cut them down before they got in amongst our foxholes.  Mercifully, Bistrap's leading platoon performed admirably and cut down two sections at close range.  But once their positions were revealed by firing, between the waves of advancing Japanese they were pounded by mortars, artillery and HMG fire and began to sustain heavy casualties almost immediately.

 The Japs close in on Bistrap again.  Note the Jap NCO on the edge of the Admin hut - 
the lone survivor of the 1st Banzai charge that came perilously close to getting into the position.

The Japs were now hitting us on three sides, having worked their way around in the jungle opposite the airstrip. Along with the infantry they infiltrated three snipers that began to cause casualties between the infantry assaults, picking out the officers and NCOs.  They proved to be devastatingly effective, taking out each of the Australian officers in turn.  The first to go was Bistrap.  Nice and safe in his foxhole under the Admin hut, he was forced to make a dash to his forward section to rally them after they began to panic under heavy fire (and casualties).  His 9" movement bought him agonizingly just short of the neighbouring foxhole. Here Greg and Ian rolled a D1 and BANG! - poor old Bidstrap gets it in the back.

This was the start of the disaster that was to roll over the Australian defences. 

 Bistrap's forward defence line - note the mortars observation team in the elevated hut - it didn't help as they couldn't see a thing!  Cut off by the flow of the battle they are now missing presumed dead.

Meanwhile B Company under Templeton (Doug) were coming under increasing pressure with Banzai attacks that made it right up to the edge of his position.  Together with the incessant Japanese fire, Templeton was called on to remove the suppression time and again.  Worse was to follow as the Vickers HMG - so effective in the Oivi battle - failed to acquire any significant targets before being zeroed by the Jap mortars and then taken out.
 The waves of Japs were getting closer all the time.  The lone survivor of an attack - the next overran the position
(Photo courtesy of Greg Blake)

Ian's Japs now also closed in on Bistrap's now leaderless company (or what was left of it).  Somehow they acquired the target no less than four times and wiped out two Jap sections - but there were three times that number coming at them!  A third Jap section charged home and a vicious hand-to-hand ensued for the Admin hut with the remainder of the Australians holding it wiped out.

With the Japs holding the hut, the remaining section poured fire into it to wipe them out in turn (save for one crazed sword-wielding survivor).  

Doug (Templeton) beat off another charge on his position in front of the village also at heavy cost.  At this point disaster struck again for the Australians.  His position repeatedly lit up by star shells, the gallant Templeton repeatedly exposed himself to enemy fire to rally his exhausted men only to fall victim to the same sniper that killed Bistrap. The redoubtable 'Hajimoto-san' had struck again.
Hajimoto strikes again!
(Photo courtesy of Greg Blake)
The attacks on the leading positions came in waves, interspersed with increasingly accurate fire of all kinds.  Jap commander Ian cleverly changed tactics, instead of charging in yet another section, got within the 12" and then used his numbers to win the fire-fight - outnumbering the opposing Australians more than three to one, the Japs were able to absorb their losses while at the same time pouring fire into the Aussie position.  The last remaining section of Bistrap's forward platoon were wiped out.

The final Japanese assault overruns the Australian positions on the edge of the plateau.
The last series of turns effectively involved trying to disengage from the Japanese and effect a withdrawal but saw vicious hand-to-hand fighting in which most of the surviving Australian units were caught in the Jap pincer movement and destroyed. 
 Ian's Japs close across the airstrip, trapping the survivors of Bistrap's D Company.  The survivors of B Company including the attached HQ Support section are cut down by Greg's victorious Japs as they try to withdraw through the village.

After Templeton was shot, Major Watson had bravely left his shaky Papuans - earlier they had attempted to winkle out the Jap snipers across the airstrip but it ended in failure, with the section being shot down or fleeing after their NCO was killed.  Watson got into the hut at the end of the village and successfully rallied Templeton's men for the last time.  At this point he ordered a withdrawal but this was ignored by the surviving militia NCO (clearly out of his mind eh Doug? ;-)  The Japanese charged in yet again and further hand-to-hand saw most of the surviving members of B Company wiped out.  The brave Major shot two with his faithful Webley hand-cannon but was himself shot down as he left the hut to rejoin his Papuans and the surviving Australians.  The position well-lit by shells, sniper Hajimoto-san had no trouble dispatching his third officer! BANZAI!!!

The survivors withdraw - less than three sections out of two & a half companies. The yellow counter on the roof of the hut yet another of those @#$% star shells!

Some of the 39th HQ Support attached joined up with the remaining two Papuan sections.  Some, like the observer team, were cut off and  although not killed in the final round, nonetheless are missing, presumed dead.  The final butcher's bill was over 100 Japanese (similar losses to the Oivi battle) but over 50 Australians and Papuans including most grievously, irreplaceable heavy weapons like the Vickers and all LMGs save one.

So ended the battle for East Kokoda, the battle for West Kokoda, the airstrip itself, promises to be even more challenging especially in the face of the Australians heavy losses - fully half of the 39th Battalion - virtually the only troops between the Japanese and Port Moresby!

Another brilliant scenario from Andrew - one of the most challenging I've ever played - aided by the expert handling of the Japanese forces by Greg and Ian.  A thoroughly enjoyable afternoon - pity we have to wait until next year to complete the first Battle for Kokoda!

Cheers,
          Doc
Had to add one last 'shot' of Hajimoto, deadly sniper!
(Photo courtesy of Greg Blake, tinkered with by me!)

Saturday, December 11, 2010

The battle of East Kokoda, part 1

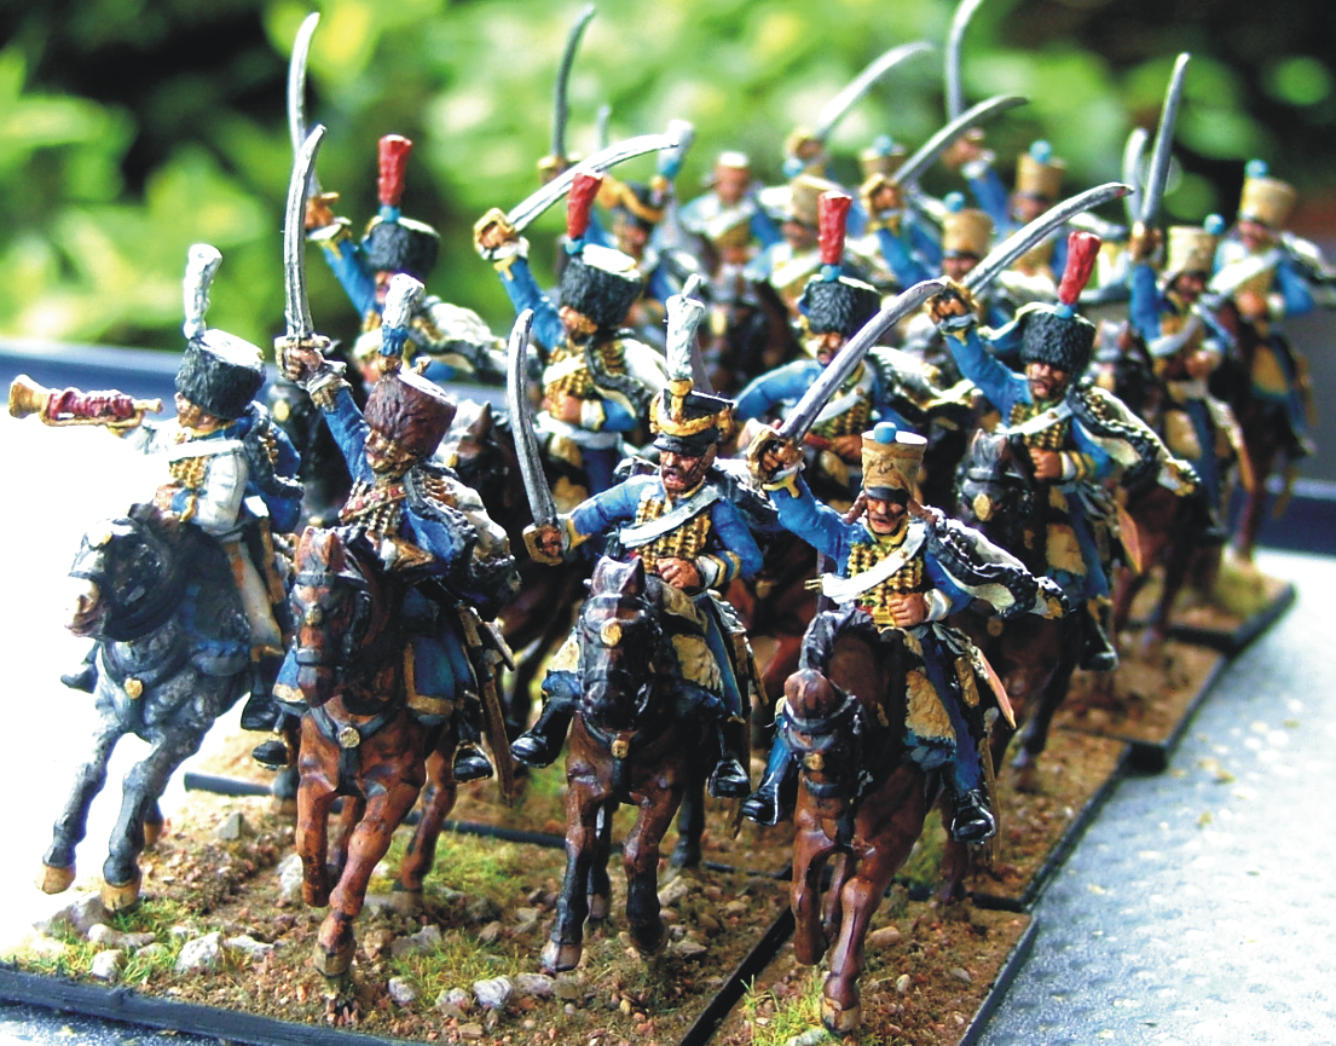
 Jap standard bearer 144th Regt of the Nankai Shitai & local commander, Lt Col Yokoyama 
(Photo courtesy of Greg Blake)

The battle started slowly.  We knew the Japs were there because of the incessant bombardment that went on all night.  In the dark the Japanese started to assemble around 1500 hours in the light jungle to the north of the Australian positions.  A heavy mist rolled in, further reducing visibility for the tired defenders.

 The Japs of the Nankai Shitai amass over the other side of the river. 
(Photo courtesy Greg Blake)

The Australian forces were actually pulled out by Bde commander Lt Col Owen who, realizing his mistake rushed them back to the airfield in the nick of time.  Consisting of D, B & E Coys, 39th Btn ('D' under Capt. Bistrap comprised of two platoons each of three sections of nine) they barely had time to dig in around the Administration buildings on the northern edge of the airstrip and on the plateau on the other side of the creek next to the native village. Each section is equipped with an antiquated Lewis light machine-gun (WWI vintage) and Stens with the occasional Thompson SMG for the NCOs.

 39th Btn Australian militia 
(photo courtesy of Greg Blake)

After the disastrous ambushed patrol previously (an entire section and LMG were lost), the Australians are on edge, realising that a large force of Japanese, at least a company and possibly battalion strength, is rapidly heading their way.

Behind them, facing the airstrip and dug in along the edge of the plateau is the remainder of the Papuan Battalion under Major Watson and Australian NCOs.  After battle casualties and desertions it consists of three small sections, one equipped with a Lewis LMG.  'Man long Yapan ekom' they mutter to each other in trepidation - most of their 'wontoks' and kin in the village have long fled into the jungle.  Many of the PB have since joined them.  The Australians, many former police or government administrators have to work hard with their native constables to keep the terrified remainder together.

 Major Watson's Papuan Battalion 
(photo courtesy of Greg Blake)

Attached to the Australian defenders to give them a little clout is the 39th Headquarters Coy HMG support section consisting of a Vickers HMG and a mortar (1 x tube plus observer team).

39th HQ Support - Vickers & mortar - Maj Watson & his Papuans in the background 
(photo courtesy of Greg Blake)

On the other side of the creek along the edge of the plateau facing north are Templeton's B Company consisting of three platoons, one understrength from the clash at Oivi just a day or two before: they have the only Bren and three Lewis guns.  Thinking (correctly) that the main Jap attack will come right at them, they have the HQ heavy weapons support behind them.  

Shrouded in a heavy mist, the Australian forward defences at Kokoda 
(the yellow marker is the first of the incessant Japanese star shells that were used to light up the Aussie positions)

Jap 3" mortar and 70mm Mountain guns of the type that kept the defenders awake all night! 
(Photo courtesy of Greg Blake)
The Japanese were the veterans of the South Seas Detachment - the Nankai Shitai - mainly the 1st Btn, 144th Regiment consisting of three full strength companies, each of  four platoons and with their own HMG.  The 3rd Coy also have knee mortars.  Attached also was the 15th Independent Engineers (3 x rifle platoons) So, at least four companies with artillery support coming right at us in the dark out of the mist and jungle. Terrifying not just for the native Papuan troops but for tired and inexperienced young Aussie militia too! 

The 1st Coy of the 1st Btn, 144th amass to the north directly in front of Templeton's position
- the Aussies can hear something, but can't see them. 
(Photo courtesy of Greg Blake)


The Japs, hidden by the mist, close in on the Australian positions from the north

Soon the Australian positions on the northern edge of the plateau and at the end of the airstrip (part of Bistrap's platoon) were coming under increasingly accurate mortar and artillery fire.  The Aussies night vision was not helped by the incessant star shells which did help the Japs zero in on the Australian positions every time we opened fire.

Note the red 'suppressed' marker on the Aussie position - 
this became a constant problem with the continuous Jap mortar, gun and HMG fire 
(photo courtesy of Greg Blake - made 'misty' by me!)

The defenders faced rapidly mounting problems, not the least of which was the only 10% chance of acquiring a target firing into the dark and mist (only on the roll of a 1 on a D10).  This only got better for the Japanese as the game went on and the Australian positions, revealed by our firing, became continually lit up by b%*#$y star shells! 

From L - R: Andrew, Doug & myself: 
Andrew cunningly hiding in the jungle with his command while Doug and I try to figure out 
(unsuccessfully as it turned out) how we can actually get to shoot the buggers
(Photo courtesy of Greg Blake)

So that sets the scene for the battle:  the Japs have bombarded all night and are now getting their attack under way.  We know they're there - but we can't see'em!  Every time we shoot it attracts increasing volumes of fire of all sorts from the hidden Japanese.  

Diabolical scenario Andrew! 

Our opponents Greg and Ian who replaced Cameron for this round are veteran WWII gamers and know how to use all the tools in their well-equipped toolbox - particularly artillery, mortars and... snipers!   How they did so will be revealed in Battle of East Kokoda Part II!

All the figures and the scenery are Andrews' - take a look at the native huts he put together from cardboard and kebab skewers only a day or two before the game!  Amazing!  Being a former Papua resident I can attest to their accuracy: dispela man emi gut bikpela 'skills' - emi makim haus lon Papua tru!

I also have to thank the Jap commander Greg for sending me some of his marvelous photos to use.  I'm particularly impressed with the close-ups which put my old Fuji digital workhorse to shame (and a pending trip to the photographic equivalent of the knackers yard!)  

Hope you all enjoyed it - more on Kokoda in a few days.

Cheers,
          Doc

Sunday, December 5, 2010

5th Hussars

Finally after no posts for almost a month, I finished the Perry's French hussars I started back in June. It has been quite a task even after finishing uni - work has been very busy and a few health issues and, well...  just not as speedy as I once was.  Old age is a bugger and at times its hard to get enthused. But Perry's are beautiful figures and as I've got boxes of 'em, I had to finish what I started.  So here are the results.  I've done them up as the 5th Regiment about 1809.  Probably should have done the shakos in black waterproof coverings, but that's something I can always change later, it is bothers me too much.


You can see the command stand I did earlier and the elite squadron behind them, also in kolpacks.  There are four squadrons each of four figures - roughly 1:30 figure ratio.  I have enough spares to add two figures per squadron if I want to expand the unit.

The regiment by squadron - turn to pages 4 & 5 of your Ospreys boys and girls (that's 'Napoleon's Hussars' by Emir Bukhari) - it can represent the colonne par divisions or serre' where the companies are expanded into a single line.

Oh what the heck, bugger the formation - just chaaaarge!!! 
 
The command.
The command (1st) and elite squadrons

Detail - Elite squadron
 
Elite Squadron - back detail.

Detail 2nd Squadron.  The one without his shako is a Victrix head with Perry's cadinettes!
 
 The 5th Hussars - back detail

That's the lot for Napoleonics for a while - too many other projects.  Must try and arrange a game or two with them but for the moment I've just finished the second Kokoda battle - or rather East Kokoda - the West portion will have to be early next year.  When I sort the photos and get Andrew's write-up(?) I'll post on it,  meanwhile, enjoy the hussars. Don't forget to click on the pics for enlargement and feel free to leave a comment.

Cheers,
             Doc