Showing posts with label Thirty Years War. Show all posts

Sunday, December 4, 2016

First game of our BA2 Greece Campaign and going for Baroque at the Club!

Mate Ian at the club last Wednesday chided me for yet again neglecting my blog and not posting for weeks - and clearly spending way too much time on #@$%ing Facebook. Guilty Yer Honour! To make amends I'm posting on not one but TWO games I had recently.  The first was my introduction to Bolt Action Ver 2 - which rules we tested out at 3D6 in Tuggeranong. Now I always give a decent establishment a plug as well, hence the link and this one to their nicely done pub next door, the Loaded Dice which has a decent bar and hot food reasonably priced mere steps away from your gaming table (food delivered while-u-throw dice!)

The first game was several weeks ago and featured by LV33 tankettes uncharacteristically successful and my Bersaglieri getting into all sorts of trouble in town. No matter as the purpose was to get use to the new revised version of BA - which is a quantum improvement over the first IMO.

The stirring sight of Italian LV33s coming to the rescue of the DAK. Hilarious!
 A rather good table with my very own 12' desert battle mat made from a canvas drop cloth from Bunnings (all of $24 - the rubber backed ones are $36 but better mats).  The second game of BA2 also went well as the first of our Greece Campaign series. In this as Italian commander I am taking a rather un-historical tack by successfully invading Greece from Albania along the coastal route.  It is a surprise move so the poor old Greeks are heavily outnumbered by Italian armour, mobile troops, artillery support and even air cover.  My opponent Mark put up a game fight (note to any Italian generals: avoid hand-to-hand with Greeks!) but pounded by a preliminary artillery bombardment (which also heralded my rolling of more boxcar D6 for any game in living memory!) which absolutely hammered the Greeks who had no defences other than a solitary bunker with an AT gun in it - an almost impossible nut to crack as it turned out.
The Greeks were outnumbered 3 to 1 and faced a horde of tanks supported by mobile infantry: the lead truck is stopped by taking a few hits - the Bersaglieri section dismount and advance across open ground at the Greeks hiding amongst the grapevines. They were reduced to half strength but kept on going - not bad for Italians!
The Regia Aeronautica also enjoyed uncharacteristic success being called in by the FOO and taking out the Greeks only artillery ordnance (a WWI vintage Austrian howitzer) virtually before it could fire a shot. The explosion marker on the other side of the grape vines marks another hit on the Greeks only HMG - which otherwise should have done great execution on the Bersa out in the open.
  Even the Italian tanks performed well... mostly. One copped several hits from the AT gun in the bunker and refused to go anywhere but the other two used their plentiful MGs to hose the Greek infantry among the grapevines.

Mark's Greeks were plenty tough - twice they had to be taken out in hand-to-hand and even hugely outnumbered, inflicting as many casualties as they suffered in the process. Like the Japs, you do NOT want to get into fisticuffs up close with the Greeks - they'll hurt you every time!

Italian armour advances. The flame symbol on the bunker in the distance is a rather optimistic (as it turned out) aerial attack marker. 
The Italians didn't get it all their own way - the AT gun in the bunker took out a truck and some of the infantry section it was carrying, forcing the rest to bail out.
The second wave of Italians, regular infantry plus supports, were most reluctant to come on before all the fighting was done, so just in time for the awarding of medals.  The Greeks bunker was a true beast which was impervious to everything thrown at it. To kill anything in the bunker you literally need to roll three 6D6 in a row, otherwise the only way to take it is with infantry assault. That's hand-to-hand. Against Greeks. Not good!

The tank made no impression as had the aerial and artillery bombardment beforehand. It was up to the brave Bersaglieri to frontally assault and pin the crew inside while the rest went around the back to get inside.  The two surviving crew took the leading NCO and his oppo with them. Another was given a large AT hole in him trying to throw grenades etc into the embrasure. Mumma mia!
The game at 3D6 was really enjoyable and we got through four turns in three hours as we became more familiar with the rules. Mark's Greeks put up a credible performance considering the odds stacked against them but the next encounter will be in the mountains to the north and they will only be outnumbered two to one next time - and no tanks!

At the Lanyon club last Wednesday Doug and I finally had that TYW game of Baroque ('Europe At War 1550 - 1700') we'd been promising to do for months. Its an unusual Impetus-style rule system that reduces things to simple mechanics rather than multiple factors, so once you get used to how it operates, the game flows and its quite enjoyable.


Unlike other systems it does not require hordes of figures, which is also useful. Two 650 point armies going at it will give you a good three hour game. Doug fielded his Ottomans and I my Poles taken from the Baroque lists. The only criticism is that artillery seem completely useless. You really don't need to spend the points on them as they do very little anyway. I realise that artillery were not as effective during this period but I think they probably go too far the other way (I may be a bit harsh here - if you buy a Master Gunner they are more effective). No matter - it doesn't spoil the game and the combat is, as it was at the time, rather brutal!

Polish army with Pacerni closest and Rieter behind. The other Pacerni are on the other side of the useless gun and Winged Hussars next to them.
The infantry - must be a later Polish army as only one unit of the fearsome Haiduks (closest) are allowed in the army list.  The rest are all standard Pike and Shot.
After being rebuffed by Doug's Sipahis, my Pacerni are hit - hard - by his ferocious Quapukulu Sipahis heavies.
My Pacerni hold and a second unit hits his Sipahis in the flank. In the background my victorious Hussars (scratch two units of mounted Sipahi Bow) are about to get their comeuppance with a devastating volley or three from the Janissaries. 
Reduced to just one effective figure the unit somehow remained on the field with Doug frustratingly unable to get the one extra hit that would have destroyed them.
Closeup of the endless melee between the Polish Pacerni and the Sipahi (Deli?) heavies.  The Ottoman heavies are as hard to kill as my Polish winged hussars.
The Pacerni in turn were hit by Doug's Sipahi/Deli heavies.
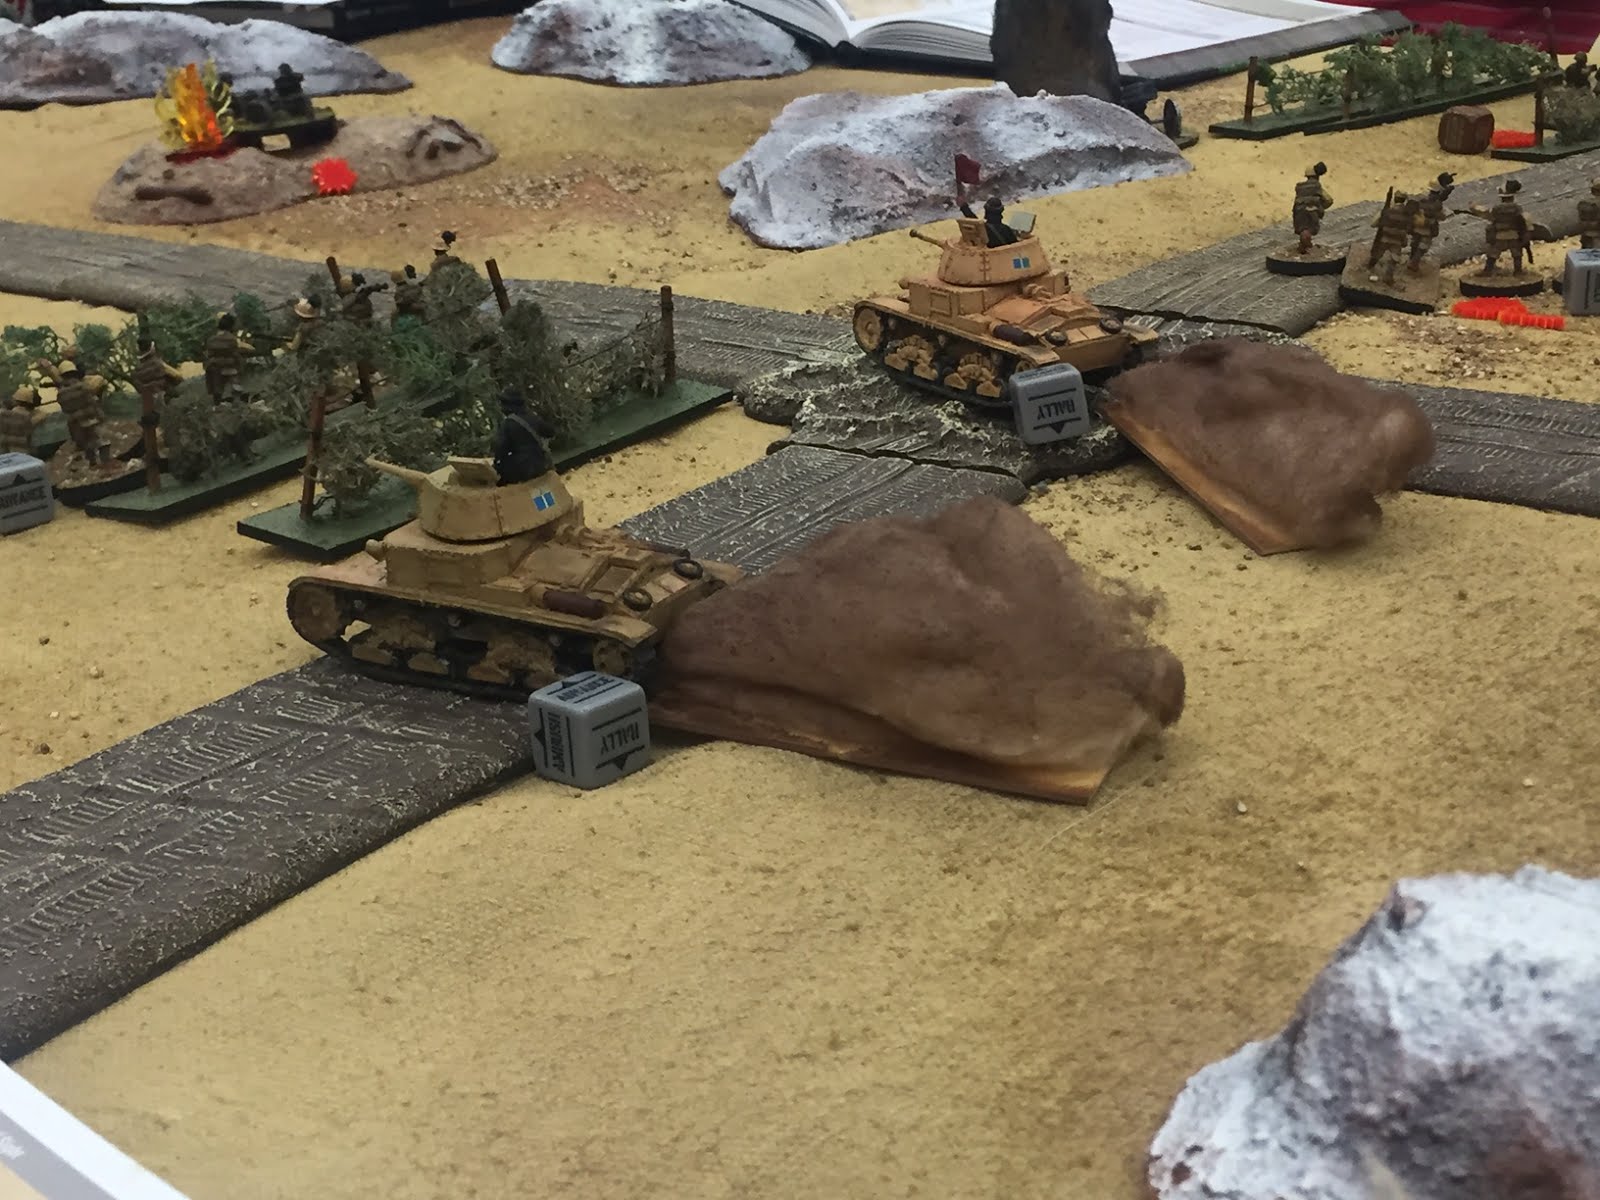
  After running out of time the infantry on the right didn't really get engaged.  The Haiduks volleyed the Ottoman bow (Anatolic skirmishers?) into oblivion but Doug's advancing Janissaries were unable to get to grips with the Poles. On the other flank Doug's Ottoman Dragoons (lurking in the rough) were destroyed by a rolling attack - effectively a caracole by the Reiter and one of the Pacerni units - who rode up to the edge of the rough, fired then were replaced by the next unit etc. With Doug's entire right wing (a third of his command) gone it was a convincing Polish victory  BUT Doug generously explained how the rules worked and I got lucky dice when I needed them.  After a frustrating start where most of my units failed their initiative several times while Doug's entire right wing division advanced, I got lucky with the melees. All in all an interesting game to play and - importantly - gave me the excuse to get out armies I haven't played in years. Great fun. We'll be playing more Baroque in the future.

'Pulled' the post for a final bit of editing as I just noticed the counter has turned over 150,000 visits. Wow - has it been that long? A HUGE thank you to all the followers and visitors to my humble blog.

Cheers,
             Doc

Saturday, April 6, 2013

Milestone passed and (some) figures painted!

It just slipped by without me noticing - 100,000 visitors to my little blog!

Yippee! Who'd-a-thought it eh?

I have to confess that I have been somewhat distracted with little chance to blog as the program of works for my recent retirement reaches fever pitch.  For example: just finished putting in 35 meters of Colorbond fence - or rather remove the old one (and attached greenery) so the contractor can put the new one in.  Crikey - I underestimated the job - it filled a 4 meter skip with enough rubbish left over for another.  Damn job nearly killed me (old age is a bugger!) - luckily my boys were here to lend a hand at the last moment (and get to play with the chainsaw as a reward!) and we got the job done.  Well, just about - my lumberjack ambitions are still to be realised with two more trees to fell.  But ah got mah boys and mah trusty Stihl - them thar trees will be match-wood in no time!  (ok, ok - no more lumberjack talk!)

Long and short of it is all my painting projects have had to be put on hold - just for the moment.

But I haven't exactly neglected my hobby either.  I've been trying to organise my Napoleonic figures into suitable forces for the next Black Powder game scheduled at the club next weekend.  Its been a bit tricky to say the least balancing home and hobby lately.  Nonetheless SOME progress has been made since my French Chasseurs were finished. I've decided to get stuck into the avalanche of Perrys' that have arrived as well as finishing off others that have been on the back-burner such as my Victrix Austrian Landwehr.  I'm halfway through my Perry Hungarian Grenadier battalion but more than that with the Victrix with one group of 16 finished and two more at least half done.

The finished Victrix Landwehr - with very en-vogue wintery dark grey clobber with red highlights!
Very nice lads.  Wait a sec - Oi! Number two - where's your bleedin' 'at then?
I must say that the Victrix turned out better than I thought they would.  I've always though them a bit too cartoonish and large but although on the big side for 28mm figures, they still fit my 'orrible old WRG sized bases (four figures to a 60mm x 20mm) - just!  And the flags supplied in the box literature are very good quality. Plenty of other figures painted or in the process of being painted, some of which have been seen in previous posts (like the Fallschirmjaeger), my Polish command stand and others which haven't made the blog like my ACW figures - an extra VMI gun (made from a Perry's Union Napoleon and crew) and two Sash and Sabre artillery limbers or even some of my TYW figures - more Poles from the Polish Commonwealth army of the early-mid 1600s (command stand).  Which reminds me - I've got to put together and paint a regiment of TYW dragoons!

Polish shotte command - mixture of figures including old Foundry, Redoubt and God-knows-what!
But the interesting thing was in addition to exploring my photography (i.e. of the none wargaming variety!) I also I picked up the pencils and tried a bit of drawing again.  Its been quite a while and my skills were very rusty. I think I may have over-worked it but not entirely un-happy with the way it turned out. Don't like the straps on the pack but... In fact I may ink this one in and do some more - when I get the time!

Polish infantryman in campaign dress 4th Regt Vistula Legion.
We do love the Poles and my 1st Regt Vistula Legion are looking likely to see action next weekend if all goes well. Still got two more battalions and an artillery battery to do as well but I had no idea when I'll be able to get to them!

My Polish pretty boys will hopefully get blooded in next week's BP game.
Well, that just about does it for this brief post - beats my usual marathon AAR's!  Game-wise we have a Crete campaign (Op MERCURY) one planned - but not sure when exactly - and I have my German Gebirgsjaeger  to put together as well.  But the big one will be the Napoleonic game next week which will feature most of my collection.  We are also contemplating a Carlist Wars game using Doug's collection of Perrys and if we can organise it, another TYW game with my Poles.

It would be very remiss of me if I did not thank all of you - now a massive 148 followers!!! ;-) who have taken the time to visit my humble blog and particularly those who take the time to comment and with whom I have intermittent correspondence over the blogosphere. I cannot tell you all just how therapeutic and fulfilling it is as well as being an outlet for my somewhat eclectic wargaming tastes!

A very big Thank You to one and all.

Cheers,
          Doc

PS:  I usually don't edit my posts that long after posting them but this time I had to as I completely forgot something that I was very excited to find in the first place. You see I have found the original painting by Edouard Detaille of the charge of the 4th Hussars at Friedland.


What's so great about that you may ask? Well, although the image of the artwork has been captured in print and replicated many times, particularly on the Web, the original painting was 'lost' for over 50 years.  It was bought by the NSW State Gallery just after the turn of the last century (so early 1900s) from its exhibition in the French Academy. After hanging in the Gallery for over thirty years it was considered old hat and consigned to the basement where it languished for decades. It was rediscovered about 7 or 8 years ago but in a very poor state, badly damaged by damp. A publicly funded subscription saw it restored - that alone took nearly five years. It then went to the High Court building in Canberra (or so I was informed) but my inquiries suggested it may not have been there.  So I'm heading to the Archibald Portrait Prize exhibition at the State, I walk through one of the main halls and viola - there it is!


It is one of if not the largest painting in the collection at some 30 ft long and twenty high - the main figure of the mounted officer is at least life size.  Its stunning to stand in front and look at.  It is a truly amazing painting and even more amazing, the painting so admired by Napoleonic affectionados and wargamers the world over actually resides here in Australia. Not only that, Lady Butler's(?) 'Rorkes Drift' - another famous battle painting - hangs just down the hall from it.  Apparently it was purchased by the NSW Academy around the same time as Detaille's Hussars.

Detaille detail - the trumpeter behind the officer - he's about 1 & 1/2 meters high and he's in the background!
It is a huuuuge painting!


If you are ever in Sydney, its well worth the visit to the NSW State Gallery to see them.  Anyway, just thought I'd share this with my blog followers as I'm sure some of you appreciate this great art as much as I do.

Cheers,
           Doc

Monday, December 10, 2012

Another TYW game - this time Pike & Shotte - weekend gaming down at t'club!

Last weekend was the monthly get together of our little wargaming group at the sumptuous Vikings Sports Club in Lanyon.  Not only are the gaming rooms spacious and clean - there's a bar (several in fact) and a restaurant for lunches.  Luxury I tell you!  Great way to spend a Sunday arvo too!  Our little group staged about four or five games, ranging from several varieties of WW2 (Disposable Heroes tank action, Bolt Action skirmish, Command Decision 15mm) to a Wild West skirmish game featuring our very own bushranger (outlaw) legend, Ned Kelly, and our Pike and Shotte Thirty Years War game between German Imperialists/Polish C'wealth and Scots Covenanters.  A nice bit of variety!

Importantly, Greg got around the games with his camera and took the following of some of the action (thanks also to organiser Leigh who emailed them to us):

Ian & Greg's Disposable Heroes WWII tank action game, set in 1941.

Some of Ian's amazing collection of WWII tanks - early war Russian armour launches its assault.

Wild West skirmish action (set in colonial Australia of course!) which featured our most famous bushranger, Ned Kelly.

And finally, myself and Mark get stuck into a short BlackPowder Pike & Shotte game.

For our little TYW scenario, as we had previously only used Warhammer ECW we decided to keep it short and simple so we could familiarize ourselves with the Pike & Shotte mechanics which differ significantly in some important aspects.  Despite the constant referencing to the book, it was an enjoyable and remarkably non-contentious game - the Black Powder 'gentlemen's agreement' aspect working so well we didn't even have to dice to decide anything!  

The main Polish contingent led by the Pancerni race for control of the village cross road

Polish traffic-jam on the road into the village - the little wood also obstructing the Pole's deployment.

The idea was for two matched sides entering from both edges, with one flank attempting to control the village cross-roads and the main forces trying to control the main road and bridge access.  The river was also fordable in two places but it never came to that as the main action took place at the other end of the table and then in the centre.  The good thing with the command rules is that if you roll well enough (three or more less than the commander's rating) you can get up to three moves in per turn for each command.  You tend to get stuck in pretty quickly.  

Mark's Scots led by his lancers race for the same objective from the other side.  Note the fearsome mortar in the foreground - fortunately for the Poles it didn't manage to hit anything.  That appeared to be largely the case with all the artillery on both sides - so I don't know if we got it entirely right this game.

German Imperialists main battalia (led by the redoubtable Saxons) forming the centre didn't get off to a very good start in the 1st Turn, only managing one move initially.

The Polish Cossack-led flanking force at the other end had to negotiate a hill before finding the enemy. The Cossacks are filth but have marauder capability which means they can pretty much do as they please - both a blessing and a nuisance for their German commander as they had a tendency to just take off - anywhere!

Seeking to pin the Imperialist flank were more of the dreaded Scots lancers

In the second turn the Cossack swarm managed to get over the hill and deploy before the Scots could move up.  Very cheekily they fired their bows at long range and managed (amazingly) to inflict a casualty and disorder the Scots lancers which was to have serious consequences for the Scots on the flank.  Note the German cuirassier behind have deployed into line ready to charge.

After disordering the Scots lancers the cossacks by-passed them, the swarm passing through the forest and overwhelming the gun on the other side which had previously managed one of the few hits.  They then swarmed on to hit one of the Scots shotte sleeves. But these Scots were made of sterner stuff and managed to hold them off.

Right behind the Cossacks, the German heavies hit the disordered Scots lancers and wiped them out.  One feature of Pike & Shotte rules is when you loose, you can really loose with the defeated unit removed from the table!

In the centre a battle royal between a German and Scots pike blocks, with neither side gaining a decisive advantage.  The German's shotte units were disordered by Scots musket and artillery fire and were kind of left behind when the pike decided to risk all and charge the centre of the Scots line!  

They copped shooting casualties but passed their morale and were finally only disordered by the Scots pike, who also ended up disordered.  After two turns of combat, both blocks retired back one move - the German's now vulnerable to the Scots extra shotte sleeves.

In the middle the Scots had been slugging it out with German Reiter across the hedge, again without either side suffering significant casualties (lousy shooting on both sides). The tide was not turned until they engaged with the Saxon shotte unit in front and were then hit at the same time by the pike block in the flank.  Ouch.

In the village the Scots got to the crossroad first but were hit by the Pancerni while still in column.  The Poles were closely supported by the Haiduks behind, the combat advantage enough to wipe out the other Scots lancers with the difference in the combat dice roll.

On the other side of the village the Polish shotte and light gun managed to get some shooting in at the Scot's heavy cav without result, ending in a sort of Mexican stand-off by the end of the game.

In the middle the hapless Scots were eventually wiped out by the Saxon pike (the German Reiter deciding very wisely NOT to try and jump over the hedge!) The other Scots had turned to face the oncoming victorious pike block but by this time it was the end of the game.

At the other end of the table Mark's Scots looked like they were about to be swept away by a sea of feelthy cossacks - but no!  These Scots managed to not only hold them off but inflicted casualties without loss themselves.  As you can't 'disorder' a swarm there was a good chance the cossacks would have run away if the game had continued and they lost another round of combat.

It was a great day's gaming and although we only managed about five full turns, the game was only two or three turns from a decisive finish - given the Scot's loss of three units and a gun it looked like victory to the German/Polish army.  Mark and I were impressed with the Pike and Shotte rules and will no doubt be trying them out again soon.   Also a big thank you to Leigh and Ian for organising another great day of gaming at the club - we even managed to raise some money for the Salvos - so well done to all concerned.

Cheers,
           Doc


Monday, November 12, 2012

Thirty Years War - Poles versus Swedes

Last weekend we had our second meeting of our wargaming group at the Lanyon Vikings Sports Club (a great venue!)   This time we had about a dozen players and four decent games - Greg's Zulu War Isandlwana scenario which he will feature together with an impressive piece of mountain scenery at the next Cancon. Mike and Craig did a Saga game with Vikings versus a Crusader military order. Leigh and Ian did a  Rapidfire 20mm refight of the WWII Corinth Canal (Op HANNIBAL).  Mike has posted some great photos and a two part report on his terrific Satrap Miniatures blog.  Doug, Mark and myself tried a Thirty Years War Pike and Shotte scenario - one of the earlier fights between Gustavus Adolphus' Swedes and the Polish Commonwealth (mainly) mounted army at some place with an unpronounceable name in Pomerania using the Warhammer ECW rules.

In the scenario the Swedes and their allies (mainly Scottish mercenaries) set up on a low series of hills opposite a low flat boggy fields with a road up the middle.  One regiment of mercenary pike and shot, my only gun (a Saker) and my cossacks were the only forces deployed with the rest of the Polish forces which included their German mercenaries marching up the only road as it emerged from marshland.  Rightly fearing the Polish horse, the Swedes had chosen their position well to restrict the Polish cavalry's maneuverability.

Polish cavalry including the famous Winged Hussars come on up the road through the marshland and deploy

I whinged a lot about the scenario thinking the hordes of Swedish artillery would just slaughter me as I came up the road - my only way on - but Doug assured me that artillery of that time was just not that good.  Well it was and it wasn't.  When it hit it did a lot of damage on the dense formations but it took quite a bit to hit - from trying to estimate the distance then a pretty good chance of a misfire of some sort.  The Swedes had only four rounds of shooting before using up all their ammunition too.  Not that it made all that much difference for my poor old Polish Pancerni cavalry who were first up the road.  

The German mercenary shotte advance with the Pancerni trotting up the road in column, an irresistible target for the Swedish guns.

The cossacks race ahead to form a skirmish screen for the cavalry coming up behind

Part of the daunting Swedish position - the right wing with Culverins on the hill, Scottish mercs in front and their heavy armoured cavalry anchoring the end

The Polish shotte come on right after the last of the cavalry (mercenary German Reiter) who have managed to mask the only Polish gun for a turn.

The Polish left including one regiment of the famous Winged Hussars. The much reduced Pancerni (about half left but still on the field!) deploy in front of the German foot.

The fearsome Haiduks (armed to the teeth with muskets, swords and dirty great axes) come on in front of the second regiment of German foot.  Unfortunately they didn't get close enough to get into action before the game ended.

After a bit of success with my own single gun firing straight up the road there was nothing for it but to charge in with my heavy cavalry and hope for the best.  On the right I started the right way with the cossacks skirmishing in front of the dangerous Swedish foot, trying to draw their fire and screening the other regiment of Winged Hussars deploying behind them and waiting for the right time to charge in.

 The cossacks skirmish with the Swedish foot - bows against muskets looks uneven but the milling cossacks are a hard target to hit!  Amazingly the losses were about the same!

The Swedish Culverins keep up a lively cannonade on the Polish cavalry.  These guns and the Petard (mortar) actually scored several hits on the hussars and the German Reiter deploying off the road behind them.

The lone Polish Saker in the far distance, when not masked by deploying troops, successfully targeted the Swedish troops at the other end of the road. No misfires for this baby!

I tried the same tactic on the Swedish right.  Unfortunately I did not have enough Pancerni left to screen my hussars properly as they had been decimated by continual cannonade and my hussars too started to suffer more hits from the Swedish guns. In a way the Pancerni had served their purpose by drawing the fire that could have otherwise weakened the hussars. The last of the Pancerni disappeared from the field after a massed volley by all the Scots mercenaries in the village virtually wiped them out. There was nothing for it but for the hussars to charge straight in.

The hussars absorb the shot and charge into contact with the pike, successfully discharging their pistols into the dense ranks of pikemen before hitting them with their own 22 foot lances!

After a ferocious melee the pike unit was destroyed and the muskets fled the field, with the hussars deciding to risk all by continuing their charge right into the guns and supporting shot (artillery guard)

It proved all too much for the artillery crews and their guard who broke and fled.  Unfortunately for the Swedes they had decided to move their heavy cavalry into the centre, otherwise the hussars would not have dared attempt to continue the attack

The last of the Pancerni - soon all but two were cut down by a deadly massed volley from the nervous Scots opposite (nearly half had already fled in panic after the successful hussar charge)

The fifth and final turn saw the last of three rounds of hand-to-hand combat between the other hussar regiment and the redoubtable Swedish pike in the centre.  The Swedes lost every combat, being whittled down to just the colour party and a few men surviving - but still standing their ground! The presence of their beloved CinC on the hill directly behind providing the incentive to fight to the last - and providing the Swedes with the necessary points to survive their morale rolls after each loosing round of combat!

Surrounded by heavy armoured hussars who hacked them down with their deadly three foot long Palasch swords, the pike stand by their colours to the last man!  Their courage saved the Swedish centre from caving in.

The final act of the game - the threatening Swedish heavy cavalry about to cop a massed volley from the famous 'Wiessfrocken' German mercs opposite 

The Swedish centre wavered but held thanks to the redoubtable Swedish pike.  The heavy armoured cavalry attempted to relieve the pressure by moving up the road against the German 'Weissfrockern' ('Whiteshirts') mercenaries advancing against the Swedish centre.  The Germans risked a massed volley (it means everybody fires at once) which gives you extra chances to hit but means you can't fire next turn - its a one shot option!  Their shooting was deadly mowing down half the front rank of cavalry who were so unnerved by it they failed their morale and fled the field.  At the same time the cossacks, although down on numbers, somehow managed to hold off Mark's Finnish madmen (light horse in the service of the Swedes - Poles hated and feared them!) long enough to eliminate the last of the threats from the Swedish position.

At that stage we had run out of time and had to finish up, awarding the game to the Poles.   I have to thank Doug and Mark for a great game and putting up with my whining about the scenario, given I was unfamiliar with the rules (and wondered how the heck they would work for the unique Polish hussars).  I should also thank Leigh and Ian for again organising a great days gaming at the club with its great counter lunch and wet bar (what more could a hungry, thirsty gamer want I ask you?).  A great afternoon at t'club with the lads -
and we'll be playing more Pike and Shot again!

Cheers,
           Doc