Showing posts with label Luftwaffe. Show all posts

Sunday, April 10, 2022

The much overdue FIRST post of 2022 (the better late than never post) update!

I have tried on several occasions to post this pilgrim's progress since the start of the year but something always seems to get in the way, the latest being a prolonged serious illness and then the bloody Wuhan Flu in the house! At least the required quarantine has been fruitful as I've just managed to finish a mate's impressive Empress 88 gun and crew done up as Condor Legion (so Luftwaffe Flakartillerie). The gun is just base-coated in Tamiya's German Grey with a black wash on the wheels etc, The brown Luftwaffe Flakartillerie uniform is correct for the Legion in Spain where the anti-aircraft guns like the 88 came under Luftwaffe control. The Unteroffizier is wearing a standard issue Luftwaffe Feldmutze and I given him a knock-off white 'Fliegerblusse' that Luftwaffe officers and NCOs liked the wear (with appropriate red tabs etc, for the artillery arm). the usual Legion uniform was brown - even the helmets but a coat of Feldgrau and they're all early war Germans again. Wonderful model but very fiddly to put together (as only the best ones can be!)


As you can see, as well as the detachable wheels the set comes with a host of ammo boxes and shells and can be set up on wheels (the 88 could still be fired that way) or on its large cruxiform stand in any position. But my best achievement (I think) so far this year has been the final completion of my Imperial Indian force. Thanks to the generosity of another friend I obtained a horde of unwanted figures including the wonderful Artisan and Copplestone NWF Indians, both Sikh and Muslim troops to add to those I already have and the units of Woodbines plus the beautiful Empress Indian Mountain gun set.

Muslim Rajput unit including HMG

Two Sikh units with HMGs (the third figure on the Sikh crew is my conversion using a Woodbine head)
 
Indian officers including one in the middle from the Artisan NWF range

The magnificent Empress Indian Mountain Gun

The collection also now includes two units of the famous Hodson's Horse - just missing one mounted officer! - and one unit of Frontier Rifles (which can double as dismounted Indian cavalry). Also prominent are three units of Ghurkas - two Woodbine (with HMG) and one Artisan (excellent figures) - plus four Woodbine units of two each of Muslim and Sikhs each with an additional Hotchkis HMG. 


A few more shots of the Mountain Gun (with mule ammo carrier!) and my Hodson's Horse officer.


Prior to my Indian army units I was finishing my WWI French army (as seen in my last post) with a colonial unit after acquiring a box of the Atlantic plastic figures which come loaded with options - and Senegalese heads! They required quite a bit of scalpel work to properly fit arms etc, and avoid odd poses but the advantage is a wide variety of figures in quite animated poses, and being plastic ideal for the odd conversion such as my bugler! Generally matching the CoC list for a late war French infantry platoon (very VB heavy!) that could also do for early WWII - European or Middle East/Levant theatre. They paint up well and I'm not unhappy with the final result.


There have been plenty of others too with some recent Perry's FPW Jaeger but more on them in a future post when I get more done - plus I'm holding out for their promised FPW French infantry release which should be any time now (hint, hint Alan and Michael! ;-)

Jumped the gun a bit publishing this as I completely forgot all the Vichy French units - and armour - that I'd also finished. The French armour includes some very interesting pieces from Mad Bob Miniatures in the UK such as the Panhard 165/175 Armoured Car and a couple of Panhard 179 APCs (amongst the world's first armoured troop carriers). The latter had two crew (one who acted as a gunner if it carried a Chauchat or Hotchkiss LMG) carrying 6-8 men and will form a mobile recce unit for my Vichy French. 

My Vichy French mobile recce unit

The rugged and reliable Panhard 165/175 Armoured Car

Next cab off the rank so to speak is the Renault R35 light tank from Rubicon which is a highly detailed plastic kit - I couldn't believe how small it is! Nonetheless it was well armoured and considered one of the best light tanks in the world at the time - the Allies in the Levant had nothing to counter it! The tank comes with both the long and short barrel 37mm gun turret. There were over 90 of these in the Vichy Arme L'Orient most operated by the famous Chasseurs D' Afrique regiments. 

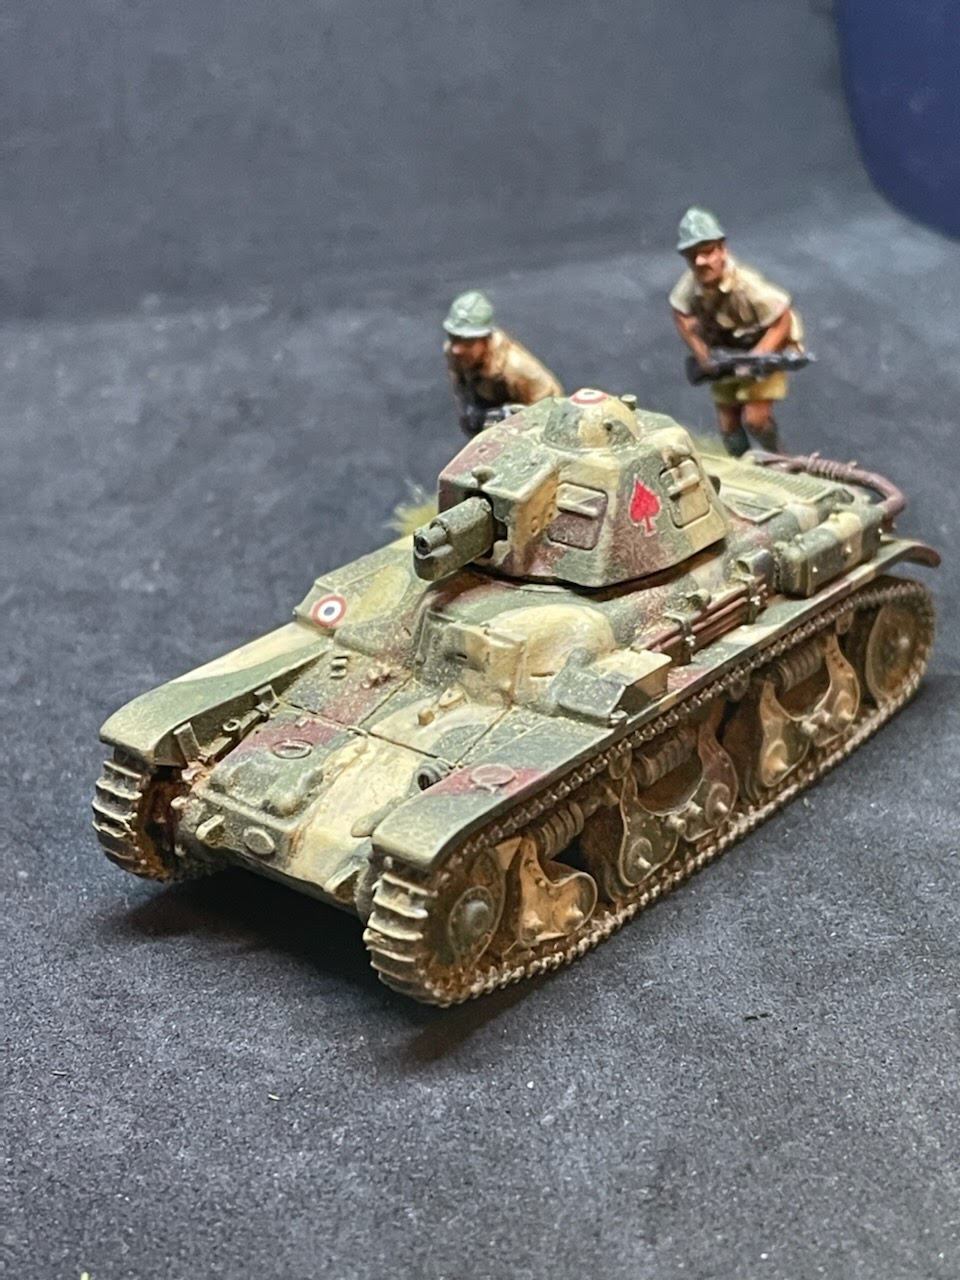
Renault R35 (short 37 gun turret version) 

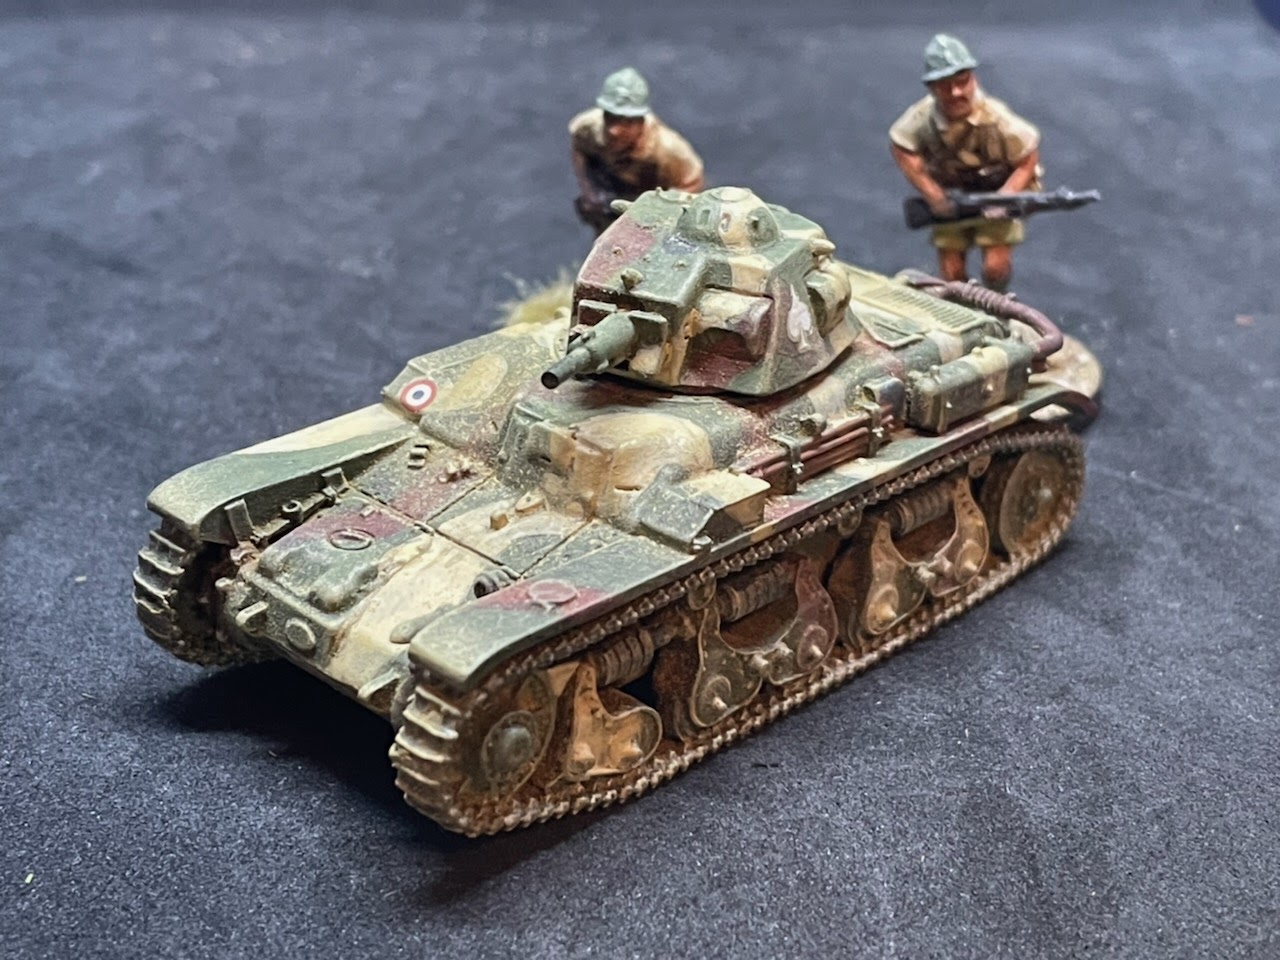
Long barrel 37mm version

Rear view of the long barrel version with two Perry Vichy French infantry to give an idea of just how small they were!

Apart from the AVs I also completed several units of figures to complete my Vichy force in the Levant and Syria including one of the more exotic cavalry the French had (several thousands of them in fact, both as mounted and mobile infantry mounted in trucks!) - this lot done up as French Moroccan Spahis - but could also easily be Circassians etc. and which I have as both mounted and dismounted.  The figures are Askari Miniatures from the US who have one of the largest ranges of various colonial types, FFL and so on available.  The quality mightn't be up there with the Perry's etc, but you can't quibble with the variety - many unique - very reasonable prices and for me anyway, the great service (and for those of you who have suffered at the hands of the US Postal Service you know how important that can be!)


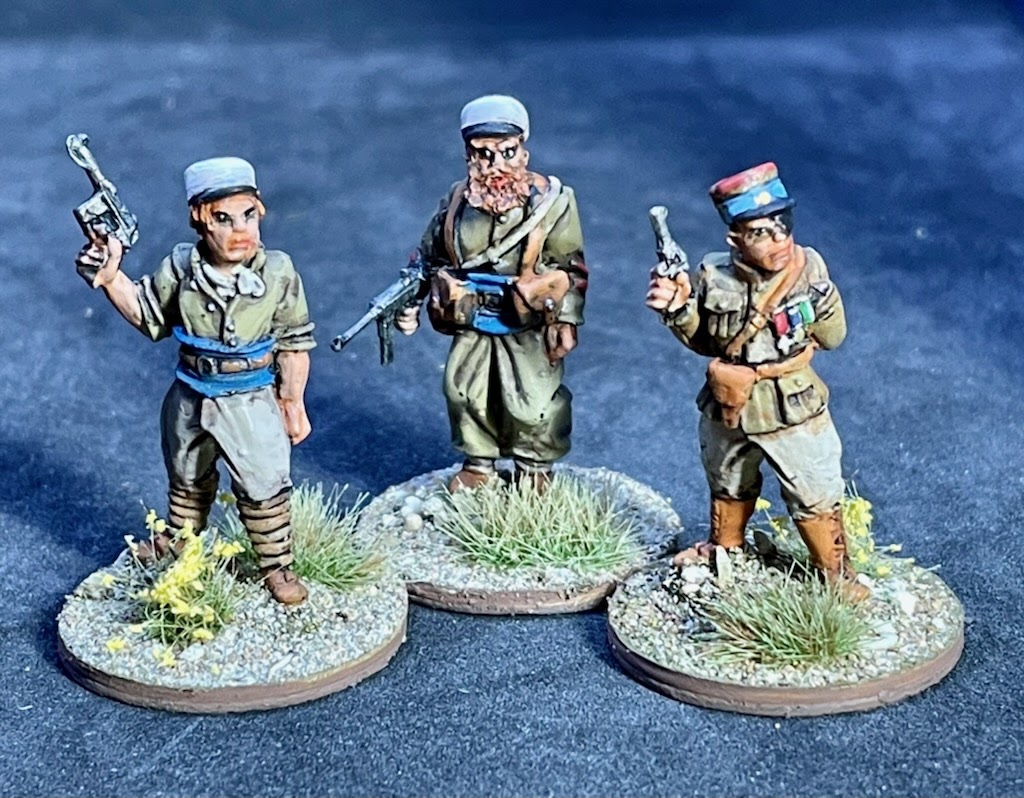
In addition to the above were more of the pile of lead given me by my very generous mate Peter. They were the first of those figures I painted and are a full unit of French Foreign Legion in Vichy service so in all-French kit. I substituted a French SMG from the Atlantic WWI French set for the bearded FFL NCO figure - all the figures are Artizan with one unique one-eyed, one-armed Pulp French officer. A great character figure whose name escapes me but based on a real-life French war hero.


With the addition of the FFL my Vichy force is about complete save for a truck or two, which I'm still trying to source. So quite an extensive update but then again its been a loooong time between posts so I have some making up to do. Hopefully the next will not be so long in the making and will include some of the FPW figures I've been doing for a skirmish style game. Ou revoir for now and may the dice gods be with you!

Doc. 

Sunday, August 17, 2014

Air Assault 'Chain of Command' games; Galatas Pt. 2


Gratuitous shot of a Heinkel over Crete - nothing to do with the game unfortunately!

This is the second of the Galatas games that we played last weekend, the first being the German's air assault on the town of Galatas outside of Canea, Crete in early April 1941 - the final stage of the German's Op MERCURE.  At this point historically, things were on a knife's edge both for the Germans and the Allies.  The German losses were so high that the High Command (OKW) told German commander Kurt Student in no uncertain terms that he had to successfully conclude operations on Crete or Hitler was going to call the whole operation off.  The Germans had by that stage taken the main centres of Allied resistance at Rethymno and Heraklion, as well as the vital airfield at Maleme but between 10-15,000 Allied troops remained in and around Canea, the last major port still in Allied hands and from which they were attempting an evacuation by sea. Despite the ULTRA decrypts of OKW communications, the Allied commander Freyberg had little idea of just how desperate the Germans were, being overwhelmed by Creforce's own dire predicament.

Sleepy little town of Galatas with Church Hill in the background.


The Allied armour advances up the road to Galatas
Galatas was the key to Canea, the last Allied stronghold on Crete and was thus vital to both sides. Amazingly the Kiwi commander, Puttinck, did not seem to realize this and left the defence of Galatas to the raw, ill-equipped Greeks supported by a few Kiwi units and advisors rather than turning it into a strongpoint and stuffing it full of the battle-hardened Kiwis and Australians he had available.  As we found out in our first game, the Germans were always going to take Galatas against such inadequate defences, our only hope was to inflict as many casualties on them as possible and I'm happy to say in our last game at Wintercon, we managed to do that. Nonetheless, the scenario for the second part of the battle was still a daunting one for the Allies, despite having armour available this time.

The formidably armoured but inexorably slow Matilda. [Photo: Greg Blake] 

Now you'd think armour against lightly armed paras would be an overwhelming advantage.  But you'd be mistaken.  Firstly, the Allied armour consisted of the lumbering Matilda - one of the most heavily armoured tanks in the war at the time - and the Vickers light tanks.  The Matilda was heavily armoured but incredibly slow and although it had a 2pdr gun, being early war it only fired solid shot not HE so was useful against other armour but not much else. It did also have hull and turret mounted MGs so it was more use as a mobile MG platform.  The Germans had nothing in their arsenal at the time that could knock it out - and as the paras didn't have any AT other than rather ineffective grenades, if the game lasted long enough it could, in theory at least, lumber across the table and any Germans in the way (provided the engine didn't seize or something!) The Vickers VIb light tank was a different case again. It was basically an armoured machinegun carrier that was relatively fast but its light armour was vulnerable at close range to HMG fire and even the Fallschirmjaeger's otherwise inadequate AT weapons.  So all in all, the Allies armour was not the decisive advantage on the battlefield it should have been.

The FJ in Galatas were allowed a 37mm PAK for this scenario (presumably 'borrowed' from the Gebirgsjaeger) and used it right from the start of the game (so much for the Allied surprise attack!) 

The second issue that quickly affected the game was that the Germans were a) not surprised and saw the Allied armour and Kiwi infantry from the outset... b) actually outnumbered the attackers across the board and c) managed to have an AT gun deployed from the outset.  Against these odds the Kiwis had only a very slim chance (at best) of actually breaking into the town.  In the otherwise excellent CoC rules, German paras have on average 24 shooting dice per section, as opposed to 14-16 for the equivalent Kiwi infantry section. Each section assaulting the town through the vineyard were faced a reinforced Fallschirmjaeger section with a HMG for a total of no less than 34 shooting dice for each round!  All I can say is Kiwi commander Paul tried valiantly from the outset to get close enough for a bayonet charge (at which the Maoris excelled) but never made it through the vineyard, with each section in turn mowed down (being in the open, a D4,5 or 6 to hit - 5, 6 to kill) while only having about 14 dice to shoot back at the FJ in hard cover (D5, 6 to hit - D6 to kill).  All the Maori's shooting was directed at that @$#%ing FJ machinegun - which they eventually routed off by the end of the game!

The Maoris deploy at their jump off point outside the vineyard - contemplate the daunting task in front of them. (Note the artillery barrage at the edge of the town - spectacular but useless!)

Now before I gripe too much about how hard the Allies had it, I must confess that they did have artillery support as well as the armour. I deployed my Forward Observer team in what cover I could find just outside the vineyards.  They directed two barrages targeting the AT gun (a mistake in hindsight - should have tried to hit the building with the HMG) which all missed save one house at the end of the town which was engulfed in flames - unfortunately no paratroopers were hurt in the process!  My ruthless German opponent Greg immediately spotted the spotters and wasted no time by firing at them at every opportunity, eventually wiping them out. As the only Kiwi HMG was assigned to the group assaulting Church Hill, the Maoris depended on the armour to absorb the German firepower and punch its way into the town.  With no less than 60!!! shooting dice combined - you'd think the armour would be able to do it. Well, you'd be wrong - if there was one thing that marked this game it was the appallingly bad shooting by just about everyone - except of course young Andrew, who even Greg ruthlessly exploited to roll fives and sixes and mow down the Kiwis!  The Germans in hard cover could only be killed on a six, so it took forever to whittle them down. Save for the section behind the hedge outside the town - they had somewhere between 120 and 180 shooting dice thrown at them, lost half their number and copped over half a dozen pin markers but still held on. Tough buggers those German paras!

As close as the brave Maoris got - and in the open without armour support - sitting ducks!

The Germans come under artillery fire 

German commander Jason very carefully fed in Gebirgsjaeger - Mountain Troops - to reinforce the paras and make Galatas just too tough a nut to crack!

The Vickers press home their attack and the Germans bring up a captured Italian 75 (minus gunsights!) which they used to great effect (thanks also to young Andrew's dice rolling!)

The Allied armour comes to a grinding halt outside Galatas!

While all this was going on my other commander Steven had the unenviable task of assaulting Church Hill and protecting the Allied flank of our armoured column.  One of the problems with this surprise attack scenario is that there were two Allied objectives that had to be attacked simultaneously and three commands of which only two could be activated each turn.  Once Steve had brought his sections out into the open to engage the Germans on Church Hill ably commanded by young Andrew (under German CinC dad Jason's watchful eye), I had to allocate my activations to my Maori command and my armour needed to support them.  This meant that Steve's Kiwis just had to sit at the edge of the olive grove without cover and cop it.  It must have been a very frustrating game for Steve and I thank him for his patience and generosity in allowing us to try the only plan open to us - up the guts with bangs and smoke!

Our only HMG sets up at the edge of the olive grove opposite the German held monastery. [Photo: Greg Blake]

Kiwi assault on Church Hill gets underway

With the Bren Carrier the Kiwis managed to lay quite a bit of fire on the Germans hiding behind the stone wall - very hard to kill them in hard cover, not so hard for them to kill us in the open!
The Allied assault on Galatas seen from Church Hill - just out of view bottom RH corner is the German mortar that gave our Bren Carrier such a scare! Note the Kiwi HMG pinned although surprisingly and unlike the first Galatas game, the Germans didn't do much with their howitzer.

With the Allied flank secure, albeit at some cost, the final stage of the desperate Allied assault was underway. Time was of the essence as the longer it took to break into the town, the harder it became as the fully committed Allies degraded with mounting casualties whereas the German defence only got stronger by steadily reinforcing Galatas with Mountain Troops. The Allied plan was always a risky one but at one point it seemed the gamble might have paid off when the dice gods intervened on the side of the Germans and put paid to any chance of Allied success.  Double sixes were rolled in the command phase and the German's got to use their ace-up-the-sleeve - and called in an airstrike!

Achtung Messerschmidt!

Allied armour grinds to a sudden halt outside the town. 

With the command tank destroyed and the remaining tanks badly damaged or immobilized, the entire Allied attack faltered.

The German's had complete air superiority over Crete and in all the games we've played so far they have managed to call on their air power at a crucial time in the game and decisively turned things in their favour. This last game was to be one of the most decisive of all the interdictions by air. This time the death blow to Allied ambitions was delivered by the awesome firepower from the four nose cannons of an ME110.  The ME strafed the lightly armoured Vickers (top armour is so thin its shell-like!) and brewed up our hero Roy Farran's tankette.  A second strafe damaged another tank who was lucky not to also go up in flames - no need even to drop the 250 lb bomb the ME110 carried - the damage had been done and the armour ground to a halt outside of town.  The lead Vickers still firing but immobilized with a dead driver after a 75 shell went straight through the hull and the second Vickers likewise having one go through the turret. With the command AFV a blazing wreck and the lumbering Matilda still half a game away from the town, it was up to the fearsome Maori to pull off a miracle.

The combined Vickers and Maori attack looked promising.. until it encountered German firepower!

And then there were (virtually) none - the Germans counter-attack and drive the surviving Maoris back.

I have to give Jason and Greg their due - they used the 'Grenaten!' rule for their elite Germans to go in for some hand-to-hand. The lead Kiwi section was wiped out and with their the sheer firepower the Germans drove the rest back almost to their jump-off point.  Their being absolutely nothing more the Allies could do and no objectives obtained, we called the game in favour of the Germans - quite a convincing win.

We were up against it with this game from the start and this wasn't helped by the fact we play-tested all the other air assault scenarios first.  Just to add further complication, one of our colleagues with a fair share of the terrain had to pull out at the last moment, so we couldn't put together the same table we'd had for the first Galatas game.  It was also a very ambitious scenario - recreating a surprise attack by a numerically inferior force against a fortified obstacle, even with armour, is a tall order.  Nonetheless I feel with some tweaking of the scenario, this could work and give the Kiwis a real chance to do what they did historically - bounce the Germans right out of Galatas.

Once again my thanks go to Andrew who devised the whole thing and to co-organiser Jason who helped pull it all together when it threatened to fall apart (again!) at the last minute - and to all my wargaming mates who came along and rolled some dice, shuffled some lead, and made for a damned fine day's gaming down't club!