Monday, September 30, 2013

Napoleonic Poles & some Legere


Finally finished my Murowski Miniatures figures - the beautiful Paul Hicks sculpted Napoleonic Polish infantry. I got the figures from Roger about a year ago(?) and had over half of them sitting around until a few weeks ago. The last of them to do was the artillery battery which I finished yesterday.  I now have a full brigade - 100 foot divided into two regiments of two 24 figures battalions apiece, with two extra stands skirmishers for the Vistula regiment I've painted in winter uniform.


The artillery are two 8pdrs and a howitzer and for completeness I've combined them all with a regiment of Perry's lancers. I  had done the lancers up as Guard Eclaireurs (scouts) but the uniform is almost identical with that worn by Polish lancers of the late Napoleonic Wars (from 1810 onwards) so they fit in rather well.


The Vistula Legion infantry are now two regiments in summer and winter uniform. I did this purely for esthetic reasons - the uniform combination of dark blue jacket with yellow facings (and czapka) has always appealed. The idea is I will have four French and allied brigades (or thereabouts) for BlackPowder games: Polish, Italian, Bavarian and French.  Opposing them I now have about 5 Allied brigades (3 Austrian and two Russian).  I've still got to finish my Austrian and Russian brigades from the Perrys' figures I've bought - which is still hundreds of figures to paint. Tempted to get more Murowski Poles but there are more than enough of the unpainted Perry's to do.


I particularly liked some of the skirmishing figures - wish I'd ordered more.  The Vistula regiment in winter uniform have 26 figure battalions rather than the usual 24 to add the skirmish stands in.


I must admit I love the Poles and waited for years for someone to produce quality figures before diving in and buying up a motza of metal. Its taken me a while but its great to have finally finished painting them. One regiment of them has already debuted on the wargaming table - now they're finished I can't wait to get the whole brigade into action!


I also did a bit more tinkering with my Legere, changing the command stand around yet again by adding two figures and making a command stand for the carabinier company.  The other revelation I've discovered is Testor's Dullcote. I know I'm a few years behind the times but after experimenting with a number of flat finish varnish systems including airbrushing artist's varnish on figures (good result and cheaper but too messy and fiddly to set and clean up) a decided to try one of the small and expensive cans of Testors. It gives the best flat varnish finish on painted figures I've ever seen. The colours seem to be enhanced by it as well.  All my new Poles as well as the Legere have now been finished in this spray lacquer.


Legere colonel with a bit of battlefield litter on the base 
A word of caution though, as good as the Testors is it has one major drawback.  I smelt some pretty heavy chemicals in it ('petroleum distillates' etc on the label) like Toluene or worse - God knows what the propellant is.  As it's an aerosol I'd only use it outdoors - and avoid getting a snoot full as it can't be good for you.  I think I got an allergic reaction to it after  I used it carefully, so beware people.  It gives great results BUT incorrect use could have a very major health risk attached to it.

Now I've scared the pants off you all, hope you enjoyed the post on the Poles!

Saturday, September 28, 2013

French & Indian Wars Game

My mates Doug and Andrew have been busily collecting figures for the North American colonial frontiers war more commonly known as the French & Indian Wars.  They have a beautiful collection of Perry, Northstar and Galloping Major figures covering the French Provencials (militia) - Coureurs des Bois etc, their Indian allies (mainly Iroquois), and their British protagonists: Highland infantry (the regulars), Rogers Rangers and American colonial (Virginian) militia. Truly wonderful figures.  The rules they were so enthused about and wanted me to try are the card-based Muskets and Tomahawks skirmish rules. I have to say, after one game - I'm sold!  They were a lot of fun and with four units a side, the ideal size skirmish game IMO.
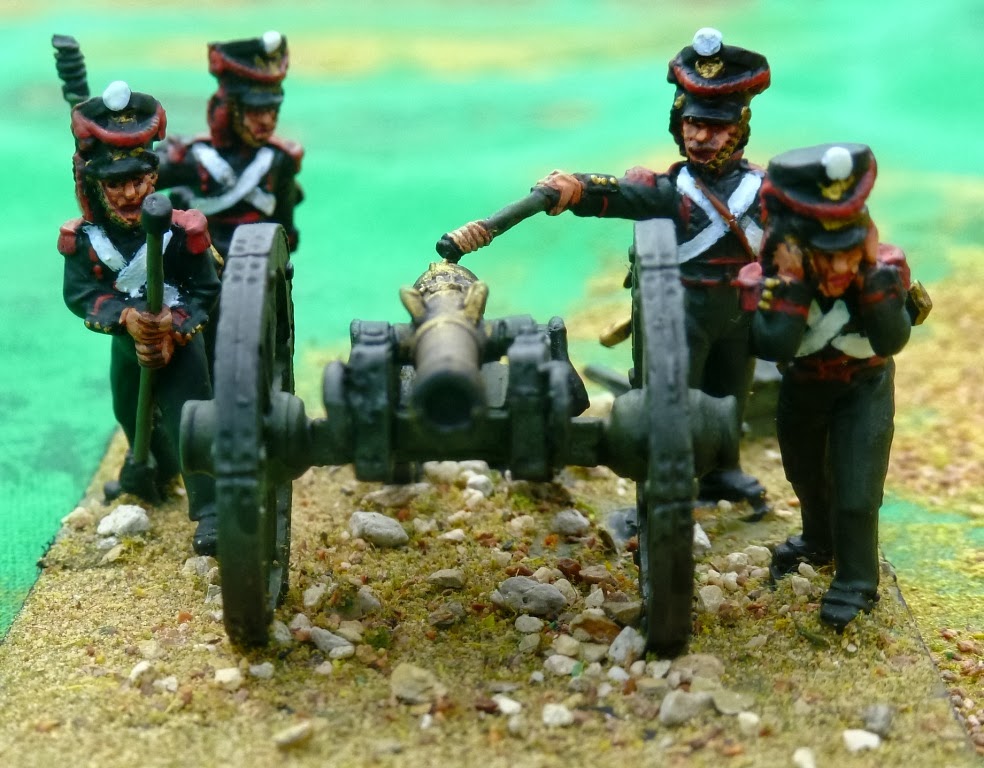
French regulars  (Companie Franche de la Marine?) let loose on the Highlanders advancing on them
Dinnae ga into tha woods laddie...
The scenario they devised was an interesting one, a reverse of the usual in that it was the French and Indians who were protecting armed civilians in a settlement and the colonial British and American forces conducting the raid to snatch them.  Once the civilians were captured or killed it would be game over and a British victory. Stopping them from doing so a French victory.  Pretty straight forward, right?
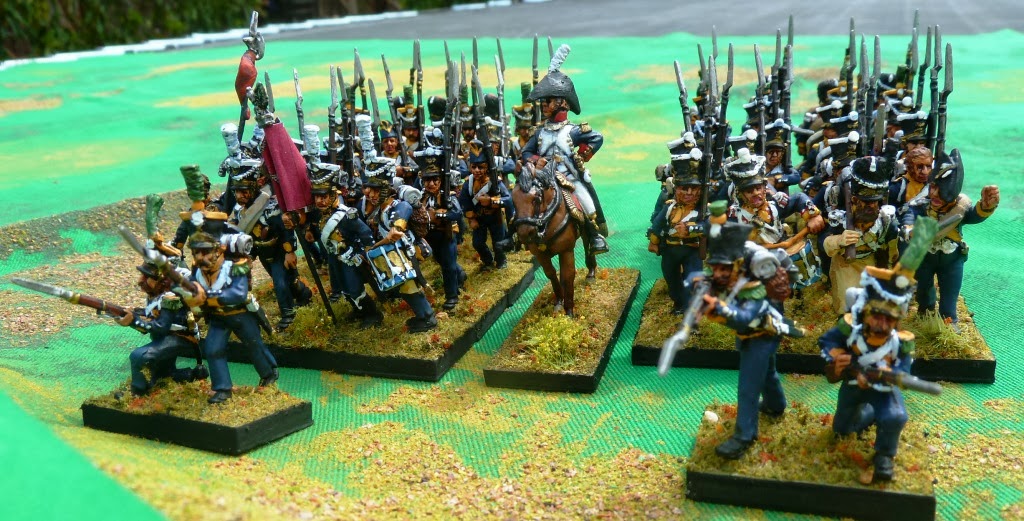
The French Provencials with their mad major looking on.
The French Provincials were commanded by a Mad Major - apparently someone who had been out in the woods far too long and was prone to bouts of complete insanity. Great. This was represented by a random card which would enable the British (Doug) to dice to see if he could get control of the addled French commander for a turn and presumably order his troops to do something completely daft like hopelessly charge formed troops across open ground or turn and fire on your own.  Four times we diced and three times I won so the Major kept it bottled - right up until the last turns of the game when he lost it completely. Its a great rule and gave us a few good laughs.  For the Brits they had a slightly less mad but rather impetuous commander of the Highland Grenadiers who could on his turn, get a sudden blood rush to the head, whip out his Claymore and charge off into the trees.
Doug's Highland regulars advance while the dastardly French are very unsporting, hiding behind trees and shooting at them!
The game started with the French getting a run of activation cards enabling them to advance to the woods in front of the town and open up on the Scots.  Doug finally got a few activations himself and wasted no time getting his elite Highlanders into the fray.  I must say I was quite content to hide behind the fence and blast away at anything in front of me. The unit of French I'd advanced on my right got some shooting in on the Scots BUT they shrugged it off and the elite grenadiers with their insanely impetuous officer got close enough to get in with a ferocious Highlander bayonet charge.

The fence afforded a nice bit of cover I thought it wise not to leave!
Ach eye laddie - get a bit 'o Heeland cold steel up yon Frogs!
Predictably they did in the French although the Frogs were also armed to the teeth with wicked tomahawks etc, (everyone is in this era!) and gave good account of themselves before loosing half their number and being driven back.  But there's the thing - I was very tinny with my saving rolls this game and this unit in particular should have disappeared off the table several times managed to hold on time and again.
Outnumbered in the hand-to-hand, the French lost half their unit to Highland steel and were driven back to the town.
At this point it looked like it was going to be very bad for the French.  Most of the civilians were in the town right behind the Provincials just flogged and forced to retreat.  The victorious Grenadiers looked like they would break through before Andrew's French allied Indians could be activated and get into the fight.  Again my arsey dice rolling saved the day.  Half the French behind the fence could just get a bead on the Grenadiers as the emerged from the woods and let loose a ferocious volley.  It felled several Highlanders, stunned them and Doug failed their morale roll - the grenadiers ran back the way they came!
Canna be true - the Highlanders running the wrong way!!
It was touch and go but the recoil of the grenadiers gave me a breathing space - which was good as Doug was not finished yet as his crack Roger's Rangers infested the woods on my left and together with the Virginian militia opened up on the Frenchies behind the fence.
Andrew's French Indian allies close in on the Rangers
Virginia militia at the edge of the woods open  fire on the French behind the fence while at the same time the Rangers behind attempt to flank them.
The French started taking more casualties but in the nick of time Andrew got one of his warbands of Iroquois into action. Doug's Rangers are all crack shots and quickly took a bead on the fearsome warband of Indians closing in on them, driving one off (they hate being shot at apparently!) but the second warband through shear weight of numbers locked horns with the Ranger's in a ferocious hand-to-hand.
In a fierce melee with one warband and another closing fast, the Rangers are about to pull back to the militia position behind. 
The Rangers and Virginian militia form a defence as groups of Indians hurl themselves at the colonials
It took some while to get all the Indians into action and even then some ran away as soon as they sustained shooting casualties. But our tinny dice rolling continued and Andrew was able to rally most of his Indians every time.  The Indians are lousy shots (cheap trade muskets!) but are vicious in hand-to-hand so the best (and perhaps only) way to handle them is get close with the opposition and melee as fast as possible. The photo above makes it look like the Indians have copped a couple of volleys - drove some off but more and more came on - and the smoke actually indicates the Rangers and militia are unloaded. The trick is to get the Indians to close before they can reload. This soon developed into another rolling melee.
More and more Indians keep joining the desperate hand-to-hand
The militia and Rangers are gradually whittled down.
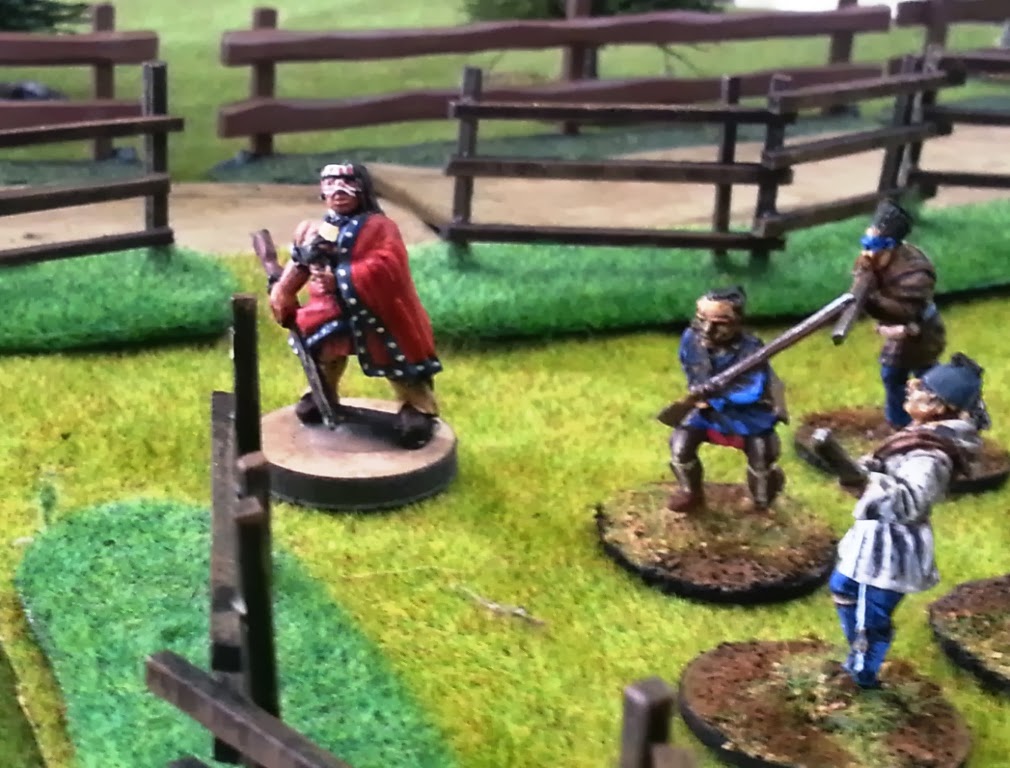
The end of the melee in the centre with only the brave militia captain left to fight on.
The Indian warbands prevailed and wiped out the militia and Rangers all except the redoubtable militia captain who somehow survived and ran to fight another day - after dispatching a few more of those pesky savages of course!  Last seen firing his pistol at Indians in the gloom as night fell.  Which brings me to the end of the game and the event card I drew earlier - night was falling and in the failing light all vision was reduced by half.  It was also at this time that I finally lost my dice duel with Doug for control of my Mad Major - who finally lost his marbles and ordered the French behind the fence to fire on one of the victorious warbands in the gloom.
The night firing incident - at the mad French commander's order they fired on and took out a group of startled Indians crossing in front of them!
  The French were driven back from the fence but rallied and reformed in double rank - hence the reason their volleys were so effective on both friend and foe!  The last turn of the game as night fell saw a final desperate melee between the victorious Indians and the Scottish regulars, the latter reduced by continuous firing from the French occupying the town. The Highlander Grenadiers had also reformed and were firing and advancing once more on the town, but it was all too late.
The last desperate struggle - tomahawks vs bayonets & Claymores
The Grenadiers are having another crack at the reinforced French at the edge of town but the game is up as behind their flank, the Iroquois finally overcome their Highlander opponents.
The Grenadiers firing gradually reduced the French unit defending the end of the town - one final charge and they would have taken the town so I formed up my regulars behind the mad commander and marched them double quick time to the end of town.  Fortunately Andrew's Indians (all that was left from two large warbands that is) had wiped out Doug's Scots and in doing so got behind the Grenadiers, ending any chance of defeating the towns defenders and seizing the civilians now hiding in the barn in the middle of town.

Situation at the end of the game
What a game! I love the idea of the random cards dictating the flow of the game not just the dice. I have used card systems before but this one is really well thought out.  The boys tell me that they are doing a large Muskets & Tomahawks skirmish demo game at CanCon next year - having seen all the beautiful figures they have - we used only a fraction of them for our game - it'll be really spectacular and a lot of fun.  And watch out for any mad commanders!


Friday, September 13, 2013

Doc's first AWI game - Germantown

We had our monthly meeting at the Lanyon Sports Club last Sunday and it was great to be able to get down there for a relaxing day's gaming. There were a number of games on including Greg, Ian and Leigh's Fire & Fury ACW and Doug put on a Fire & Fury AWI 'Germantown' game with Andrew and myself.  Its a fantastic venue with acres of space, a bar upstairs and great lunches at the Club bistro. Its great just to get out there!  The only downside is as there is no storage we have to haul all our lead and wargaming gear up and down the stairs - good exercise though! I have to once again thank Greg for taking some good photos of the action - just as well as my trusty camera phone ran out of battery and died in the bum before the end of the game. Typical.
Greg's shot of Doug, me and Andrew getting ready for the start of Germantown.. I'm the one getting RSI from writing out all the command labels for the hordes and hordes of American stands!
For those not familiar with the scenario, a smaller British force was confronted (i.e. surprised) by an entire American army bearing down on them.  The British light infantry pickets were driven in and fell back on the Chew House (in the centre of the table) which was quickly turned into a stronghold and desperately defended while British reinforcements (the rest of the available brigade) were brought up. This particular game was the action in the middle of the battlefield.

The Continentals start to arrive in force, driving the two LI battalions before them. The 40th Foot occupy the walls of Chew House behind them. 
The Lights fell back to join the 40th defending the Manor House.
On the left side (where Doug is hovering in the above photo) the Hessian Jaeger (numbering about 400) occupying the woods were faced with about 2000 Pennsylvanian militia rapidly advancing over a small stream with the aim to outflank and isolate the Manor house strongpoint.

The Pennsylvania militia face off against the much smaller Hessian Jaegers holding the woods opposite.
A brigade of American regulars (more Pennsylvanians?) assaulted the two battalions of light infantry holding the house. Most of them were behind stone walls so American musketry was not as effective as it should have been.  I pulled the 40th back into the Manor house and left the two Lights to join up again and defend the grounds.  Several of Doug's regiments of Americans ignored the strongpoint and advanced straight down the road towards the oncoming British reinforcements at the same time as his Pennsylvanians assaulted Chew House.
Shooting from the house was effective, disordering the American regiment next to it and taking a few stands of them. The regiment in front got the worst of the shooting with the British regiment opposite and both American units were driven off.
The Americans make a determined assault but faced with steady disciplined British musketry, cannot manage to break in.
While the Americans were pressing the flank and centre, Andrew directed the reinforcements  (1st and 2nd Brigades) to stop the American advance and stop them from reinforcing the push on the centre from two Virginian brigades advancing down the road from our right. He had one regiment at his disposal and immediately crossed the fields and threw it at the advancing Virginians.

Andrew's regiment (5th Foot?) was after some musketry exchanges, initially thrown back but being veterans, rallied and came on again.
More Virginian regiments try to break through Andrew's redoubtable Welsh - they were up for a fight boyo!
The battle on the right seesawed back and forth as more American regiments arrived and were thrown at the British who themselves came on time and again. The British had no choice as the remaining reinforcements (2nd Brigade) did not get to come on until Turn 4! The other two regiments of the 1st Brigade went straight up the road against the Americans that were flanking Chew House and if they broke threw, threatened to cut the British force in half.

The remaining British reinforcements (1st Bde closest, the rest of 2nd Bde marching up the road to help Andrew's isolated and hard-pressed 5th as its being hit by up to four regiments of Virginians! 
Could have been a game-changer - the American artillery finally got into action, destroying one of the reinforcing regiments on the road opposite (Greg's photo).
Another of Greg's photos of the American's pouring into the fight on the British right. Only two British regiments got involved, the third suffering heavily near the end of the game at the hands of Doug's artillery - the only guns in the game.
Help is on the way! 
The assault on Chew House was thrown back with British fire disordering several regiments and bringing them to a halt, with several others leaving the field altogether! (Greg's photo)
On the British left flank Doug's Penn militia were having much better success.  Originally we thought that being raw militia advancing in the open against veteran riflemen concealed in the woods, they'd be mown down, break and run away (much as happened historically) but the dice gods were extremely unkind to the Hessians.  Amazingly they didn't hit a thing in three rounds of shooting.  There were so many militia that the firing did not have enough effect to stop them.  As far as the militia were concerned, they took two stands off the Hessians in reply - then charged across the stream and drove them back through the woods.

The hordes of American militia conduct a successful assault of the thin line of Hessians in the woods.
We did have a discussion as to whether or not the militia would actually have bayonets, deciding that at this stage of the war, enough of them would have been so equipped - the front rank anyway - to be able to get into hand-to-hand. All very dodgy Fire & Fury in my opinion but at the end of the day I rolled crap when I needed to roll well. Still, they were veterans so I was able to rally them, drive the militia out of the woods then disorder them with musketry by the end of the game, thereby restoring Hessian honour!  What their fellow German Pennsylvanian militia thought about it all is not recorded!


A print of the actual battle for Benjamin Chew House at Germantown.  It proved to be formidable obstacle that the Americans failed to take.
The game went similarly to the historical result.  The casualties were very disproportionate for the first half with Doug's Americans really copping it. It was a bit more even in the second half, particularly with Doug's artillery really dishing it out. Still, the real achievement was Andrew's two remaining regiments who broke and drove off two(?) American brigades. Doug managed to rally his left in the last turn but the game was well and truly won by the British.

All in all a very enjoyable afternoon - and one of my first AWI games - hopefully the first of many more!  I have to say the figures are all Doug's and all Perry. They are really beautiful figures and if I didn't already have too many I'd really be tempted to collect them as well!

Finally, apologies for some of the poor photography - which was all mine!  Gotta learn how to use the mobile phone camera properly - making sure the damn thing is fully charged would be a good start!

Cheers,
            Doc